What is Salabhasana (Locust Pose)?
Salabhasana or Locust Pose is a backbend prepping yoga asana, and it also works to open up your chest muscles as well as the essential chakras. Plus, this pose can improve core stability so you can perform deeper backbends with regular practice.
Locust pose is grouped among the backbend family. This posture activates deep tissues inside your spine, tailbone, and abdomen. As a result, you can build strength in your lower back, spine, and legs with consistent practice of this pose.
Overview & Etymology
In Sanskrit, Shalabh means "Grasshopper," and Asana means "Pose." This prone backbend posture is named after the shape of a Locust or Grasshopper.
Even though it is a Hatha Yoga pose, there is no description of Locust Pose in ancient Hatha Yoga texts.
But we can find a detailed description of this pose in the 1960 book Complete Illustrated Book of Yoga by Swami Vishnudevananda, founder of Sivananda Yoga, and 1966 book Light on Yoga by B.K.S Iyengar.
Sanskrit Name: शलभासन Pronunciation: sha-la-BAHS-anna
Pose Type: Backbend, Chest Opener Also known as: Locust Pose
Strengthens: Arm, Legs, Lower Back, Abdomen, Glutes, Spine, and Neck
Stretches: Abdomen, Thorax, Navel, Quadriceps, and Lower Back
Health Benefits of Salabhasana
Improves digestion-related functions.
Heals digestive problems like constipation and IBS.
Improves flexibility of the spinal cord.
Lowers mild pain around the back, neck, and shoulders.
Activates the Root, Sacral, Solar Plexus, and Heart Chakras.
Improves range of motion in the tailbone and lower back.
Provides a deep tissue massage to the abdominal organs.
When to Avoid Performing Salabhasana
Avoid this pose if you lack breath control.
Avoid if you have asthma, heart, or blood pressure problems.
Avoid if you have had any recent abdomen, back, or pelvis surgery.
Avoid during pregnancy, six months post-pregnancy, and menstruation.
Avoid if you have a hernia, ulcers, degenerated disc disease, spinal injury, or neck injury.
How to do Salabhasana (Locust Pose)
The whole practice of successfully getting into Salabhasana is divided into four different parts:
Part 1 - Preparatory Poses for Salabhasana
First, it’s important to warm up the shoulders, neck, spine, lower back, and legs in preparation of Locust pose. Start with a few dynamic body stretches and then slowly move into performing the following yoga asanas for complete body activation:
1. Surya Namaskar (Sun Salutation) - If you are working out in the morning right after waking up, performing the Surya Namaskar flow will activate blood circulation in the legs, spine, and upper body.
.jpg")
Perform sun salutations for a minimum of 10 to 12 rounds and let your muscles open up. This way, your muscles, ligaments, and joints will be safe from any unwanted injury.
2. Bhujangasana (Cobra Pose) - If you feel tightness in your lower back, cobra pose can help ease the tension. Lie down with your belly on the ground and legs spread out behind. Make sure your core and glutes are tight.
.jpg")
Now, place your arms close to your chest and inhale deeply as you lift your upper body off the mat. Keep a slight bend in your arms, and hold this backbend stretch for a few seconds, and then gently release this pose.
3. Urdhva Mukha Svanasana (Upward-Facing Dog Pose) - This posture is very similar to cobra pose, but your muscles will flex even deeper because your body is not resting on the ground.
.jpg")
The only difference between the upward-facing dog pose and the cobra pose is that you lift your knees off the mat and keep your body weight on your palms and toes. Hold this pose for a few seconds.
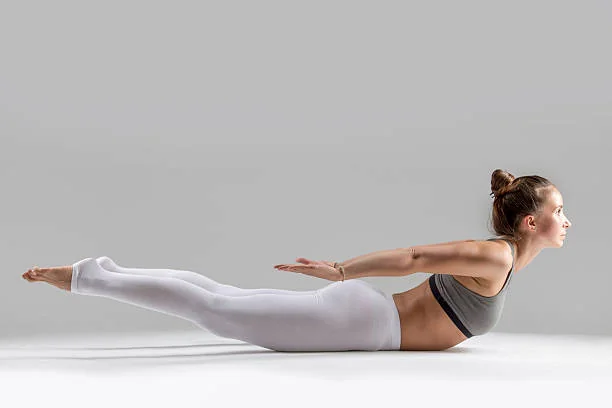
Part 2: Step-by-Step Instructions to Perform Salabhasana
The locust pose can help lengthen and extend your spine and strengthens your deep core and back muscles.
This pose can provide therapeutic benefits to your lower back if you follow the below-mentioned cues carefully:
Step 1- Lie on your belly with your legs extended, and your arms stacked under your head. Rest your head on your forearms.
Step 2- Keep your legs close to each other and breathe mindfully.
Step 3- With an inhale, extend your arms to your sides and lift your lower legs off the mat, keeping your upper legs (thighs and core) flat on the mat.
Step 4- Engage your glutes and press both legs together while holding them up.
Step 5- Rest your upper body on your chin and hold this position here for 3 to 5 full breaths.
Step 6- If you feel strong, lift your chin and chest off the mat, and hold the position for 3 to 5 deep breaths again.
Breath Awareness:
Inhale deeply as you lift up your legs.
Keep inhaling and exhaling slowly while holding the pose.
Exhale slowly as you release the pose and place your legs back on the ground.
Performance Duration for Beginners: Hold the locust pose for 20-60 seconds.
Performance Duration for Advanced: Hold the locust pose for 1 to 3 minutes.
Part 3: Things to Keep in Mind
It’s important to keep a few things in mind before starting the locust pose practice:
Engage the abdomen: In order to lift your legs like a grasshopper, your core muscles must be engaged and stable.
If you are unable to lift your legs, you may lack core and lower back strength. If that’s the case, try practicing some core strengthening asanas before your main practice.
Do not overwork your lower back: Over-flexing around the tailbone while your legs are raised can cause lower back discomfort and pain later on. This can also lead to injury, so try not to push your body beyond its limits.
Part 4: Relaxing Poses After Salabhasana
It’s essential to decompress your whole spine after any backbend asana, so make sure to end your Salabhasana practice with these follow-up yoga poses:
1. Advasana (Reverse Corpse Pose): From Salabhasana, place your legs on the mat and rest your forehead on the ground as you get into the reverse corpse pose.
.jpg")
This pose is best for coming back into a neutral state after flexing the lower back for prolonged durations. Focus on your breath and slowly feel the tension leaving your body.
2. Uttana Shishosana (Puppy Dog Pose): From Advasana, move your arms and legs into a tabletop position. Slowly walk your hands out and push your hips halfway back towards your heels.
.png")
Because this pose is a heart-melting restorative yoga pose, you will feel a calming stretch in your upper back, neck, shoulders, and arms. It will also release any excess tension around your lower back.
3. Adho Mukha Virasana (Forward Bend Hero Pose): Move your legs from the puppy dog pose into the hero pose stance. Place your torso and rib cage down between your legs and rest your head on the ground.
.jpg")
Stretch both your arms forward and feel a deeper stretch from your lower back to your upper body. Hold this relaxed pose until your lower back aligns back to its normal shape.
Salabhasana Variations to Consider
Depending upon experience performing Salabhasana, the following are some different asana variations you can try to either improve your posture or challenge your body.
1. Salabhasana with Resting Legs: If it’s challenging to raise either of your legs, try building posture awareness in your body first with the Locust pose.
.png")
Just lift your upper body with your spine and keep both arms flexed at the back. Rest your legs on the ground and concentrate on engaging your lower body.
2. Salabhasana with Elbows Bent: To develop core strength for raising both legs, try placing your palms close to your chest.
.png")
Push onto the floor with your palms to lift your upper body and then lift both your legs up. If it's not possible for you to lift your legs higher, you can limit your tail bones' range of motion in this Salabhasana variation.
3. Locust Pose Bound Hands: If you are an advanced practitioner and want to challenge yourself in the Locust pose, try the bounded arms variation.
.png")
Here, your legs are flexing back in the air, and your arms are bound and raised in the air. This pose activates the lower back, plus it helps in opening your chest muscles.

Enjoy a Free 1-on-1 Session with a Coach!
Receive personalized guidance tailored to your unique fitness goals, live with a dedicated coach—no credit card required.
Frequently Asked Questions about Salabhasana
The following are some health benefits of Salabhasana:
- Improves digestion.
- Ease lower back pain.
- Helps prepare for deeper backbends.
- Stimulates the autonomic nervous system.
- Improves your standing and seated posture.
- It helps burn fat around the abdomen and legs.
- Encourages therapeutic healing due to activation of multiple Chakras.
- Stretches and strengthens the spine, navel, neck, abs, glutes, back, and legs.
Ardha Salabhasana is an easy variation of Locust Pose, which translates from Sanskrit to English as "Half-Locust Pose."
In this pose, instead of raising both legs up against gravity, only one leg is raised at a time. This way, it’s easier for beginners to gain more stability in the pose, and it will also help you build strength over time for the full Locust Pose practice.
Beginners should avoid practicing Viparita Salabhasana if they are just starting yoga. It's better to build your foundation by doing simple backbends at first, like Cobra Pose, Up-Dog, and Camel Pose.
Once your core and lower body are strong enough, you can start with the Half-Locust Pose, then move to the full Locust pose. Once you have mastered the Locust pose, you can gently move forward to more advanced variations of Salabhasana.
Salabhasana is a combination of two Sanskrit words, "Salabh," which means Locust or Grasshopper, and "Asana," which means Pose or Posture. The meaning of Salabhasana is literally Grasshopper pose or Locust pose.
The following are step-by-step instructions for practicing Salabhasana:
- Lie down on your stomach on your yoga mat.
- Place your hands under your thighs.
- Rest your head on your chin and focus on breathing slowly for a few seconds.
- Inhale deep and engage your entire core and shoulders.
- Raise your legs behind you and hold the pose.
- Continue holding for 5 to 30 seconds.
- Finally, exhale and slowly release the pose by placing your legs back on the ground.
As a beginner, you can expect to hold the Locust pose for about 5 to 10 seconds. An advanced yogi can hold the same pose for 30 to 60 seconds or even more.
Related Articles on Padmasana

Yin vs Restorative Yoga: What’s the Difference?
Yin vs Restorative Yoga explained. Compare intensity, hold times, props, and benefits. Learn the key differences and choose the right slow yoga style for you.
.webp)
Detox Yoga Sequence: Refresh and Renew After Holiday Indulgence
Refresh and renew after holiday indulgence with this 12-pose detox yoga sequence. Gentle twists and mindful stretches for digestion, circulation, and energy.
%20(7).webp)
Yoga for Gut Health: How This Ancient Practice Heals Your Gut-Brain Connection
Discover how yoga improves gut health through the gut-brain connection. Learn 8 poses to balance microbiomes, reduce inflammation, and heal your digestive system.