What is Chakrasana (Wheel Pose)

Chakrasana, also known as Full-Wheel Pose or Upward Bow Pose (Urdhva Dhanurasana), is a back-bending pose that tones the thighs, belly, and arms while engaging the entire body. This unique position and movement relaxes the body’s energy, and increases your level of consciousness.
It requires a lot of strength in the arms, lower back, neck, shoulders, chest, legs, and feet to get into this posture. So, we’ve designed this detailed guide to help you start your Wheel Pose practice.
Overview & Etymology
Overview
Chakrasana is derived from the Sanskrit terms Chakra, meaning "Wheel," and Asana, meaning "Posture" or "Seat.”
Urdhva Dhanurasana is also derived from the Sanskrit words Urdhva, which means Upwards, and Dhanura, which means bow (for shooting arrows). This pose is mentioned in the 19th century Sritattvanidhi (Karnataka language book showing divine figures in South India) as Paryaksana or Couch Pose.
Sanskrit Name: चक्रासन Pronunciation: CHAAH-kraa-SUN-ah
Pose Type: Backbend, Chest Opener Also known as: Wheel Pose or Upwards Facing Bow
Strengthens: Back, Diaphragm, Arms, Spine, Glutes, and Abdomen
Stretches: Abdomen, Chest, Throat, Neck, and Entire Back
Health Benefits of Chakrasana
Improves mental health.
Improves respiratory health.
Improves flexibility in the spine.
Enhances overall organ functions.
Stretches and strengthens the whole body.
Reduces low back pain and strengthens the back.
It can heal cervical spondylitis, spondylitis, digestive disorders, and mental conditions.
When to Avoid Performing Chakrasana?
Avoid if you have high blood pressure.
Avoid if you have serious heart problems.
Avoid if you are experiencing pressure around your eyes.
Avoid if you’ve had a recent back, neck, or spine injury/surgery.
Avoid if you lack physical flexibility or mental awareness to perform the Wheel Pose.
How to do Chakrasana (Wheel Pose)
The body is curled in this stance to resemble a wheel. This pose falls within the advanced category of yoga poses, such as advanced back and chest opener yoga poses.
It’s crucial to flex during warm-up in order to activate the entire body, and stretch post-practice to relax the whole body. The following are ways to execute the wheel pose safely.
Part 1 - Preparatory Poses for Chakrasana
A deep opening of the body through the below-listed warm-up asanas is a must to perform Chakrasana safely. Also, understanding the nature of the body and the stretch of Chakrasana practice is necessary for sequencing the preparation flow of yoga poses before Chakrasana.
1. Surya Namaskar (Sun Salutation) - Surya Namaskar’s energy flow promotes a good opening of the entire body’s muscles. The 12-step flow, combined with adequate breathing, ensures that tightness throughout the body is quickly released.
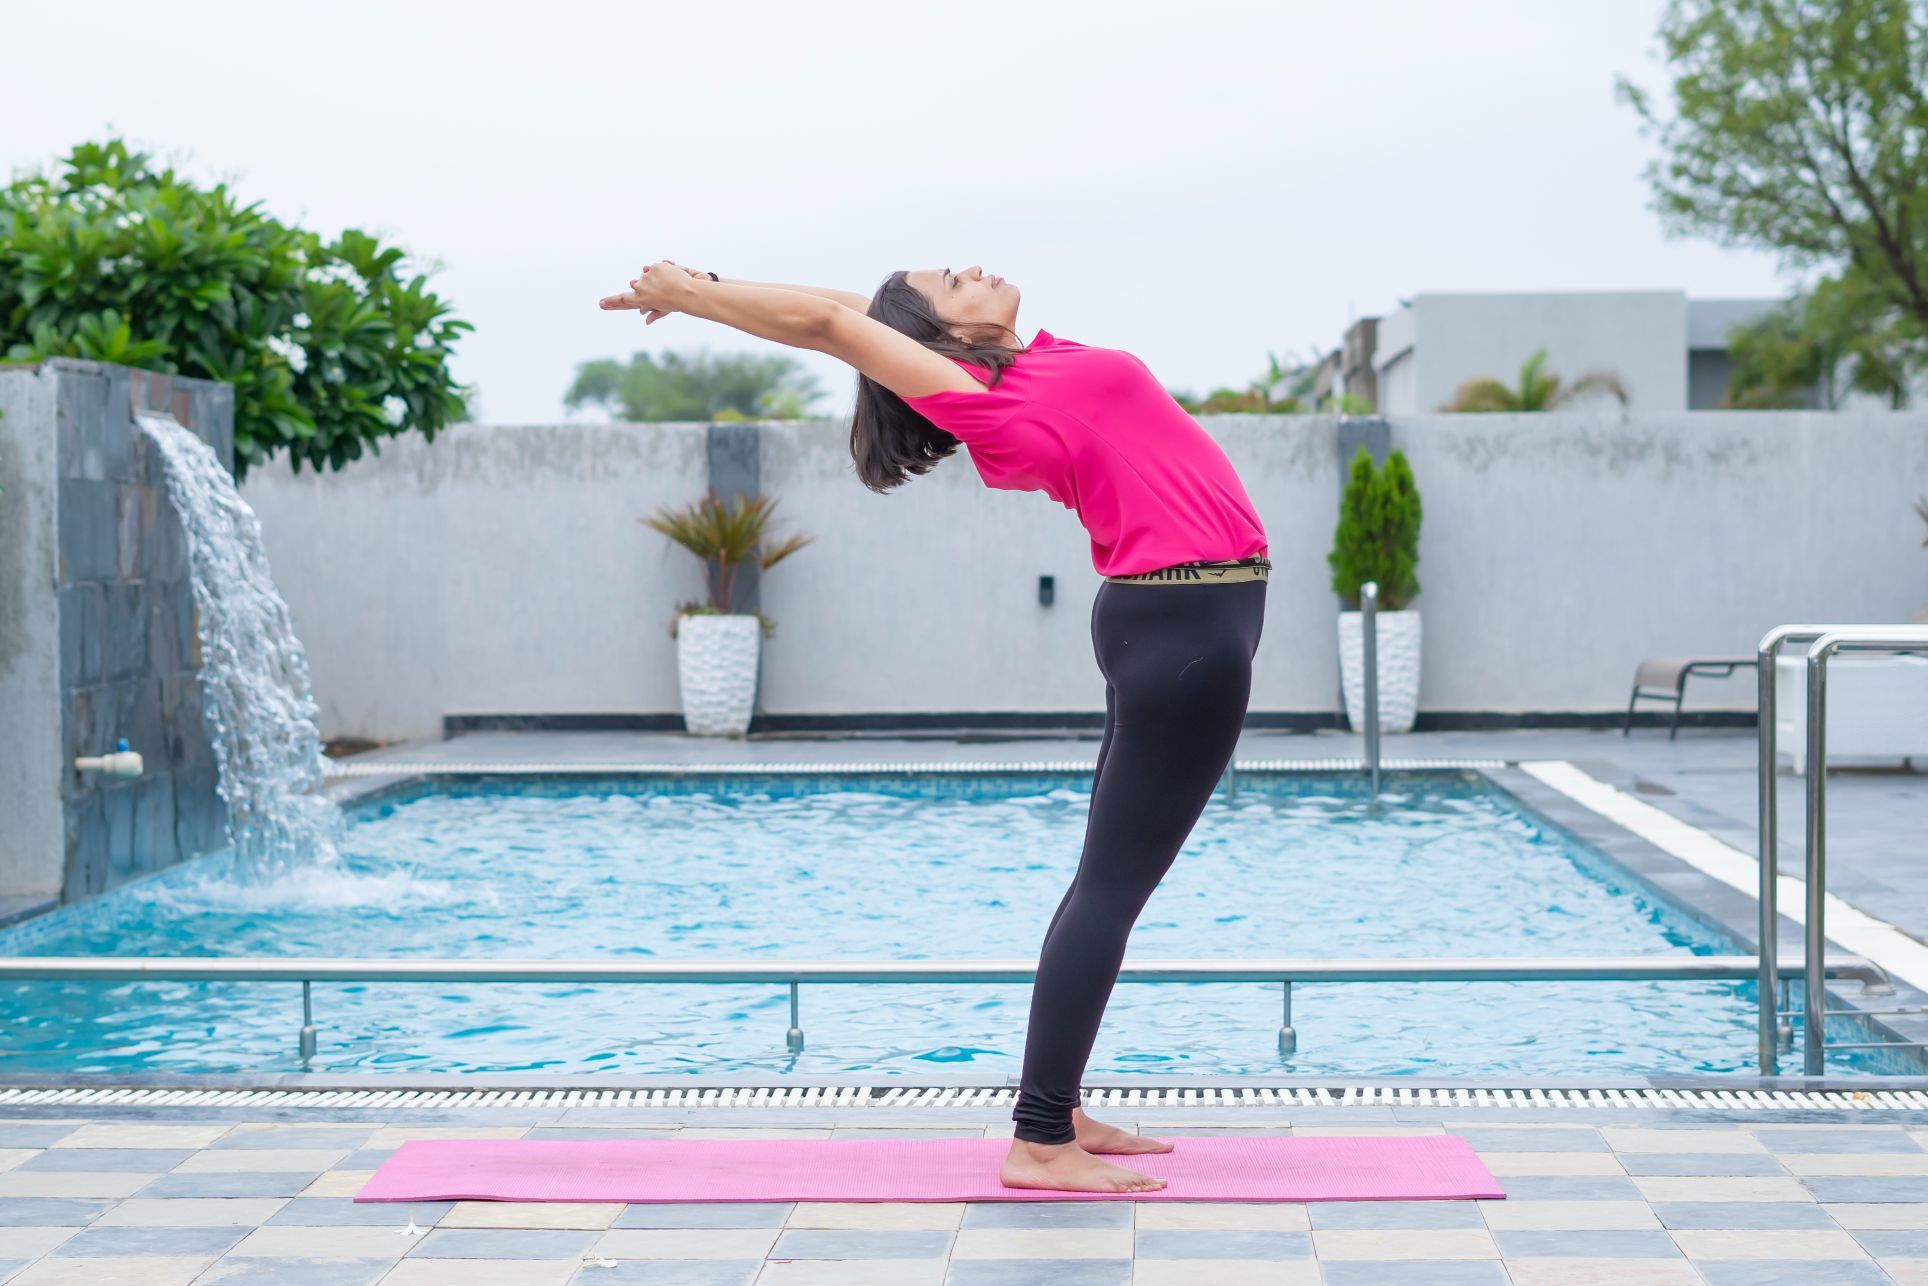
If you’re doing yoga in the morning, opening up stiff nerves and limbs around the whole body is necessary. Perform this flow a total of 12 times while maintaining appropriate posture and breathing.
2. Paryankasana (Couch Pose) - After Suryanamaskar, sit in Vajrasana (Thunderbolt Pose) for a few deep breaths and relax your breathing. When you’re ready, place both elbows on the floor behind you, dropping your back backward.
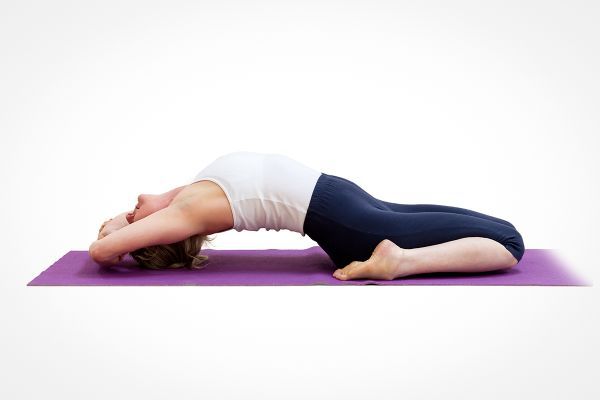
With a long inhale, lower your neck and shoulders to the floor, then exhale completely to rest the top of your head on the floor.
Place both elbows close to your head and raise your upper and middle back off the floor for a deeper lower backstretch. This stretch helps loosen tightness in the shoulders and mid-back, making it a good warm-up for Chakrasana.
3. Setu Bandha Sarvangasana (Bridge Pose) - This pose also works the entire back. Stay supine and bring your feet close to your back, knees bent in this position. First, spread your arms out to the sides of your body, and as you lift the glutes, clasp both your palms below the mid-back.

Be sure to raise your lower and upper back high up with a deep inhalation, keeping your thighs parallel to the floor. Hold the bridge pose for as long as you feel comfortable and strong.
Part 2: Step-by-Step Instructions to Perform Chakrasana
When you’re ready for the ultimate advanced backbend, try wheel pose by following the steps below:
Step 1- Lie on your back with your knees bent, your feet flat on the mat, and your arms relaxed at your sides.
Step 2- Bring your feet as close to your buttocks as possible, but make sure that both feet are slightly apart from each other and not touching.
Step 3- Bend your elbows and place your hands under your shoulders, pointing your fingers in the direction of your feet. Make sure you have also aligned your wrists with your ears.
Step 4- Press down through your hands and feet, lift your hips off the mat, and keep your head flat on the mat. (Reposition your hands with a wide stance if required.)
Step 5- Press down through your legs and arms, lifting your head off the mat. Lift your chest up and back, straightening your arms and legs as much as possible, but try not to lock your joints.
Step 6- Align your feet with your palms. Keep your core tight and hold the position here with small but continuous breaths.
Inhalation: Inhale deeply as you lift your butt, arms, and shoulder off the mat.
Exhalation: When you up in the wheel pose, exhale slowly and breath in twice the inhale. This will help you hold the pose longer.
Performance Duration for Beginners: Hold the wheel pose for 20-60 seconds.
Performance Duration for Advanced: Hold the wheel pose for 1 to 3 minutes.
Part 3: Things to Keep in Mind
It’s crucial to avoid these common mistakes to avoid injury and maintain proper technique during the upwards-bow pose practice:
Practice with a teacher: It’s challenging to see yourself and know whether your body’s balance and alignment are correct. A yoga teacher will help guide you through, and help you avoid unnecessary injuries.
Never overstretch: Chakrasana is a backbend pose, and many people feel relaxed around the lower back after this stretch. However, it’s not advised to overstretch in this pose for long durations, because overstretching can force unnecessary strain on the joints and ligaments, causing unnecessary pain in the joints.
Part 4: Relaxing Poses After Chakrasana
The spine is stretched to its fullest length in Chakrasana. So, here are some of the soothing relaxing positions that can be done immediately after wheel pose practice.
1. Supta Baddha Konasana (Reclining Bound Angle Pose): After releasing the wheel pose, place your feet into Namaste formation and keep both arms stretched on the sides.
Work on breathing steadily while keeping your entire back near the floor, and relax the spine by feeling it stretch and contract with each breath.
This type of breathing and body awareness causes the spine to relax more quickly and gives the muscles around the spine the power they need for this pose.
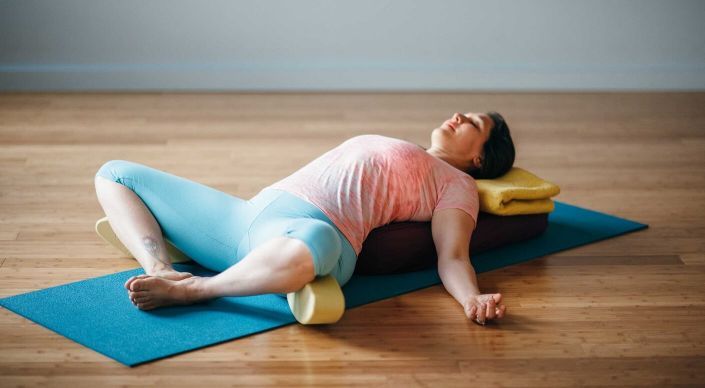
Image Credits: yogaclicks.com
2. Ardha Halasana (Half Plow Pose): The blood flow to the thighs and calf is critical right after Chakrasana is released; so it’s good to practice half plow pose immediately after Wheel Pose.
Raise both legs to 90 degrees with one deep exhalation and hold for a few breaths. Make sure your legs aren’t overextended any further than they need to be, and that your spine is comfortable while in this position.
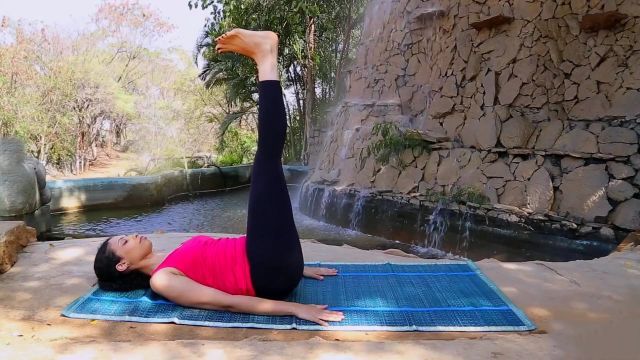
Image Credits: 101yogastudio.com
3. Apanasana (Knees to Chest Pose): While practicing any heart-opening stance like Wheel or Bow Pose, the natural impulse is to fold the body entirely forward. But moving back and forth between the two extremes might produce physical strain. Knees-to-chest is a suitable counterpose because it softly stretches and neutralizes the whole spine.

Chakrasana Variations to Consider
No matter your degree of ability, yoga position variations can help you grow and gain more confidence in your practice. Here are a few variations of the Upwards Bow Pose to consider:
1. Two-legged Inverted Staff Pose: Two-Legged Inverted Staff Pose or Dwi Pada Viparita Dandasana is a deep, heart-opening advanced-level backbend that requires a lot of patience and self-awareness. Whether you’re flexible or stiff, it’s beneficial to perform this pose for a deeper opening of the lower back and chest muscles.

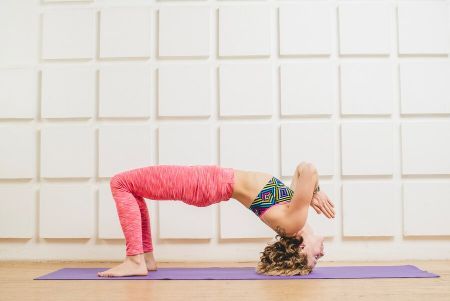
2. Bridge Pose On Head: With the legs stretched, heels together, and feet apart, Bridge Pose On Head or Sirsa Setu Bandhasana is an advanced inverted yoga pose of Greevasana and is also known as half-wheel pose. This pose is part of the Ashtanga Primary Series and is also used in Iyengar Yoga.
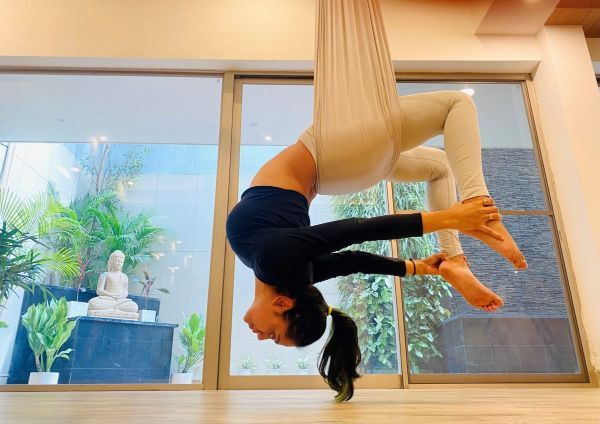
3. Inverted Bow Pose Aerial Yoga Pose: Gravity helps the back leg relax and the spine curve naturally when using aerial silk or hammock. You’ll stop fighting gravity and instead rely on the hammock’s support to assist you as you extend. Inverted Dhanurasana Aerial can be utilized in flow yoga sequences to improve energy levels in the body.
Enjoy a Free 1-on-1 Session with a Coach!
Receive personalized guidance tailored to your unique fitness goals, live with a dedicated coach—no credit card required.
Frequently Asked Questions about Chakrasana
The Chakrasana or wheel pose, is a back-bending yoga posture. Chakra means wheel in Sanskrit. Here is the Chakrasana procedure:
- Inhale deeply and firmly press your palms against the floor.
- Firmly press your shoulders and elbows against the floor.
- Both feet should be firmly placed on the yoga mat.
- Lift your hips high as you inhale.
You can do Chakrasana right away if you’ve been practicing yoga for a while. However, if you are a beginner, do not start with Chakrasana as your first backbend.
You can begin with Setu Bandhasana, also known as the bridge posture, or Camel Pose. These poses serve as entry postures for beginners who wish to execute Chakrasana.
Ardha Chakrasana, also known as half wheel pose, is an intermediate asana that prepares the body and mind for more advanced backbends and heart-opening postures. The name comes from Sanskrit–Ardha means "half" and Chakra means "wheel."
According to a research published in the Journal of Physical Therapy Science, performing the wheel pose for three months is all it takes to enhance your metabolism. Apart from that, Chakrasana will tone, burn fat, and strengthen your abdomen, back, legs, arms, and shoulders.
But don’t forget that Chakrasana alone cannot reduce belly fat. Consider focusing on your eating habits and making sure you are also performing cardio yoga poses like, Surya Namaskar, regularly.
Kati Chakrasana is a basic standing pose with a twist in the spine.
The name is derived from Sanskrit words such as Kati, "waist," Chakra, "wheel" and Asana, which means "posture."
Kati Chakrasana offers the Vata site a good stretch, making it flexible and strong, allowing Vayu to circulate freely. Also, your spine's flexibility improves as this asana strengthens your waist, lower back, neck, shoulders, arms, and glutes.


.webp)
%20(7).jpg)
