What is Dhanurasana (Bow Pose)?
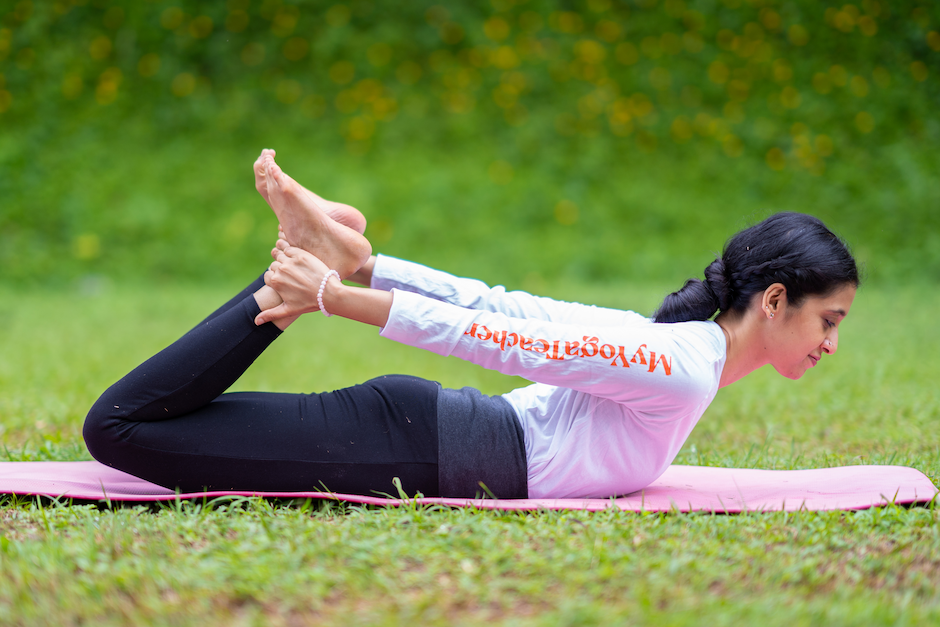
Bow Pose (Dhanurasana) is a prone backbending yoga pose that strengthens the entire back, opens the chest, and improves spinal flexibility. The name comes from the Sanskrit words “Dhanu” (bow) and “Asana” (pose). When practiced safely, this intermediate-level pose stimulates digestive organs, enhances posture, and builds core strength.
Dhanurasana: Overview and Meaning of Bow Pose
Dhanurasana is described in classical Hatha Yoga texts like the Gheranda Samhita and Hatha Yoga Pradipika as a powerful pose that awakens vital energy (prana) and strengthens the spine and digestive system.
Traditionally, it was practiced to build strength, focus, and control—much like an archer preparing to release an arrow. In modern yoga, Dhanurasana remains a key backbend in Hatha and Vinyasa sequences for its ability to combine strength, flexibility, and energy activation. It’s often performed midway through practice to energize the body and prepare for deeper heart-opening poses.
Regular practice helps counter slouching and sedentary habits by engaging the spine, core, and hip flexors. This pose also stimulates internal organs, improves digestion, and supports better posture. Beyond the physical, this pose opens the heart center, promoting vitality and emotional release.
At a Glance
- Sanskrit Name: धनुरासन (Dhanurasana)
- Pronunciation: Dah-noor-AH-suh-nuh
- English Name: Bow Pose
- Pose Type: Prone backbend, chest opener, full-body strengthener
- Level: Intermediate
- Duration: 20 seconds - 5 minutes
Benefits of Bow Pose (Dhanurasana)
Bow Pose offers a mix of strength, flexibility, and rejuvenation. From improving posture and digestion to boosting energy and confidence, this backbend benefits both body and mind when practiced mindfully.
Physical Benefits
- Strengthens the back: Builds a strong, supportive spine and relieves tension from the upper and lower back.
- Opens the chest and shoulders: Expands the lungs, improves breathing, and helps reverse slouching.
- Improves spinal flexibility: Encourages a supple, mobile spine and supports healthy movement.
- Boosts digestion: The gentle pressure on the abdomen stimulates digestive organs and metabolism.
- Tones the legs and glutes: Activates quads, hamstrings, and glutes to build strength and stability.
- Improves posture: Helps you stand taller by countering the effects of slouching or desk work.
- Releases tight hips: Opens hip flexors and relieves stiffness from prolonged sitting.
Therapeutic Benefits
- Supports respiratory health: Chest opening can improve breathing and assist with mild asthma or shallow breathing.
- Aids digestion: Abdominal compression may help relieve constipation, bloating, and sluggish digestion.
- Eases menstrual discomfort: Pelvic stimulation and spinal stretch can support regular cycles and reduce cramps.
- Boosts energy levels: Stimulates adrenal glands, combats fatigue, and reduces lethargy.
Emotional & Spiritual Benefits
- Reduces stress and tension: Heart-opening posture encourages emotional release and relaxation.
- Builds confidence: Expansive pose promotes self-esteem and a sense of personal power.
- Improves focus and mindfulness: Balancing the lift with steady breath enhances concentration.
- Symbolizes readiness and strength: Like a drawn bow, the pose embodies alertness, vitality, and personal empowerment.
- Encourages emotional balance: Combines physical openness with breath awareness to support calmness and clarity.
How to Do Dhanurasana (Bow Pose): Step-by-Step Guide
Part 1: Preparing for Bow Pose
Before attempting Dhanurasana, it’s important to mobilize the spine, prepare the back for extension, and open up the hip flexors.
1. Cat-Cow Pose (Marjaryasana–Bitilasana)
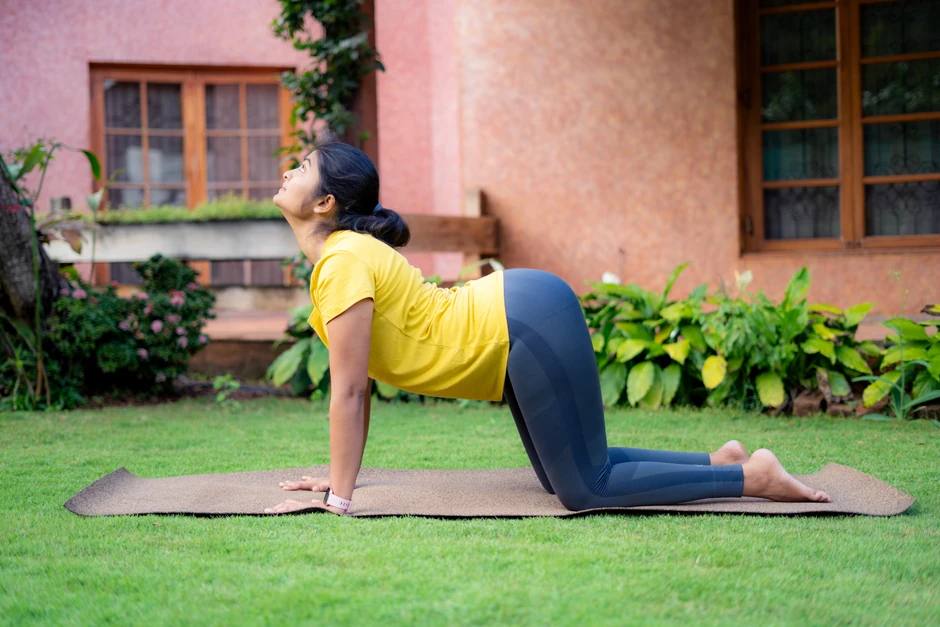
This dynamic movement gently mobilizes the spine and warms up the back and shoulders.
- Begin on all fours, with wrists under shoulders and knees under hips.
- Inhale as you arch your back and lift your chest and tailbone (Cow Pose).
- Exhale as you round your spine and tuck your chin toward your chest (Cat Pose).
- Continue flowing with your breath for 5–8 rounds.
2. Cobra Pose (Bhujangasana)
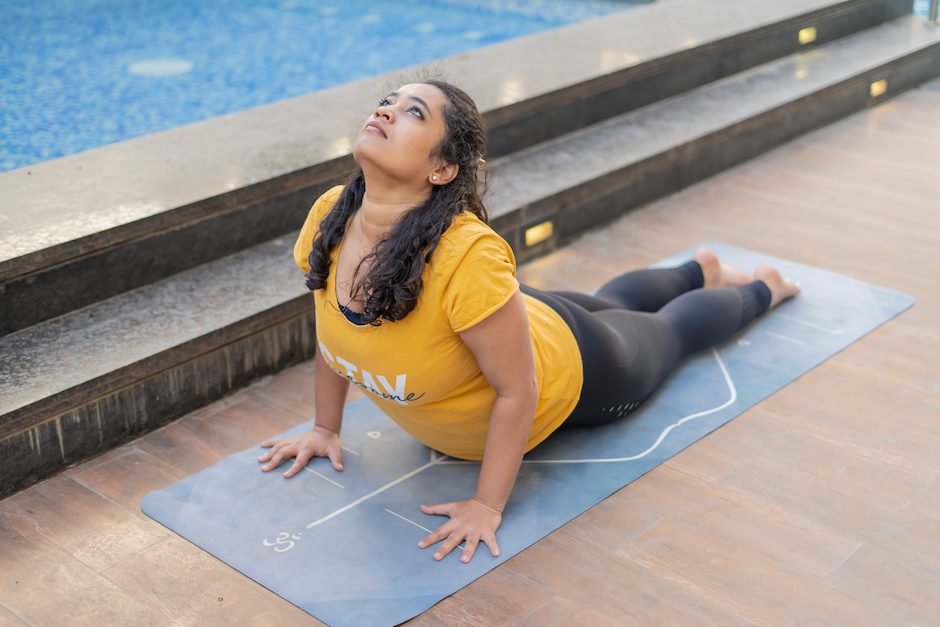
Prepares the back muscles for deeper extension in Dhanurasana.
- Lie on your stomach with palms beside your ribs and elbows close to the body.
- Inhale, press into your palms, and lift your chest off the mat.
- Keep shoulders relaxed and elbows slightly bent.
- Hold for 3–5 breaths, then release gently.
3. Locust Pose (Salabhasana)
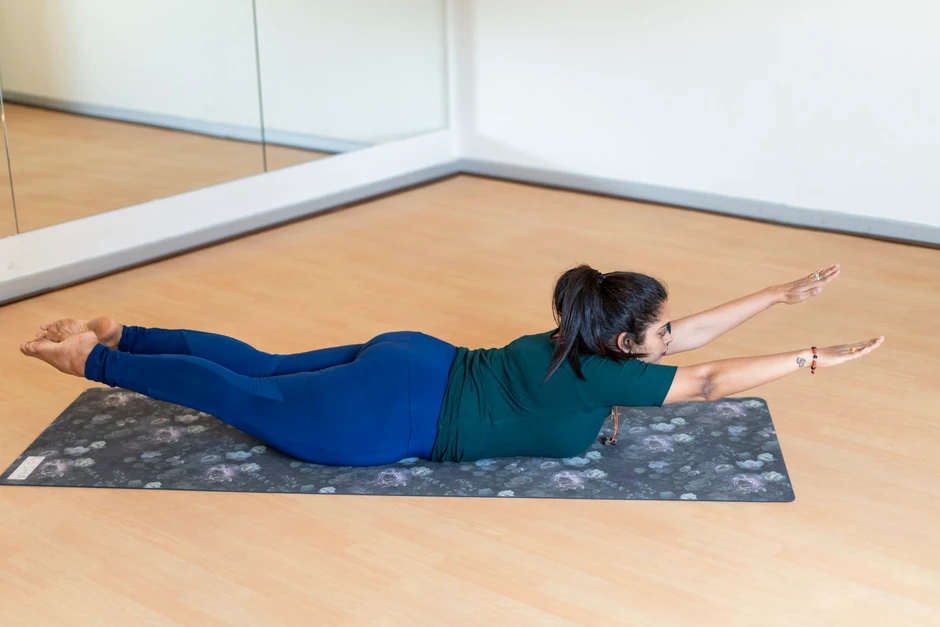
This pose activates the spinal extensors and strengthens the back and glutes.
- Lie face down with arms alongside your body, palms facing down.
- Inhale and lift your chest, arms, and legs off the mat.
- Engage your core and gaze slightly forward.
- Hold for 3–5 breaths, then lower with control.
4. Low Lunge (Anjaneyasana)
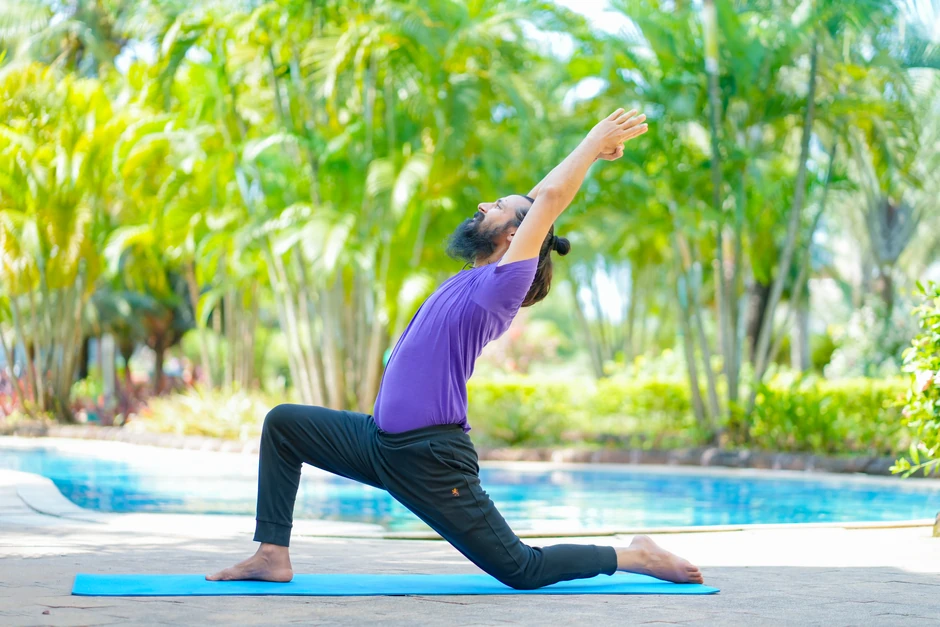
This pose opens the hip flexors and prepares the front body for backbending.
- From Downward Dog, step your right foot forward between your hands.
- Lower your left knee to the floor and untuck your toes.
- Inhale, lift your torso, and reach your arms overhead.
- Hold for 3–5 breaths, then switch sides.
Part 2: How to Do Bow Pose (Dhanurasana): Step-by-Step Instructions
- Lie face down on your mat, legs hip-width apart, arms alongside your body, and forehead resting gently on the floor. Take a few deep breaths to center yourself.
- Exhale and bend your knees, bringing your heels toward your glutes. Keep the knees hip-width apart.
- Reach your arms back and grasp your ankles firmly. If you can’t reach, loop a yoga strap around your ankles.
- Inhale, press your feet into your hands, and lift your chest and thighs off the mat simultaneously. Keep the lower belly engaged.
- Press your feet away from your hands to deepen the arch. Lift the thighs higher and broaden the chest forward.
- Gaze straight ahead or slightly upward. Maintain steady, rhythmic breathing.
- Hold the Pose:
- Beginners: 20–30 seconds
- Intermediate: 30–60 seconds
- Advanced: 2–6 minutes (with rest between rounds)
8. Exhale, slowly release your ankles, lower chest, and thighs to the mat, and rest your forehead on the floor. Breathe deeply to relax the spine.
Part 3: Alignment & Safety Tips
- Engage glutes and core to protect the lower back
- Press feet into hands, don’t pull with arms
- Keep your shoulders away from your ears
- Maintain hip-width leg position
- Never force the depth; use props if needed
Learn Bow Pose step-by-step with a coach. Book a free 1-on-1 session today!
Bow Pose Variations
Dhanurasana (Bow Pose) can be adapted to suit different levels of flexibility and strength. From beginner-friendly modifications to challenging advanced versions, these variations help you build back strength, improve mobility, and explore deeper heart-opening expressions safely.
Beginner Modifications
1. Ardha Dhanurasana (Half Bow Pose)
Builds strength gradually and eases strain on the lower back.
- Lie face down, bend one knee, and grasp the ankle while keeping the other leg grounded.
- Lift chest and thigh gently.
- Hold for 20-30 seconds. Repeat on the other side.
2. Strap-Assisted Bow
Makes the pose accessible for tight shoulders or short arms, maintaining alignment.
- Loop a yoga strap around your ankles and hold the strap while lifting your chest and thighs.
- Hold for 20–40 seconds.
3. Supported Chest Bow
Reduces intensity while building back strength and confidence.
- Place a bolster under the chest.
- Lift the legs and grasp the ankles if possible.
- Focus on gentle back engagement.
- Hold for 30-60 seconds.
Intermediate Variations
1. Parsva Dhanurasana (Side Bow Pose)
Enhances lateral spine flexibility and stimulates digestion.
- From full Bow, gently roll onto one side, lifting the chest and legs.
- Hold for 15–20 seconds per side.
2. Dynamic Bow (Rocking Bow)
Massages the abdomen, improves flexibility, and warms up the spine.
- Rock forward and backward gently while in full Bow, coordinating movement with breath.
- Continue for 5–8 rocking motions.
Advanced Variations
1. Akarna Dhanurasana (Shooting Bow Pose)
Develops hip flexibility, balance, and concentration.
- Seated, extend one leg forward, pull the opposite foot toward the ear, and reach the arms in a bow-like alignment.
- Hold for 20–30 seconds per side.
2. Dandayamana Dhanurasana (Standing Bow Pulling Pose)
Strengthens legs, improves balance, and integrates full-body coordination.
- Stand on one leg, hold the opposite ankle behind you, and extend the other arm forward while balancing.
- Hold for 15–20 seconds per side.
Dhanurasana (Bow Pose) Precautions & Contraindications
While bow pose is relatively easy, there are a few safety considerations to keep in mind.
Avoid Bow Pose if you have:
- Recent back surgery or severe spinal injury: Deep backbends can strain healing tissues.
- Herniated discs or chronic spinal conditions: The pose may worsen existing issues.
- Pregnancy: Prone position is unsafe after the first trimester.
- High or low blood pressure: Intense backbends affect circulation.
- Neck injuries: The position of the head in this pose may aggravate strain.
- Severe headaches or migraines: Backbend intensity may trigger symptoms.
- Recent abdominal surgery: Pressure on the abdomen may delay healing.
Practice With Caution in case of:
- Shoulder injuries: Use a strap or modifications; avoid forcing arm position.
- Weak lower back: Start with Half Bow (Ardha Dhanurasana) and build strength gradually.
- Tight hip flexors: Use props and work separately on flexibility.
- Menstruation: Listen to your body; some find the pose energizing, others may prefer to skip.
- Digestive issues: Practice on an empty stomach; avoid if severe conditions exist.
Safety Guidelines

- Warm up thoroughly: Never skip preparatory poses.
- Never force the pose: Work within your comfort range.
- Engage legs actively: Press feet into hands instead of pulling with arms.
- Protect lower back: Activate glutes and core throughout.
- Exit slowly: Lower chest and thighs in a controlled manner to avoid jarring the spine.
- Counter poses: Follow with Child’s Pose or Forward Fold for spinal relief.
To practice with maximum safety, book a free 1-on-1 session today!
Dhanurasana (Bow Pose): Related Poses
If you enjoy Bow Pose, here are a few similar backbends that share its benefits while offering new challenges:
1. Cobra Pose (Bhujangasana)
This gentle backbend warms up the spine, opens the chest, and strengthens the back muscles, making it an ideal preparatory pose for Dhanurasana.
- Lie face down with palms under your shoulders.
- Inhale and lift your chest while keeping your elbows slightly bent.
- Hold for 15–30 seconds, breathing steadily.
2. Locust Pose (Salabhasana)
A prone back-strengthening pose that engages the lower back, glutes, and legs, preparing the body for deeper backbends like Bow Pose.
- Lie face down, arms alongside your body.
- Inhale, lift chest, arms, and legs off the mat.
- Keep gaze forward and hold for 20–30 seconds.
3. Camel Pose (Ustrasana)
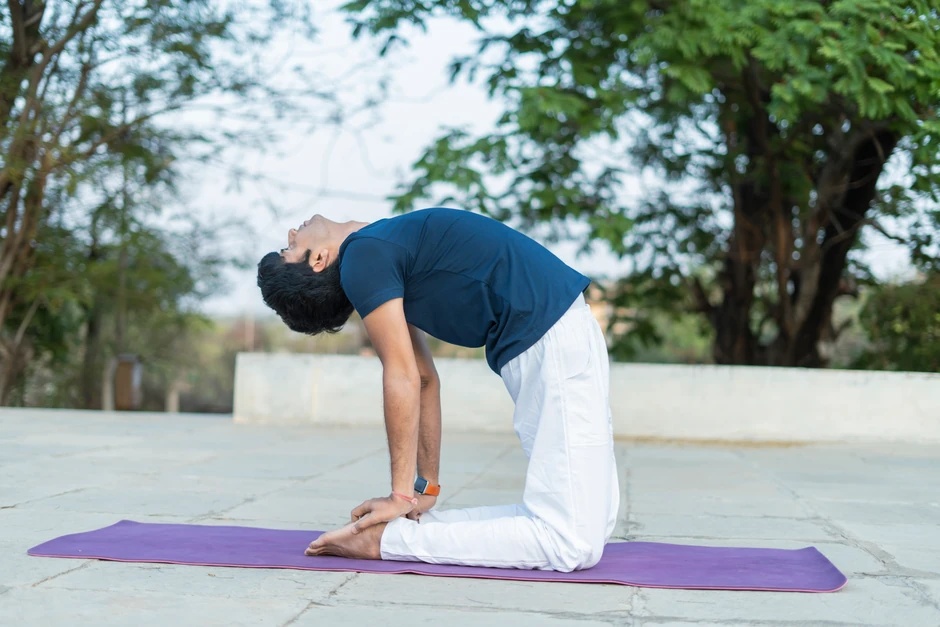
This kneeling backbend deeply opens the chest and shoulders while stretching hip flexors, complementing the spinal extension of Dhanurasana.
- Kneel with knees hip-width apart, hands on lower back or heels.
- Inhale, lift chest, gently press hips forward, and open the heart.
- Hold for 20–30 seconds, breathing deeply.
4. Wheel Pose (Urdhva Dhanurasana)

A more intense backbend that builds full-body strength and flexibility, providing a progression from the Bow Pose.
- Lie on your back, bend your knees, and place your hands beside your ears.
- Press into hands and feet to lift hips and chest.
- Hold for 15–30 seconds, then release slowly.
Enjoy a Free 1-on-1 Session with a Coach!
Receive personalized guidance tailored to your unique fitness goals, live with a dedicated coach—no credit card required.
Frequently Asked Questions
Dhanurasana (Bow Pose) is performed lying on the stomach, where you lift your chest and thighs by holding your ankles, creating a bow-like shape that strengthens the back and opens the chest and shoulders.
Urdhva Dhanurasana (Upward Bow or Wheel Pose) is a deeper backbend done lying on the back, lifting the entire body into an arch supported by the hands and feet. It’s more intense, building strength in the arms, legs, and spine while improving flexibility and energy flow.
In short, Dhanurasana is a prone backbend; Urdhva Dhanurasana is a full upward backbend.
- Beginners: 20–30 seconds
- Intermediate: 30–60 seconds
- Advanced: 2–6 minutes with rests between rounds
Focus on proper form rather than duration.
Dhanurasana is an intermediate level. If you’re a beginner, start with Ardha Dhanurasana (Half Bow) or use a strap to reach the ankles safely.
It can help strengthen back muscles and relieve mild pain, but avoid it if you have herniated discs, severe injuries, or chronic conditions. Always consult a healthcare provider first.
Limited shoulder flexibility, tight hips, or short arms may prevent it. Using a yoga strap around your ankles helps maintain alignment while you build flexibility.
Yes! Heart-opening in Bow Pose can reduce stress, boost confidence, and energize the body. Spiritually, it symbolizes readiness, focus, and personal strength.



.webp)
%20(7).jpg)
