What is Uttanasana (Standing Forward Bend)?
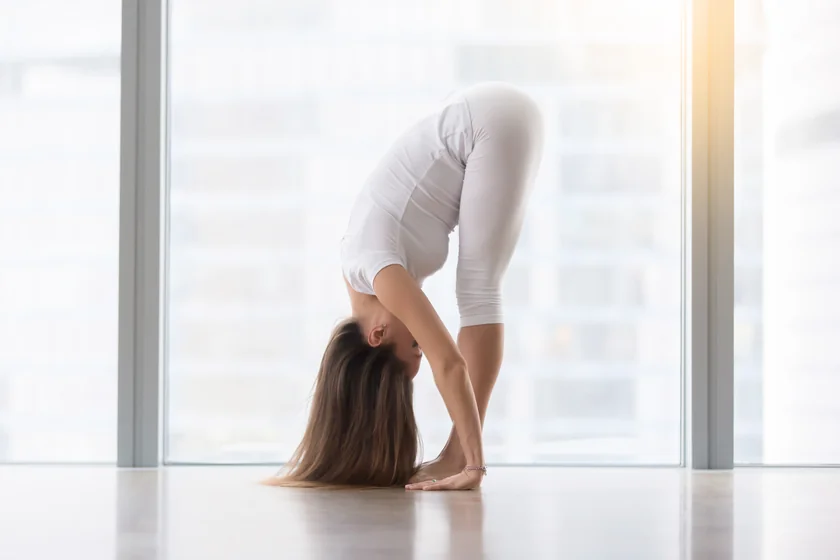
Uttanasana (Standing Forward Bend) is a standing forward fold where you hinge at the hips and bring your torso toward your legs while keeping the spine long and the breath steady. It’s commonly used in Sun Salutations and is known for stretching the hamstrings and back body, calming the nervous system, and building a safer hip-hinge pattern for everyday movement.
While this foundational yoga pose looks simple, it offers deep physical and mental benefits. It combines a gentle forward bend with an inversion effect, helping release tension in the body while calming the nervous system.
Uttanasana: Overview and Meaning of Standing Forward Bend
The Sanskrit name Uttanasana comes from ut (intense), tan (to stretch), and asana (pose), meaning “intense stretch pose.” The posture encourages letting go—folding inward while staying grounded through the feet. Traditionally, Uttanasana is associated with surrender, introspection, and calming the mind.
In modern yoga, Uttanasana is often taught as “touch your toes,” but the real goal is different: fold from the hips and prioritize a long, supported spine. That’s why many teachers cue a gentle knee bend—especially for people with tight hamstrings or stiff hips. The pose is also used to counteract prolonged sitting and transition between standing and floor-based poses.
Anatomically, Uttanasana stretches the hamstrings, calves, hips, and spine while gently decompressing the lower back. When practiced with bent knees, it allows the spine to lengthen safely. The mild inversion also increases blood flow to the head, contributing to its calming effect.
At a Glance
- Primary name: Uttanasana
- Also called: Standing Forward Bend / Standing Forward Fold
- Main stretch focus: Hamstrings, calves, hips, spine
- Common props: Yoga blocks, chair, wall
- Typical hold time: 30–60 seconds (beginners), 1–3 minutes (long hold practice)
- Best beginner tip: Bend the knees to keep the fold in the hips—not the low back
Benefits of Uttanasana (Standing Forward Bend)
Uttanasana offers benefits that go far beyond flexibility. Because it works on the muscles, spine, nervous system, and internal organs simultaneously, it’s considered one of yoga’s most holistic standing poses. When practiced correctly—and consistently—it supports both physical ease and mental clarity.
Physical Benefits
- Deep hamstring and calf stretch: Uttanasana powerfully lengthens the hamstrings and calves—areas that commonly become tight due to prolonged sitting, driving, and repetitive activities like running or cycling.
- Improves spinal flexibility and gentle decompression: Gravity assists the forward fold, creating natural traction through the spine that helps reduce compression between vertebrae.
- Supports healthier posture: Tight hamstrings often pull the pelvis out of alignment, contributing to slouching and lower-back strain; Uttanasana helps rebalance the posterior chain and supports better posture over time.
- Strengthens legs and joint stability: The pose requires active engagement of the quadriceps and subtle core support, helping protect the knees while strengthening the thighs, ankles, and feet.
- Releases tension in the entire back body: Uttanasana stretches the full posterior line—from the soles of the feet through the calves, hamstrings, hips, spine, and neck—making it especially effective after long hours of desk work.
Mental & Nervous System Benefits
- Calms the nervous system: As a forward fold, Uttanasana naturally turns attention inward and stimulates the parasympathetic (“rest and digest”) response, helping reduce stress and anxiety.
- Reduces mental fatigue: The mild inversion effect (head below heart) increases blood flow to the brain, which can leave you feeling refreshed and mentally clear without overstimulation.
- Supports emotional release: Many practitioners experience Uttanasana as grounding and emotionally soothing when held with slow, steady breathing.
- Improves focus and mindfulness: Staying present with breath and sensation while holding the pose trains attention and body awareness.
Digestive & Circulatory Benefits
- Stimulates digestive organs: Gentle abdominal compression massages organs such as the liver, kidneys, and intestines, which may support digestion and help relieve bloating.
- Encourages healthy circulation: Uttanasana assists venous return (blood flow from the legs back to the heart) and supports overall circulation, particularly when practiced regularly.
Functional & Everyday Benefits
- Teaches safe hip-hinge mechanics: Learning to fold from the hips rather than rounding the lower back directly translates to safer everyday movements like bending, lifting, and reaching.
- Counteracts the effects of prolonged sitting: For sedentary lifestyles, Uttanasana helps reverse stiffness by lengthening shortened muscles and reintroducing gentle spinal movement.
- Builds a foundation for advanced forward bends: The pose prepares the body for deeper postures such as Paschimottanasana, Padahastasana, Ardha Uttanasana, and Eka Pada Uttanasana.
Therapeutic Applications (Supportive, Not Medical)
When practiced with proper alignment and appropriate modifications, Uttanasana may help support:
- Chronic hamstring tightness
- Tension-related lower back discomfort
- Stress, anxiety, and mild insomnia
- Digestive sluggishness
- Fatigue from prolonged sitting
To reap the maximum benefits of your practice, book a free 1-on-1 session today!
How to Do Uttanasana (Standing Forward Bend): Step-by-Step Guide
Uttanasana looks simple, but how you enter, hold, and exit the pose makes a big difference to its safety and effectiveness. This step-by-step guide explains how to practice the pose with clarity, control, and modifications.
Part 1: Setting Yourself Up
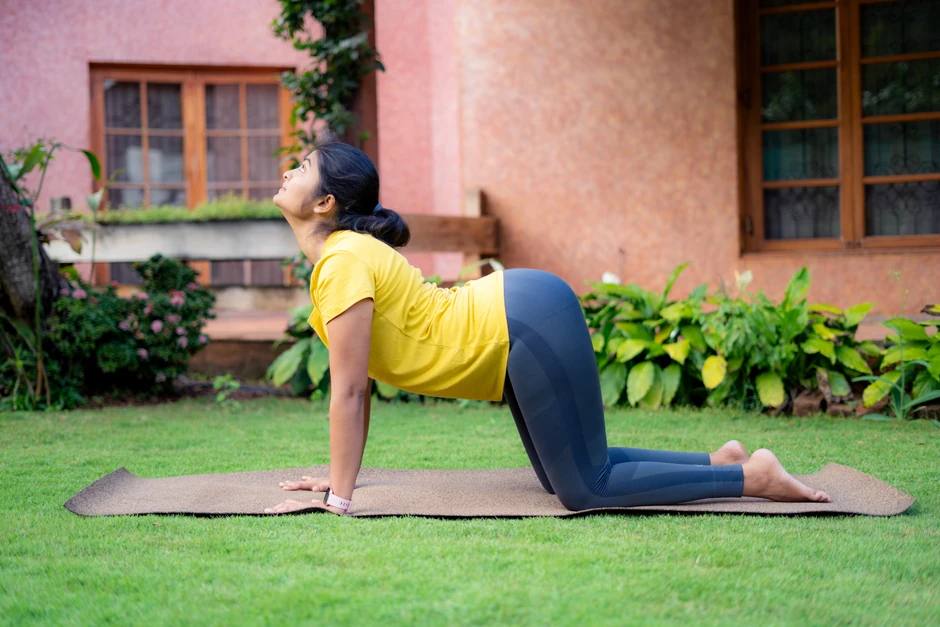
- Practice on an empty or light stomach (2–3 hours after meals)
- Use yoga blocks if your hands don’t reach the floor comfortably
- Warm up with gentle movements like Cat–Cow or a short Sun Salutation
- Remember: bent knees are correct, not a beginner mistake
Part 2: How to Do Uttanasana (Standing Forward Fold): Step-by-Step
- Begin standing in Mountain Pose (Tadasana) with your feet hip-width apart.
- Ground evenly through the heels, outer edges of the feet, and the base of the big toes.
- Lengthen your spine, soften your shoulders, and take 2–3 steady breaths to settle.
- On an inhale, gently lift your chest and create space through the front of the body. As you exhale, hinge forward from the hips, not the lower back. Bend your knees as much as needed and allow your torso to move toward your thighs.
- Let your hands come to the floor, yoga blocks, shins, or thighs, depending on your flexibility. Keep the weight rooted in your feet rather than collapsing into your hands. Allow your head and neck to relax completely, releasing tension in the jaw and shoulders.
- With each inhale, gently lengthen the spine—imagine the torso extending forward. With each exhale, soften deeper into the fold without forcing. The goal is ease and release, not depth.
- Hold the pose for 30 seconds to 2 minutes, breathing slowly and evenly. Feel the stretch along the back of the legs and spine while maintaining comfort in the lower back.
- To exit, bend the knees generously, engage your core, and press firmly through your feet.
- Slowly roll up to standing one vertebra at a time, bringing the head up last. Pause in Mountain Pose for a few breaths before moving on.
Key Alignment Cues for Uttanasana
- Keep knees bent if hamstrings feel tight
- Fold from the hips, not the waist
- Let the head hang heavy without strain
- Distribute weight evenly through the feet
- Breathe slowly—never hold the breath
Common Mistakes to Avoid
- Forcing straight legs
- Rounding sharply through the lower back
- Locking the knees
- Pulling the head toward the shins
- Rushing in or out of the pose
Stretch and find flexibility with these group classes!

Yoga Fusion- Sweat and Stretch

Flex and Flow: Yoga for Strength and Flexibility
Uttanasana Variations
One of the reasons Uttanasana (Standing Forward Bend) is so widely practiced is its adaptability. With the right variations and props, this pose can meet beginners, experienced practitioners, and those with physical limitations exactly where they are—while still building flexibility and awareness.
Beginner-Friendly Modifications
1. Uttanasana with Bent Knees (Foundational Modification)
Protects the lower back and hamstrings while teaching a safe hip hinge.
- From standing, hinge forward from the hips and bend the knees generously.
- Let the torso rest closer to the thighs.
- Place hands on the floor, blocks, shins, or thighs.
- Keep the spine long, and the head relaxed.
2. Uttanasana with Hands on Yoga Blocks
Maintains spinal length while reducing strain on tight hamstrings.
- Place one or two blocks under the hands at a comfortable height.
- Fold forward with knees bent as needed.
- Lengthen the spine on each inhale.
- Soften deeper on exhales without forcing.
3. Chair-Supported Uttanasana
Makes forward folding accessible with added stability and support.
- Stand a short distance behind a chair.
- Hinge forward and rest your hands on the chair seat or back.
- Keep the spine long and weight grounded in the feet.
- Breathe steadily and rise slowly to exit.
For more Chair Yoga Poses, read this detailed guide!
4. Rag Doll Pose (Baddha Hasta Uttanasana)
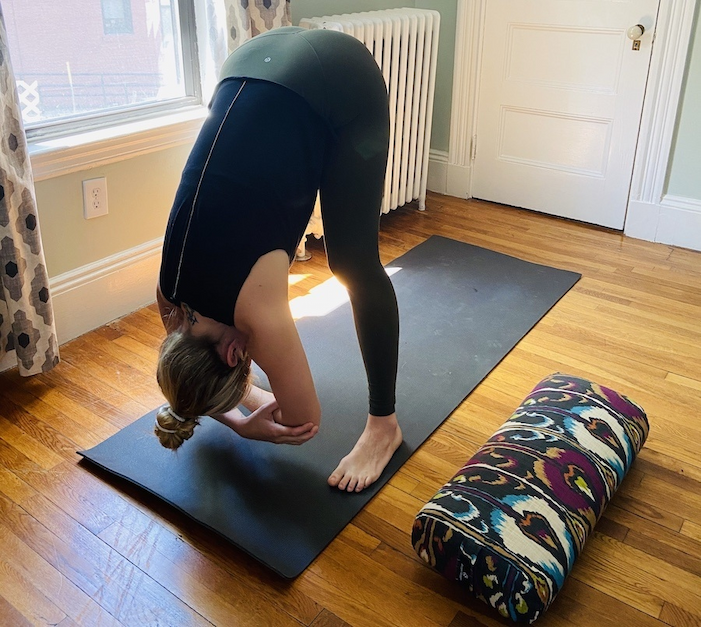
Releases neck, shoulder, and upper-back tension.
- Fold forward with knees bent.
- Hold opposite elbows and let the head hang heavy.
- Gently sway side to side if comfortable.
- Relax the jaw and breathe slowly.
Key Variations (Common in Sequences)
5. Ardha Uttanasana (Standing Half Forward Bend)
Strengthens the back and builds postural awareness.
- From Uttanasana, lift the torso halfway.
- Place hands on shins or blocks.
- Lengthen the spine forward, gaze down.
- Keep core engaged and neck long.
6. Hasta Uttanasana (Raised Arms Pose)
Creates spinal length and opens the chest before folding.
- Stand tall in Mountain Pose.
- Inhale and raise arms overhead.
- Lift through the chest while grounding the feet.
- Exhale to transition into Uttanasana.
Intermediate Variations
7. Wide-Legged Uttanasana (Prasarita Padottanasana)
Reduces hamstring intensity while engaging inner thighs.
- Step feet wide apart, toes slightly in.
- Hinge forward from the hips.
- Place hands on the floor or blocks.
- Let the head relax downward.
8. Uttanasana with Ankle or Calf Hold
Deepens the forward fold for flexible practitioners.
- Fold forward with knees straight or softly bent.
- Gently hold ankles or calves.
- Lengthen the spine before deepening.
- Avoid pulling—use breath to soften.
Advanced Variations
9. Padahastasana (Hand-to-Foot Pose)
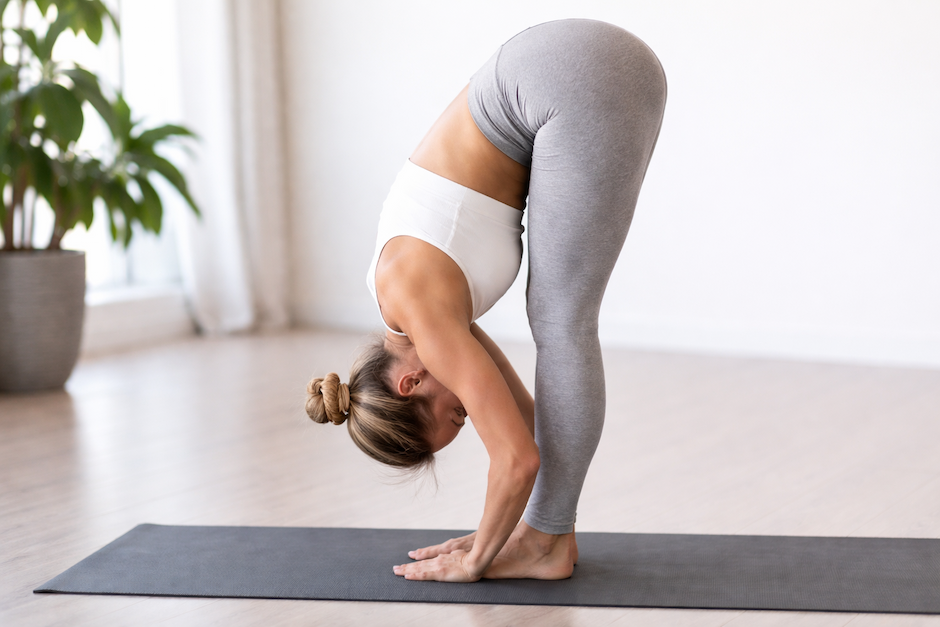
Intensifies the hamstring stretch and adds wrist extension.
- Fold forward and slide hands under the feet, palms up.
- Toes rest at the wrists.
- Let the torso soften toward the legs.
- Keep knees soft if needed.
10. Eka Pada Uttanasana (One-Legged Forward Bend)
Combines hamstring stretch with balance and hip stability.
- Shift weight into one leg and fold forward.
- Lift the opposite leg straight back.
- Keep hips level and spine long.
- Lower the lifted leg to switch sides.
Using Props to Customize Your Practice
- Yoga blocks: Reduce reach and support spinal length
- Chair: Adds stability and accessibility
- Wall: Assists balance and alignment
- Strap: Extends reach in modified versions
In personalized sessions, teachers often adjust variations based on your body structure, flexibility, and goals—helping you choose the version of Uttanasana that supports progress without strain.
Book a free 1-on-1 session today!
Uttanasana (Standing Forward Bend) Precautions & Contraindications
Uttanasana is widely practiced and generally safe when done with proper alignment and modifications. However, because it places the body in a deep forward fold, certain conditions require extra care—or complete avoidance.
Avoid Uttanasana If You Have
- Recent or severe hamstring tears or strains
- Herniated or bulging discs, especially in the lumbar spine
- Acute lower back pain or active back injury
- Severe or sharp sciatica pain radiating down the leg
- Detached retina, glaucoma, or recent eye surgery
- Uncontrolled high blood pressure
- Severe osteoporosis involving spinal fractures
- Recent abdominal or spinal surgery
- Late-stage pregnancy (third trimester)
- Chronic vertigo or balance disorders
In these cases, gentler alternatives such as seated forward folds, supine hamstring stretches, or chair-supported versions are usually safer.
Practice with Caution & Modifications in case of
- Tight hamstrings (very common): Keep the knees deeply bent, use yoga blocks or a chair for support, focus on spinal length rather than depth, and progress gradually over weeks or months.
- Chronic lower back sensitivity: Always bend the knees, hinge from the hips instead of the waist, engage the core gently for support, and exit the pose immediately if pain increases.
- Mild sciatica or nerve sensitivity: Practice only shallow forward folds, avoid long holds, and stop immediately if you feel tingling, numbness, or sharp sensations.
- High blood pressure (controlled): Keep holds short (30–60 seconds), rise very slowly to prevent dizziness, and avoid long static holds.
- Neck issues: Avoid letting the head hang heavily, keep the neck neutral or gaze toward the shins, and exit the pose if discomfort appears.
- Knee concerns: Maintain a soft bend in the knees at all times, avoid locking or hyperextending, and gently engage the thigh muscles for joint support.
- Pregnancy (first and second trimester): Practice with feet wider apart, avoid compressing the abdomen, discontinue forward folds in the third trimester, and seek prenatal yoga guidance when possible.
For trimester-specific guidance, read this detailed guide on prenatal yoga, or consider booking a 1-on-1 session with a prenatal yoga coach!
Essential Safety Guidelines
Do’s
- Warm up before folding forward
- Use props freely
- Bend the knees whenever needed
- Move in and out of the pose slowly
- Breathe steadily throughout
Avoid
- Forcing straight legs
- Bouncing or jerking movements
- Comparing your flexibility to others
- Ignoring pain signals
- Practicing with cold muscles
A healthy Uttanasana should feel stretchy, supported, and calm—never sharp, rushed, or painful.
Uttanasana (Standing Forward Bend): Related Yoga Poses
If you enjoy Uttanasana, try these similar yoga poses.
1. Seated Forward Fold (Paschimottanasana)
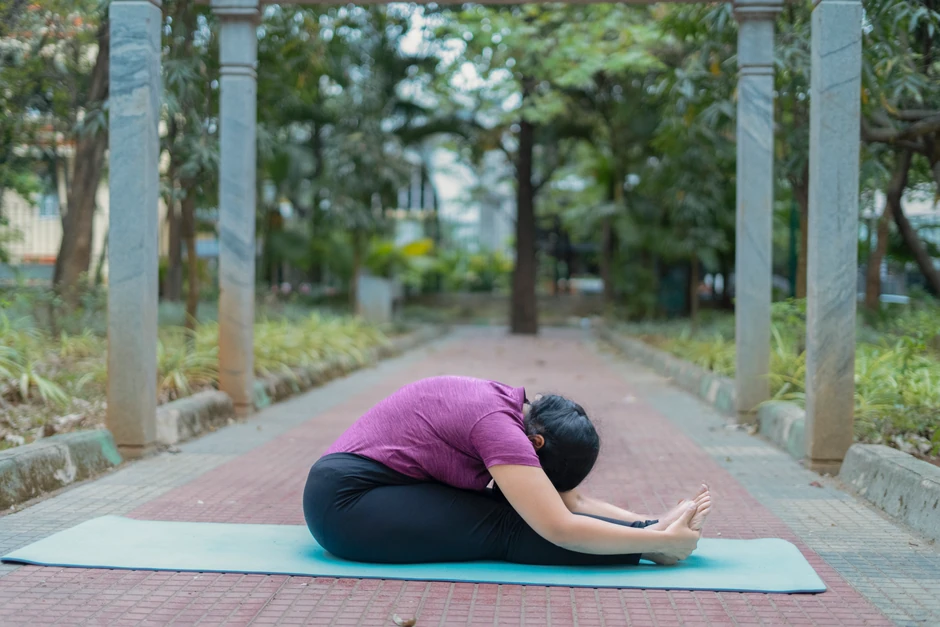
Deeply stretches the back body while calming the nervous system.
- Sit with legs extended straight in front of you.
- Inhale to lengthen the spine, arms reaching up.
- Exhale and hinge forward from the hips.
- Rest hands on shins, ankles, or feet and breathe steadily.
2. Head-to-Knee Pose (Janu Sirsasana)
Gently stretches the hamstrings and lower back while improving digestion.
- Sit with one leg extended and the other foot placed against the inner thigh.
- Inhale to lift and lengthen the spine.
- Exhale and fold forward over the extended leg.
- Hold with relaxed breath, then switch sides.
3. Hand-to-Foot Pose (Padahastasana)
Intensifies the hamstring stretch and adds wrist extension.
- From standing, fold forward from the hips.
- Slide hands under the feet, palms facing up.
- Allow the torso to soften toward the legs.
- Keep knees soft if needed and breathe calmly.
4. Wide-Legged Forward Fold (Prasarita Padottanasana)
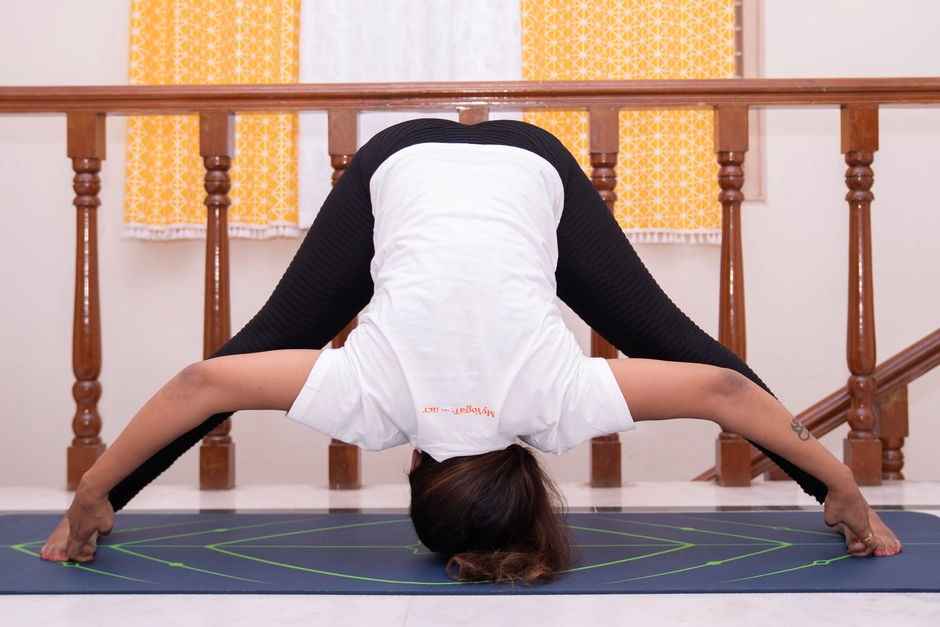
Stretches the hamstrings and inner thighs while decompressing the spine.
- Stand with feet wide apart, toes slightly turned in.
- Inhale to lengthen the spine.
- Exhale and hinge forward from the hips.
- Rest your hands on the floor or blocks and relax your head.
5. Pyramid Pose (Parsvottanasana)
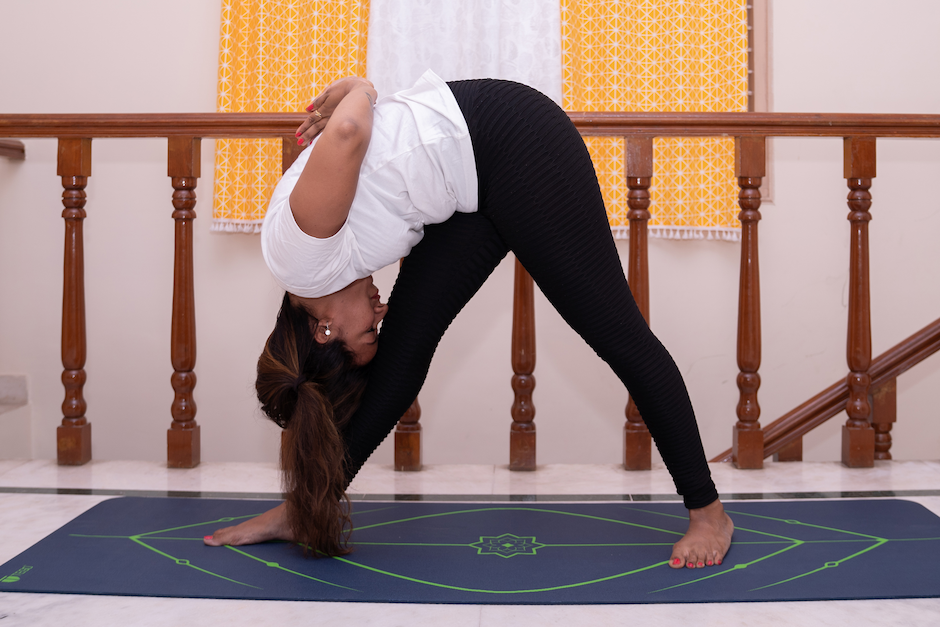
Stretches the hamstrings while improving balance and posture.
- Step one foot back into a staggered stance.
- Square hips toward the front foot.
- Inhale to lengthen the spine, exhale to fold forward.
- Keep legs strong and spine long, then switch sides.
Enjoy a Free 1-on-1 Session with a Coach!
Receive personalized guidance tailored to your unique fitness goals, live with a dedicated coach—no credit card required.
Frequently Asked Questions
Uttanasana is excellent for stretching the hamstrings, calves, hips, and back while calming the nervous system. It supports better posture, relieves stiffness from prolonged sitting, improves digestion through gentle abdominal compression, and helps reduce stress and mental fatigue. It’s also a foundational pose for learning safe forward bending mechanics.
Beginners typically hold Uttanasana for 30–60 seconds with bent knees. Intermediate practitioners may hold it for 1–3 minutes, while advanced practitioners can stay for up to 5 minutes.
In Sun Salutations, the pose is held briefly—usually for one breath cycle. Duration should always match comfort and breath quality.
Yes. Uttanasana is beginner-friendly when practiced with modifications such as bent knees, hands on blocks, or chair support. Straight legs are not required. Learning proper hip hinging and spinal alignment is far more important than depth.To learn with proper guidance, book a free 1-on-1 session today!
Uttanasana is the full forward fold, where the torso moves toward the legs. Ardha Uttanasana (Half Forward Bend) lifts the torso halfway, creating a flat back with the spine parallel to the floor. Ardha Uttanasana builds strength and alignment awareness and commonly appears between forward folds in flow sequences.
Hasta Uttanasana, or Raised Arms Pose, is the upward stretch performed before folding forward in Sun Salutations. It lengthens the spine, opens the chest and shoulders, and prepares the body for Uttanasana.
Most people have tight hamstrings due to prolonged sitting, genetics, or certain physical activities. This is normal. Touching the toes is not a requirement for the pose. Bending the knees and using props allows you to practice Uttanasana safely while flexibility develops gradually over time.


.webp)
%20(7).jpg)
