What is Sukhasana (Easy Pose)?

Sukhasana (Easy Pose) is a basic cross-legged seated yoga pose that improves posture, opens the hips, and promotes meditation. This beginner-friendly pose reduces stress, enhances focus, and provides a stable foundation for breathing exercises and mindfulness practice.
Sukhasana: Origin and Meaning of Easy Pose
Sukhasana comes from the Sanskrit words Sukha, meaning ease, comfort, or happiness, and Asana, meaning posture or seat. True to its name, the Sukhasana pose promotes sitting with ease, or effortless sitting, allowing you to find stability and relaxation during meditation and breathwork.
One of the oldest mentions of Sukhasana appears in the Darshana Upanishad (4th century CE), which describes it as a meditative seat for spiritual practices. It is also documented in the Sritattvanidhi, a 19th-century text from Karnataka, which catalogs 122 Hatha yoga poses, including Sukhasana.
As a foundational seated posture, Sukhasana pose is widely used for meditation, pranayama, and mantra chanting. The simple yet effective alignment encourages a straight spine, relaxed shoulders, and an open chest—helping cultivate mindfulness and inner calm.
At a Glance
Sanskrit Name: सुखासन
Pronunciation: Soo-kaah-SUN-ah
Pose Type: Seated, Hip Opener
Also Known As: Easy Pose
Strengthens: Mind, Back, Hips
Stretches: Spine, Knees, Groin, Legs
Benefits of Sukhasana (Easy Pose)
Sukhasana (Easy Pose) has several benefits for the mind and body:
Physical Benefits
- Improves Posture: This pose encourages sitting with an upright spine, reducing slouching and improving posture over time.
- Opens the Hips: Sitting in a cross-legged position gently opens the hips, inner thighs, and groin, improving flexibility in key areas to reduce stiffness and pain.
- Relieves Lower Back Tension: The upright position strengthens the spine to relieve lower back pain, often caused by long hours of sitting.
- Enhances Core Stability: Sukhasana requires you to engage the core muscles as you sit, promoting stability, balance, and body awareness.
Mental Benefits
- Reduces Stress and Anxiety: By encouraging slow and deep breathing, this pose naturally aligns the diaphragm and lungs, improving oxygen flow and reducing anxiety.
- Improves Focus and Awareness: The stable posture minimizes distractions, allowing the mind to stay present and engaged, which enhances concentration.
- Promotes Relaxation: Sitting in a comfortable posture reduces muscle tension, signaling the nervous system to shift into a state of relaxation and ease.
Spiritual Benefits
- Enhances Mind-Body Connection: The pose promotes mindfulness by encouraging awareness of posture, breath, and bodily sensations, fostering inner balance.
- Promotes Groundedness: The cross-legged position with an aligned spine anchors the body, creating a sense of stability and stillness that supports spiritual awareness.
How to Do Sukhasana: Step-by-Step Guide
Part 1: Preparing for Sukhasana
Before settling into Sukhasana (Easy Pose), it's important to prepare your body with gentle stretches to open the hips, lengthen the spine, and ease any stiffness. Here are some warm-up poses:
1. Baddha Konasana (Butterfly Pose)
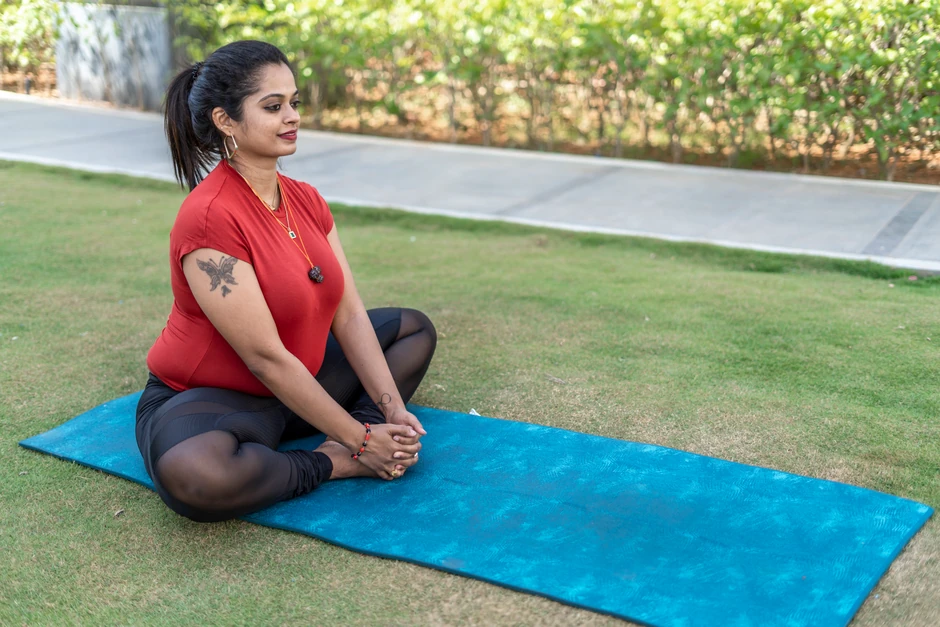
This is a great pose to open the hips and inner thighs, making it more comfortable to practice and hold Sukhasana.
- Sit with your legs extended forward.
- Bend your knees and bring the soles of your feet together.
- Hold your feet with your hands and let your knees drop toward the floor.
- Sit tall, lengthening your spine.
- Hold for 30 seconds to 1 minute.
2. Paschimottanasana (Seated Forward Bend)
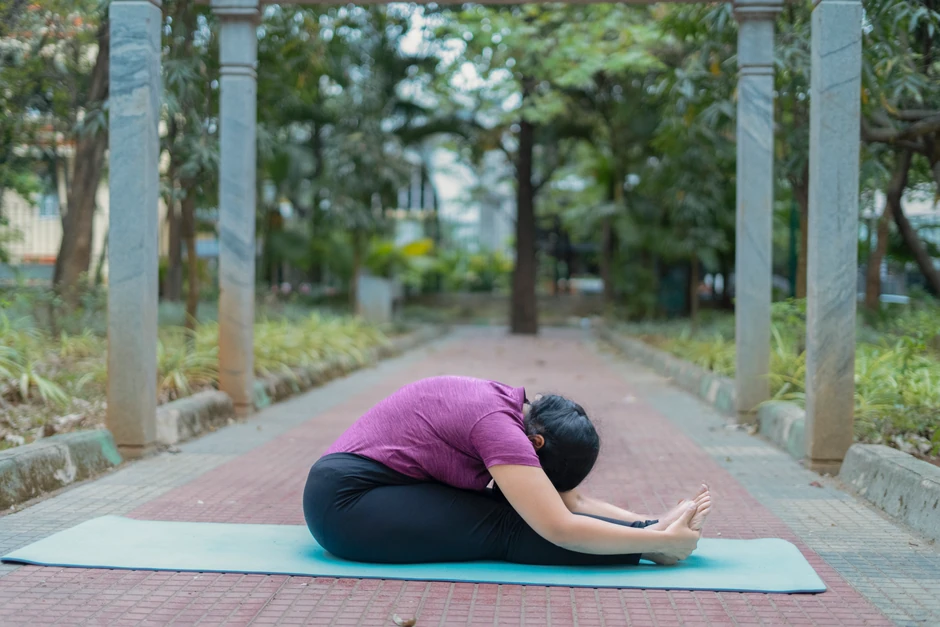
This is an excellent pose to stretch the spine and the hamstrings, making it easier to sit tall with crossed legs while doing the Easy Pose.
- Sit with your legs straight in front of you.
- Inhale and extend your arms overhead.
- Exhale and hinge forward from your hips, reaching for your feet.
- Keep your spine long and avoid rounding your back.
- Hold for 30 seconds.
3. Anjaneyasana (Low Lunge)
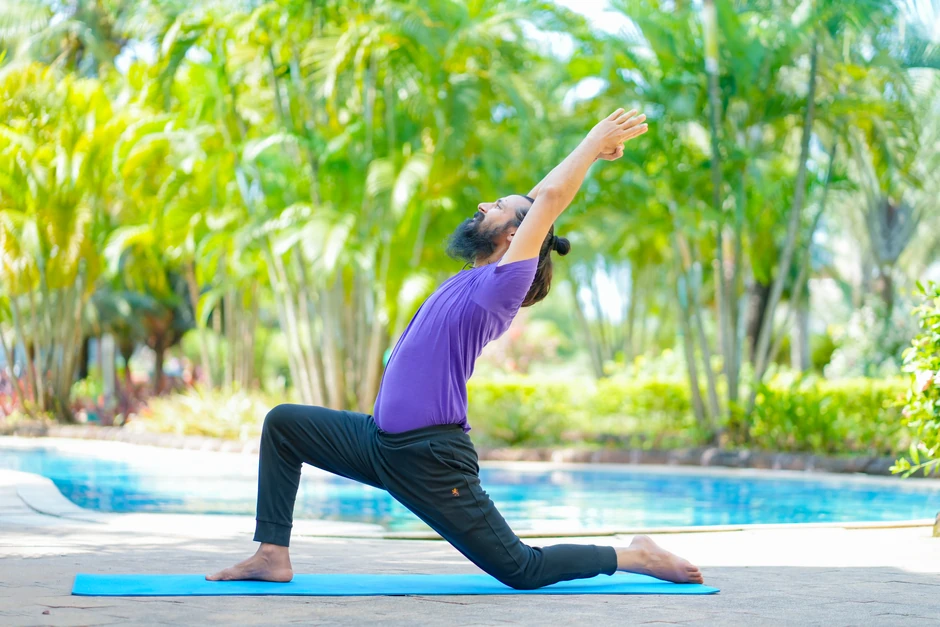
This pose can help release tight hip flexors, reducing stiffness to make Sukhasana more comfortable.
- Step one foot forward into a lunge position, keeping the other knee on the floor.
- Sink your hips down while keeping your spine upright.
- Hold for 20-30 seconds on each side.
Part 2: Step-by-Step Instructions for Sukhasana
- Sit on a yoga mat and place a cushion or folded blanket underneath. Elevating the hips by using props supports your lower back and helps maintain proper spinal alignment.
- Cross your legs at the shins, placing each foot beneath the opposite knee. Ensure both knees rest comfortably on the floor.
- If your hips feel tight or your knees lift off the ground, use yoga blocks or cushions under your knees for support.
- Sit tall with your spine naturally elongated. Avoid slouching or arching your lower back.
- Engage your core slightly to maintain stability.
- Gently roll your shoulders up and back, allowing them to relax away from your ears.
- Keep your chest open and your neck aligned with your spine.
- Rest your palms on your knees, either facing down to feel more grounded or facing up for openness.
- Close your eyes or maintain a soft gaze at a fixed point in front of you.
- Breathe naturally, inhaling deeply through the nose and exhaling slowly. Focus on steady, rhythmic breathing to relax the mind and body.
Part 3: Tips for Proper Alignment and Safety
- Elevate the Hips: Sitting on a folded blanket or cushion helps prevent rounding the lower back.
- Relax the Knees: If your knees are too high, prop them with blocks for added support.
- Engage the Core: Lightly activate your core muscles to keep your posture upright.
- Relax the Shoulders: Keep them down and away from the ears to avoid tension.
- Cool Down: Practice counter poses to ease out of the pose. These include:
- Seated Side Stretch
- Ardha Matsyendrasana (Setaed Twist)
Learn Sukhasana step-by-step with a coach! Book a free 1-on-1 trial session today.
Sukhasana Variations
Sukhasana (Easy Pose) can be modified to enhance flexibility, improve spinal mobility, and make the posture more accessible for different needs. Some variations of the Easy Pose include:
- Parivrtta Sukhasana (Seated Twist in Easy Pose): This is an excellent pose for people with tight shoulders or stiffness in the spine. It enhances spinal flexibility, relieves tension in the back, and stimulates digestion.
- Parsva Sukhasana (Side Bend in Easy Pose): This pose stretches the sides of the torso, improves spinal flexibility, and relieves tension. It is great for those who experience stiffness in the side body and need a gentle stretch for better posture.
- Adho Mukha Sukhasana (Forward Fold in Easy Pose): People with tight hips and lower back stiffness can do this pose as it releases tension in the lower back, stretches the hips, and calms the nervous system.
- Supta Sukhasana (Reclining Easy Pose): This pose gently stretches the lower back and opens the chest, promoting relaxation. It’s great if tight hips or back pain make sitting upright uncomfortable.
Sukhasana (Easy Pose) Precautions and Contraindications
While Sukhasana is generally a gentle and safe seated yoga posture, it may not be suitable for everyone. Additionally, certain conditions may require modifications or alternatives to prevent discomfort or strain.
Who Should Avoid Easy Pose?
- Individuals with knee pain: Sitting cross-legged may put pressure on the knees, worsening discomfort. Try these yoga poses for knee pain instead.
- People with hip injuries or stiffness: Limited hip mobility can cause strain in the joints and muscles while sitting in a cross-legged position.
- Those with sciatica or lower back issues: Sitting in Sukhasana for long periods may aggravate sciatic nerve pain or tension.
- Post-Surgery patients: Consult a doctor before attempting Sukhasana, especially after recent surgeries in the hips, knees, or spine.
Tips to Practice Easy Pose Safely
- Engage in Gentle Warm-Ups: Hip and knee stretches before Sukhasana can help improve flexibility and comfort and prepare you for the pose adequately.
- Use Props: Sit on a cushion, folded blanket, or yoga block to reduce strain on the hips and knees.
- Maintain Proper Alignment: Avoid rounding the back and engage the core slightly to maintain a tall posture.
- Take Breaks: Avoid holding the pose for too long, especially if you feel discomfort or numbness in the legs.
- Try Variations: If sitting on the floor is painful, try practicing on a chair with feet flat on the ground.
Following these precautions ensures a safe and comfortable practice, preventing unnecessary strain while still benefiting from the pose.
Sukhasana (Easy Pose): Related Poses
If you enjoy Sukhasana, here are a few similar seated or hip-opening poses that share its benefits while offering new challenges:
1. Padmasana (Lotus Pose)
This pose deeply opens the hips and strengthens the spine, making it ideal for meditation.
- Sit with your legs crossed, placing each foot on the opposite thigh.
- Lengthen your spine and rest your hands on your knees.
- Keep your shoulders relaxed and chest open.
- Hold the posture while breathing deeply and evenly.
2. Virasana (Hero Pose)
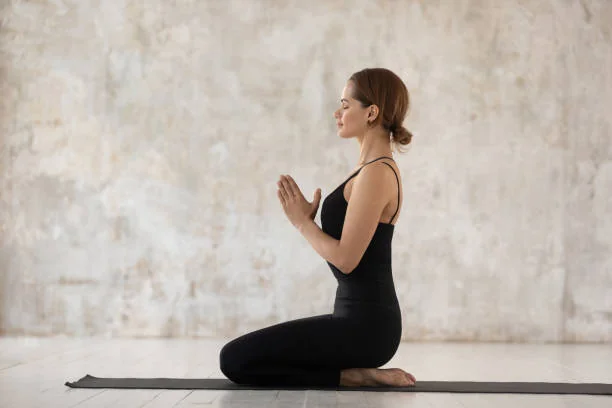
Hero Pose stretches the thighs, knees, and ankles while promoting better posture for seated practices.
- Kneel on the mat with knees together and feet slightly wider than hips.
- Sit back between your heels, keeping the spine tall.
- Place your hands on your thighs and relax your shoulders.
- Breathe steadily and maintain an upright posture.
Enjoy a Free 1-on-1 Session with a Coach!
Receive personalized guidance tailored to your unique fitness goals, live with a dedicated coach—no credit card required.
Frequently Asked Questions
Yes! Sukhasana (Easy Pose) is one of the most beginner-friendly seated yoga postures. It provides a stable and comfortable position for meditation and breathwork while gently improving posture, flexibility, and mindfulness. Beginners can use props like cushions or blocks under the hips for better support.
You can hold Sukhasana for 5 to 15 minutes during meditation or breathwork sessions. But it’s important to listen to your body—if you feel discomfort in your hips, knees, or lower back, adjust your position or take breaks as needed.
Sukhasana is also commonly known as Easy Pose, Cross-Legged Pose, or Meditation Pose. These names reflect its simplicity, comfort, and suitability for seated meditation practices.
While both are seated meditative postures, here’s how they differ:
- Sukhasana (Easy Pose) is a simple cross-legged seated position, ideal for beginners and meditation. The legs are loosely crossed without a strict alignment requirement.
- Siddhasana (Accomplished Pose) is a more structured meditative posture where one heel is placed close to the perineum, and the other foot rests against the opposite ankle. It provides a deeper stretch and is often considered more advanced.
Yes! Sukhasana is a cross-legged meditation pose that encourages a relaxed but alert posture. It promotes sitting upright and breathing deeply, thus allowing for longer meditation sessions with minimal discomfort.
Yes, but with modifications. Sukhasana can be a great prenatal pose for relaxation and breathwork, but pregnant women should sit on a cushion and avoid holding the pose for too long. Make sure you consult a healthcare professional or prenatal yoga coach before practicing Sukhasana during pregnancy.



.webp)
%20(7).jpg)
