What is Mayurasana (Peacock Pose)?
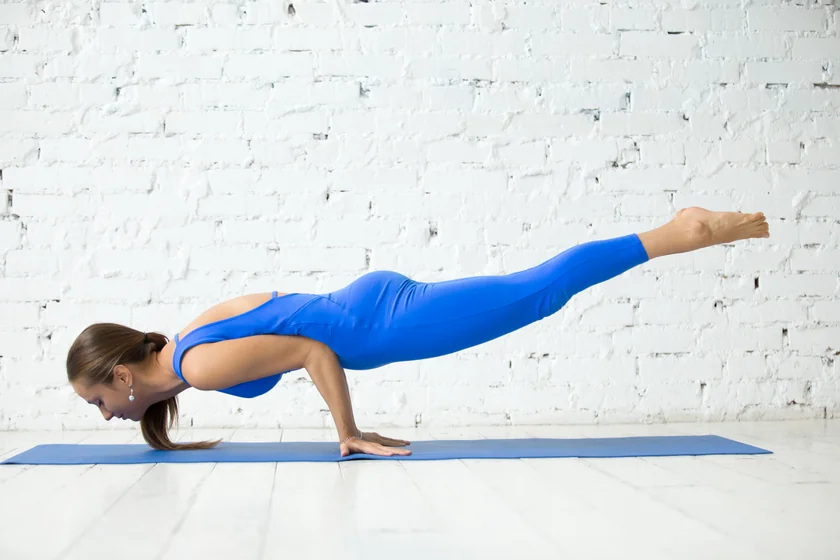
Mayurasana, or Peacock pose, is an advanced arm-balancing yoga pose. This pose is only for skilled yogis and not for beginners, as this pose requires high core strength and focus.
You’ll start with Virasana or Padmasana pose with your palms on the yoga mat in front. Next, you’ll slowly lean forward and rest your upper abs against the back of your bent arms. When your core is engaged and your gaze is focused, your legs will come off the mat and into the air.
Mayurasana is an ancient Hatha yoga pose perfect for toning your arms and abdomen. If you're new to learning this pose, this step-by-step guide is for you.
Overview & Etymology
'Mayura' is a Sanskrit word for Peacock, and 'Asana' means pose or posture. This pose was first described in the Vimanarcanakalpa, a prose language text on Hatha yoga from the 10th century.
Following in the 13th century's ancient Hatha yoga text, Vasishtha Samhita Mayurasana is described as a yoga pose that destroys all sins.
Mayurasana symbolizes patience, beauty, and balance which helps the practitioner to not only become physically more balanced but also assists in boosting mental strength, willpower, and self-esteem.
Sanskrit Name: मयूरासन Pronunciation: muh-uu-raa-suh-nuh
Pose Type: Arm Balance Also known as: Peacock Pose
Strengthens: Forearms, Shoulders, Back, and Core Stretches: Forearms and Wrist
Health Benefits of Mayurasana
Boosts energy.
Enhances concentration.
Improves core and arm balance.
Increases forearm and wrist strength.
Tones the muscles in the upper body.
Activates the kundalini (serpent) energy.
Increases mindfulness and self-awareness.
Helps burn fat around your arms and core.
Boosts emotional health and reduces stress and depression.
Stimulates the Muladhara Chakra (root energy or tailbone area).
When to Avoid Performing Mayurasana
Avoid if you are pregnant.
Avoid during menstruation.
Avoid if you have elbow arthritis.
Avoid during migraines and vertigo.
Avoid if you have tension in your neck.
Avoid if you have had a severe injury or surgery.
How to do Mayurasana (Peacock Pose)
It’s best to divide the process of learning this pose into four simple parts:
Part 1 - Preparatory Poses for Mayurasana
To bring balance to your core muscles and strengthen your upper body, you’ll need to activate and warm-up your entire body:
1. Phalakasana (Plank Pose) - To get into this pose, start on all fours, keep your hands on the mat shoulder-width apart, and your knees under your hips. Squeeze your hands and shoulders to lift your chest a little higher.
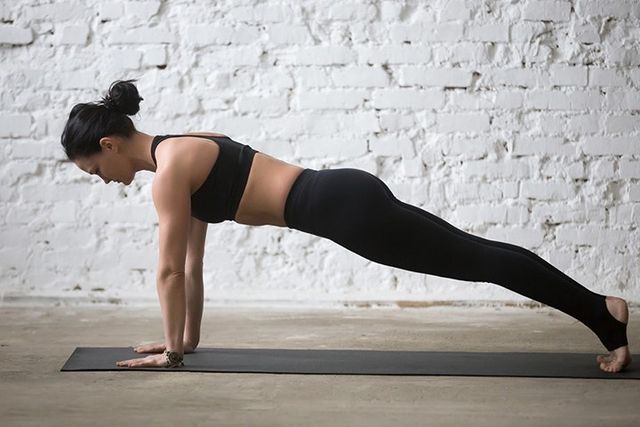
Next, lift your knees and extend your legs one by one while maintaining a tight core. Bring your gaze down in-between your hands or slightly forward. Hold this pose for 3 to 5 minutes to condition your upper body and core for arm balance.
2. Chaturanga Dandasana (Four-Limbed Staff Pose) - Start in Plank position, bend from the elbows at a 90-degree angle and bring your body to a low plank position. Make sure your body is parallel to the ground and that you’re utilizing your upper body strength to maintain this arm balance.

Hold this for 30 seconds for 3 to 5 rounds to build strength in your shoulders, upper back, traps, and wrists.
3. Hamsasana (Swan Pose) - If you don't have enough wrist flexibility and core strength to hold Peacock pose, Swan pose is another option.
Continue from Plank pose, reverse your grip and rest your abs on your elbows. Make sure your elbows are close together and right below your ribcage. No need to lift your legs – maintain your gaze forward and hold this pose for 1 to 5 minutes.
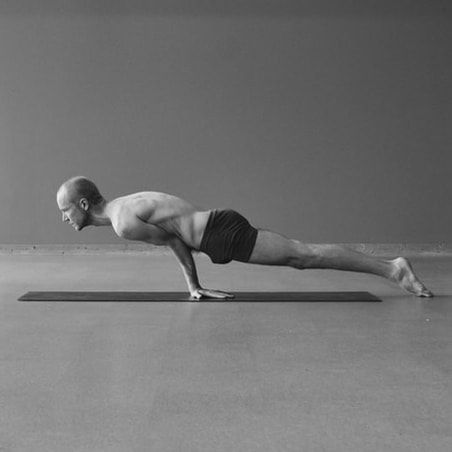
Swan pose helps beginners adapt to Peacock pose faster by strengthening the necessary muscle groups without too much stress.
Part 2: Step-by-Step Instructions to Perform Mayurasana
The following are steps to practice Peacock pose:
Step 1- Start by sitting in the middle of your mat in Hero Pose or Virasana position. Sit upright for a few seconds and focus on your breath.
Step 2- Now, place both palms shoulder-width apart in front on the mat so that your fingers are pointing toward your lower body.
Step 3- Keep your shoulders, upper back, and core engaged.
Step 4- Bend your arms at 90 degrees, and make sure your elbows are close to each other while keeping space between your palms.
Step 5- Inhale and exhale, lean forward, rest your head on the ground, and place the center of your abdomen on your elbows.
Step 6- As you exhale entirely, hold your breath during the main arm balance. Lift your legs in the air and stretch them out straight, all toes pointing.
Step 7- Finally, gently lift your head off the mat, gaze forward, and keep your body straight from head to toe.
Step 8- Exhale and release this pose by bringing your legs back on the mat in Virasana position.
Breath Awareness:
Hold Breathe: During the balancing act.
Exhale: When you are about to exit from the main posture.
Inhale: When your palms are placed on the mat in front of you.
Inhale & Exhale: While sitting in Hero position and right before you’re about to place your core on your elbows.
Performance Duration for Beginners: Hold Mayurasana for 10 to 20 seconds.
Performance Duration for Advanced: Hold Mayurasana for 30 to 90 seconds.
Part 3: Things to Keep in Mind
Here are a few essential posture cues to be mindful of while getting started with this powerful arm balance.
Grip your yoga mat - While performing any arm balance, you're most likely placing your hands on the mat, and most of the pressure is on your wrists. To ensure your wrist doesn’t get hurt in prolonged arm balance holds, spread your hands and press your fingers into the mat like you're holding the ground with your front fingers.
Do not release your legs too fast - Releasing your legs before your body is ready to balance itself can make it challenging to get into this pose. Take your time. First, give your wrist, elbows, and head time to adjust and create a strong foundation. Next, focus on your breath, keep your core and upper body engaged, and then let go of your legs with your gaze focused in front.
Do not lean too far forward - Some yogis get their legs too high in the air, with their head either on the ground or raised close to the ground. This happens when you lean in too far forward, turning your body into a see-saw because one side is heavier than the other. Find your body’s midpoint to align your elbows and make sure both sides are parallel to the ground.
Part 4: Relaxing Poses After Mayurasana
Arm balancing yoga poses can be exhausting and overwhelming. Give yourself time to unwind with the following relaxation sequences post-Mayurasana practice:
1. Adho Mukha Svanasana (Downward Facing Dog Pose) - Lie on your abdomen with your hands close to your chest and keep your legs together. Inhale, lift from your chest with your palms pushing into the mat.

Tuck your toes into the mat and lift your knees off the mat. Point your pelvis toward the ceiling, and slowly form a triangle-like posture with your hands and feet flat on the mat. Finally, exhale and relax your tensed upper back, shoulders, neck, and arms in this counter pose for a few minutes.
2. Balasana (The Child’s Pose) - Continue from the Down-Dog position by bending your knees and bringing them back to the ground. Form the table-top position, bring your pelvis onto your heels, and rest your head on the floor.
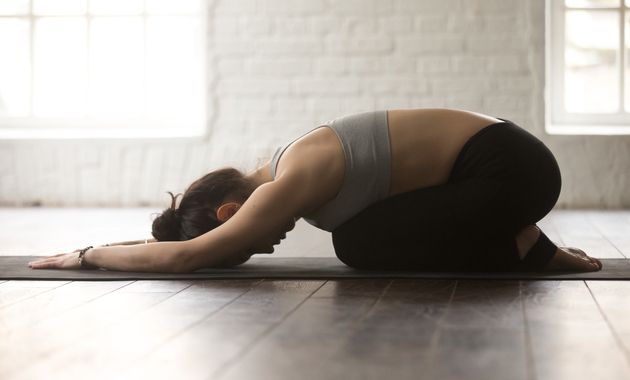
You can stretch your arms in front or just keep them at your sides, with both palms facing the ceiling. Hold until your spine, neck, core, and arms return to their respective neutral form.
Mayurasana Variations to Consider
We often walk on different paths in our learning journey, and you can choose a posture variation you feel most comfortable with, or one that challenges you.
1. Padma Mayurasana (Lotus Peacock Pose): Sit in Padmasana for a few breaths. Bring your hands forward and shift your body weight onto your palms and knees.
Point all your fingers backward, bend at your elbows and fit your elbows below your ribcage. Slowly shift your body weight over your elbows and raise your knees off the mat in sustained Padma legs formation.
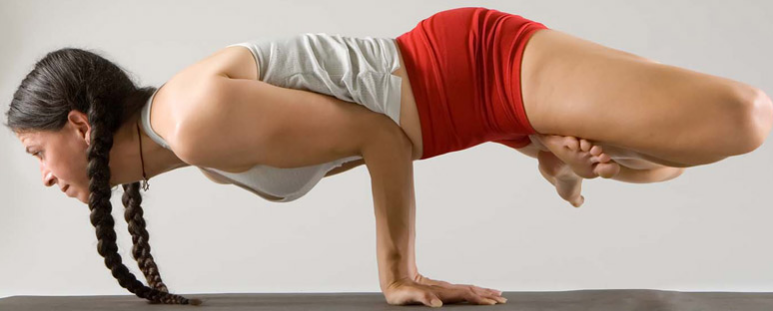
Hold this variation while staying parallel with the ground for 30 to 90 seconds, and relax by placing your knees back on the floor.
This is a suitable variation for intermediate yogis who find lifting their legs straight in the air challenging.
2. Pungu Mayurasana (Wounded Peacock Pose): Feeling extremely powerful with your Peacock pose practice? Continue to challenge your arm balance further with this one-arm Peacock stance.
Start like you would for the primary Peacock pose and keep your core engaged. Get your right elbow close to the side of your navel or right below your rib cage.
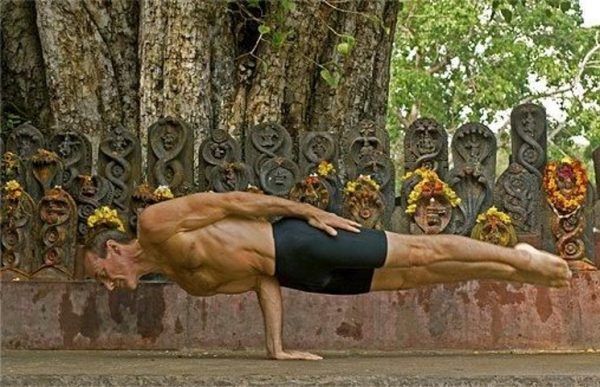
Spread your right palm fingers to grip the yoga mat and make sure your shoulders and upper back muscles are super engaged. Keep your other hand resting close to your chest.
Now, lift your legs to balance on your right elbow. Slowly, take away your resting hand off the ground and bring it in line with your legs. Hold this variation by concentrating your gaze at one point for a few seconds and then repeat the same on the other side.

Enjoy a Free 1-on-1 Session with a Coach!
Receive personalized guidance tailored to your unique fitness goals, live with a dedicated coach—no credit card required.


.webp)
%20(7).jpg)
