What is Matsyasana (Fish Pose)?
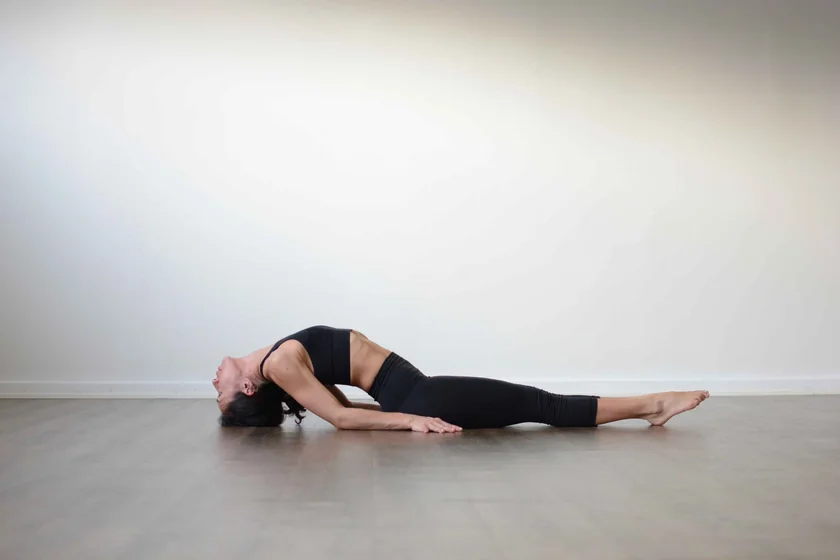
Matsyasana, or Fish Pose, is a chest opening reclining back bend. It's usually performed as a counter pose after a shoulder stand or headstand to calm the tension in the shoulders, neck, and spine.
In Matsyasana your pelvis rests on the floor so your arms can be placed underneath. Your legs can be either bent or straight, with your head touching the mat, and your bent elbows helping to stabilize your core. When performing this pose, your chest should be lifted and your back arched.
This pose activates your crown, throat, and eye chakras, promoting wisdom, emotional healing and enhanced hormonal balance.
Overview & Etymology
Matsyasana is a combination of Sanskrit words, where 'Matsya' means fish and 'Asana' means posture. If performed in water, this pose can help the human body to float. That’s why its name is Fish pose.
Matsyasana is mentioned in ancient yoga texts like 17th-century Gheranda Samhita – an encyclopedia book on hatha yoga poses. Fish pose is one of the 12 basic yoga poses in Hatha yoga and it’s also part of Ashtanga yoga primary postures series.
According to Hindu Mythology, the supreme lord Vishnu reincarnated on earth as a Matsyavatar (fish). He saved Vaivasvata Manu (the first man), the seven sages, and the Vedas from a great deluge by building a boat.
Lord Vishnu also shared his knowledge and wisdom with Manu, which is well elaborated in the eighteen Mahapuran (vast Hindu literature) Matsya Purana. The fish pose thus symbolizes wisdom, devotion, and karma.
Sanskrit Name: मत्स्यासन Pronunciation: maht-see-AHS-uh-nuh
Pose Type: Backbend, Chest Opener Also known as: FishPose
Strengthens: Upper Back and Neck
Stretches: Spine, Throat, Chest, Psoas Muscles, and Abdomen
Health Benefits of Matsyasana
Improves posture.
Opens the chest and ribs.
Improves breathing capacity.
Activates crown, eye, and throat chakras.
Activates the thyroid and pituitary glands.
Lengthens the spine and increases its flexibility.
Enhances organ functioning in the digestive system.
Alleviates stress and tension from the neck and back.
Improves blood circulation in the shoulders, throat, and spine.
Balances the female menstrual cycle and helps to alleviate period cramps.
When to Avoid Performing Matsyasana
Avoid if you have osteoporosis.
Avoid if you are experiencing a migraine or vertigo.
Avoid if you have degenerative disc disease.
Avoid if you have chronic back or neck pain.
Avoid this pose if you recently have had any injury or surgery.
How to do Matsyasana (Fish Pose)
For beginners, the Matsyasana practice is divided into four different parts below:
Part 1 - Preparatory Poses for Matsyasana
Warming up the shoulders, spine, neck, and low back is crucial to accomplishing the perfect fish posture.
The following are some warm-up yoga poses to get your activate your muscles and get your blood moving:
1. Ustrasana (Camel Pose) - This pose is also known as kneeling back-bend. Start by standing on your knees, keeping your core muscles stable and your spine lengthened. Inhale to expand your chest, and begin to bend your neck backward.
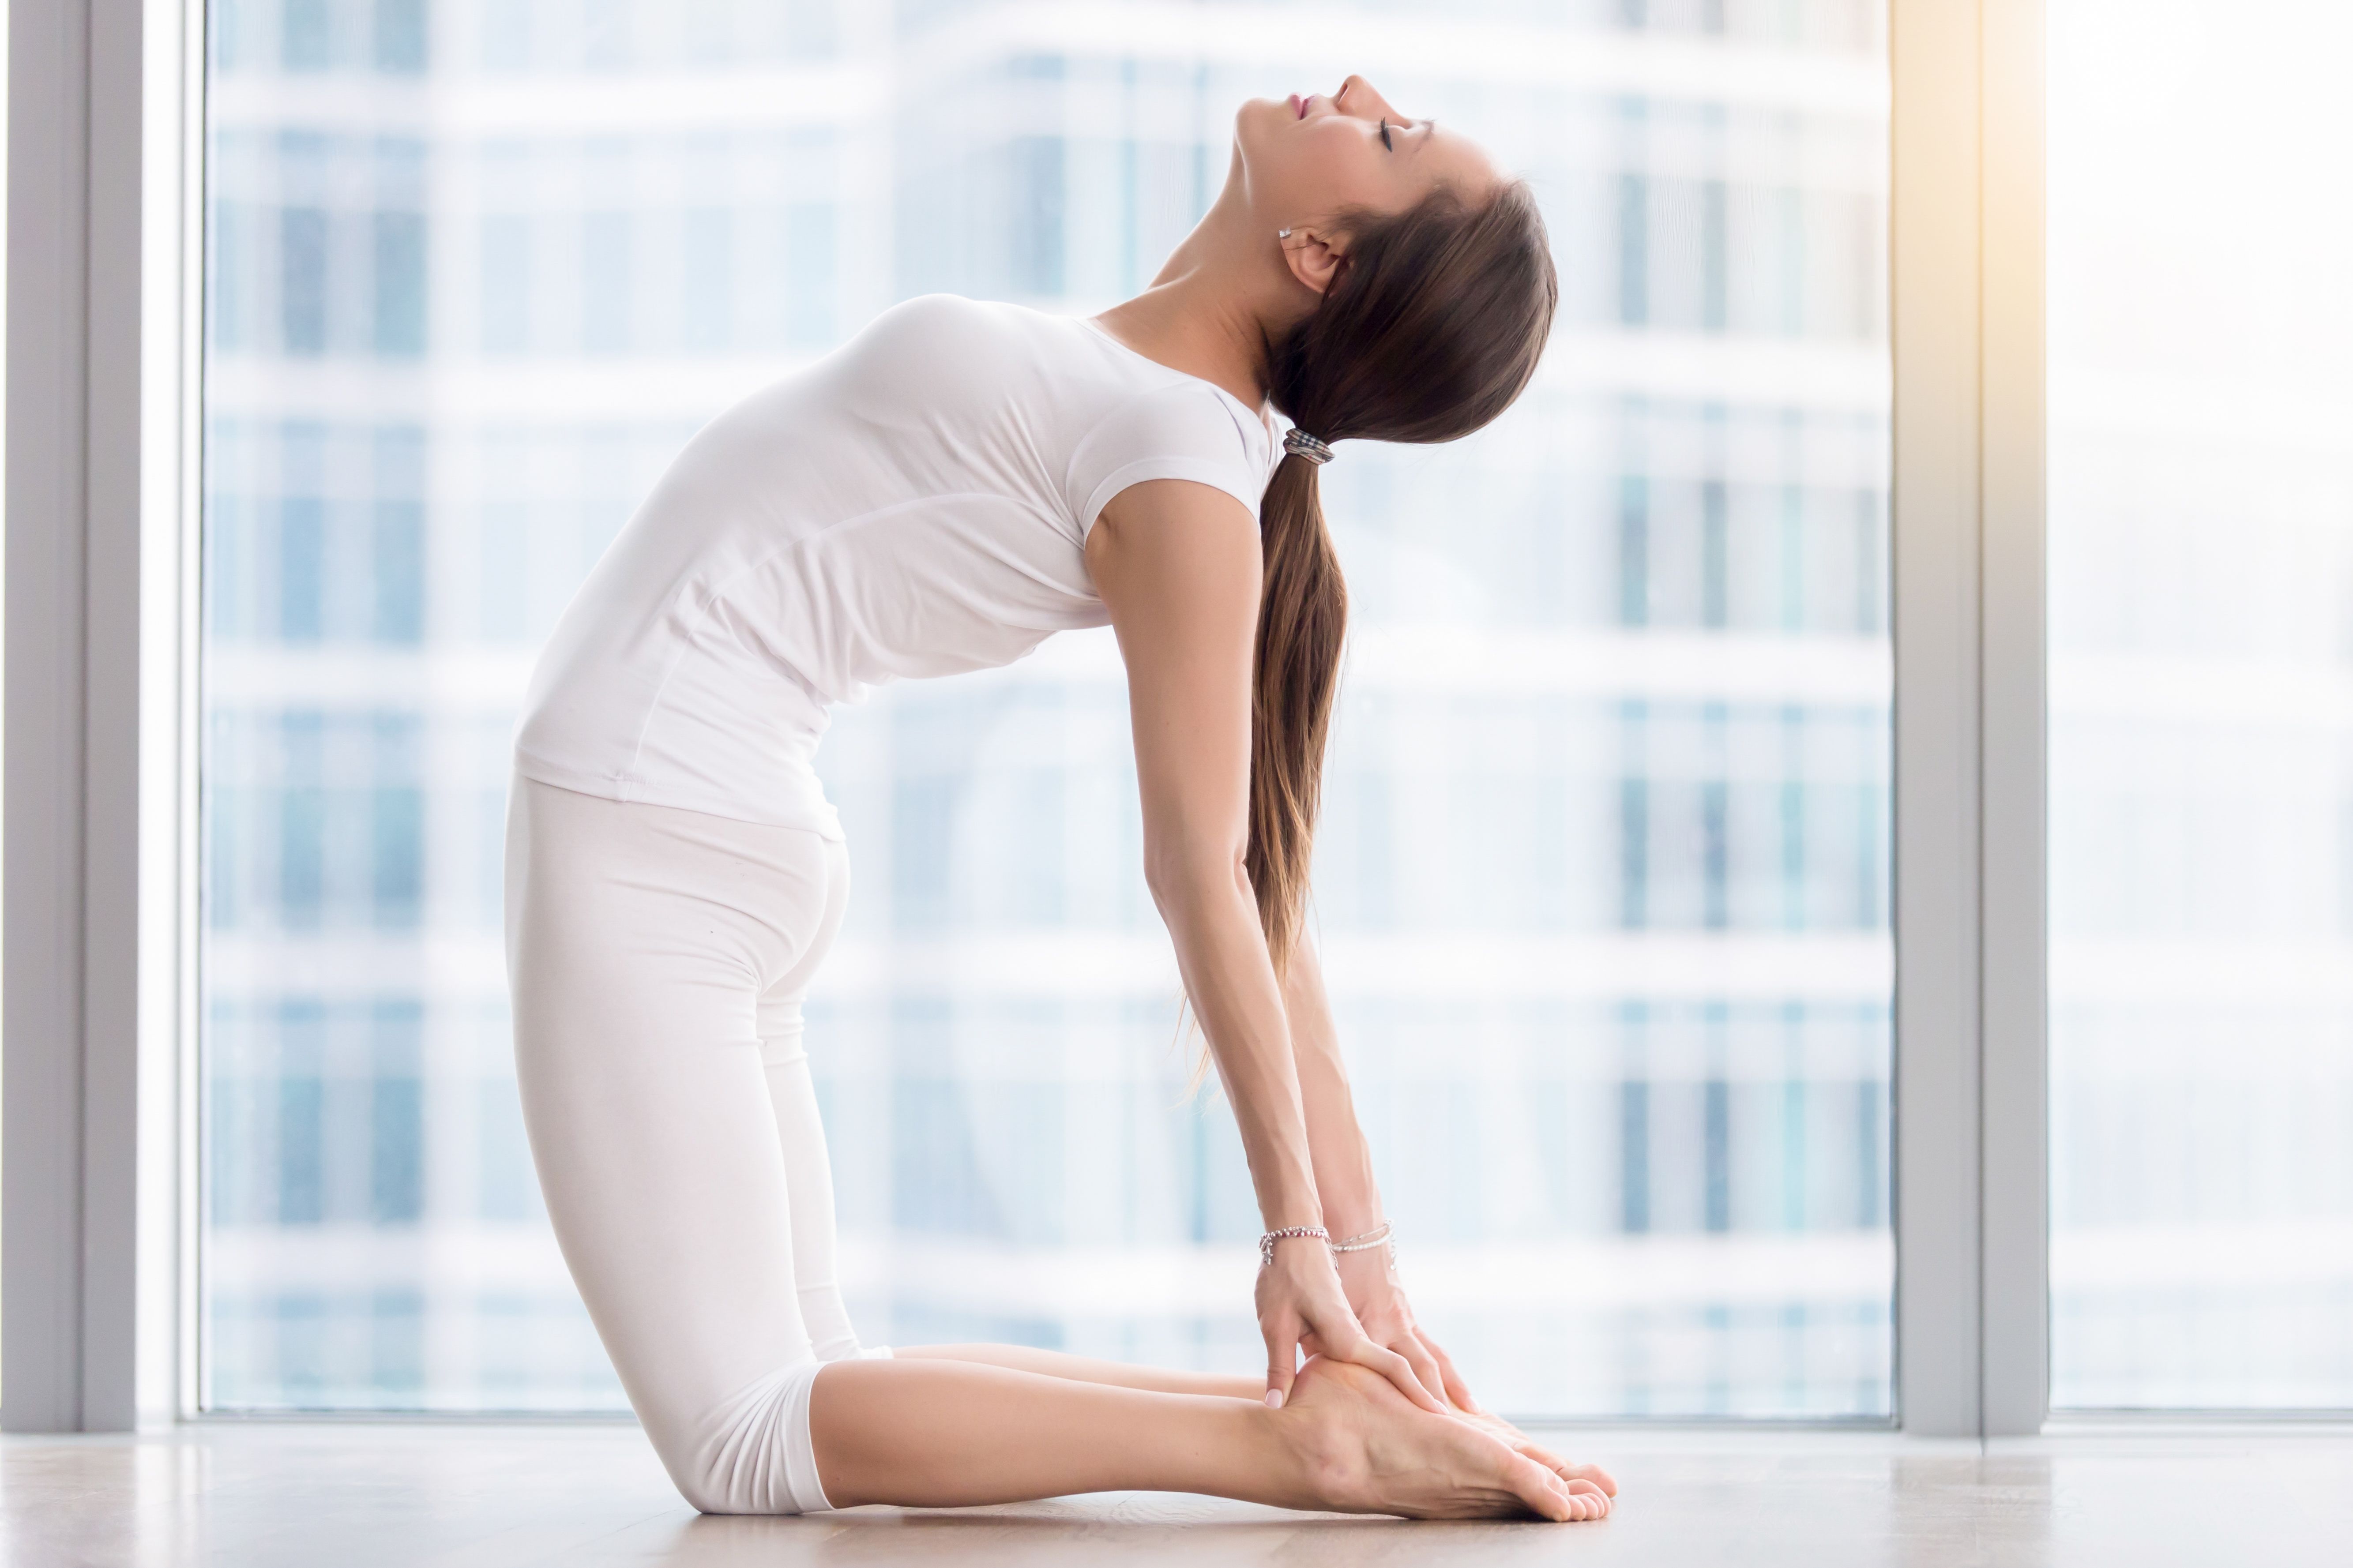
Slowly expand your chest, arch your lower back, and hold both ankles with your fingers. Now, perform an elongated inhale and hold the pose as you exhale. This asana opens all of the necessary muscles required for Fish pose.
2. Salabhasana (Locust Pose) - This is a beginner-friendly back bend pose and an excellent way to strengthen the lower back and core muscles. Start by lying on your stomach and engaging all of your limbs and core.
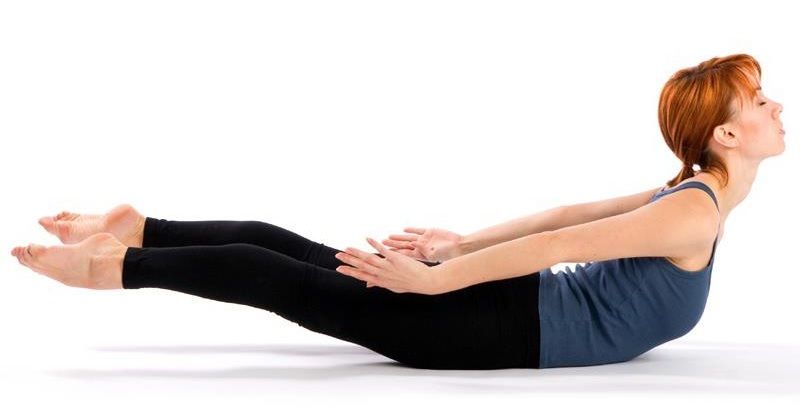
Next, inhale, lift your legs off the mat, and hover your arms at your sides. Keep your gaze directed upward. Hold this pose here for 10 to 60 seconds.
Part 2: Step-by-Step Instructions to Perform Matsyasana
The following are steps to practice Matsyasana or Fish pose:
Step 1- Inhale and start by sitting in Lotus or Staff pose. Take a few deep breaths.
Step 2- Begin by lowering yourself down entirely on the yoga mat.
Step 3- Bring your arms under your lower back with your palms pressing on the mat right below your tailbone.
Step 4- Take another deep breath, and keep the crown of your head on the ground.
Step 5- Now, continue to expand your chest muscles with your next inhale and gently lift your neck, spine, and chest off the mat, as if a string is pulling them all together upward to the ceiling.
Step 6- Ensure that your back maintains a curve while your elbows and palms press against the yoga mat to support your spine.
Step 7- Relax your body with deep inhales and exhales while holding Fish pose.
Step 8- Hold this pose here for a few seconds, and then gently release your chest, neck, and spine in chronological order.
Breath Awareness:
Inhale: While getting into the starting position, while raising your neck and spine, and while placing your arms below the low back.
Exhale: While expanding your chest upward and during the posture hold.
Performance Duration for Beginners: Hold Matsyasana for 15-30 seconds.
Performance Duration for Advanced: Hold Matsyasana for 60-90 seconds.
Part 3: Things to Keep in Mind
While practicing the Fish pose, your neck and spine are held in a precarious position. Thus, it’s important to keep in mind some of the following posture cues:
Avoid straining your head or neck: Holding your head, neck, and spine in Fish pose for a prolonged duration without any prior strength training can potentially lead to muscle cramps or serious spinal injuries. In order to first build enough strength for prolonged holds, try taking little breaks every few seconds.
Stabilize your head: Don't disconnect the crown of your head away from the ground. Try to keep your head in line with your neck, spine, core, and tailbone.
Don't over-arch your back: The most common mistake that most practitioners make during Matsyasana is overarching their lower back and minimizing the arch in their upper back. Instead, this should be vice-versa. To fix this problem, actively engage your core muscles and tuck your tailbone flat to the mat. Now, try to arch your upper spine via pressure from your palms as they press into the mat.
Part 4: Relaxing Poses After Matsyasana
Make sure you’re relaxing your spine, upper back, and neck in counter yoga positions to make sure that it returns to its neutral shape.
To relax, here are a couple of counter yoga asanas to perform after your Fish pose practice:
1. Pavan Muktasana (Wind Release Pose with Head Up): After your Matsyasana practice, lie on your back with the head, neck, shoulders, and spine relaxing on the ground. Now, press your neck, core, and spine into the yoga mat and inhale deep.
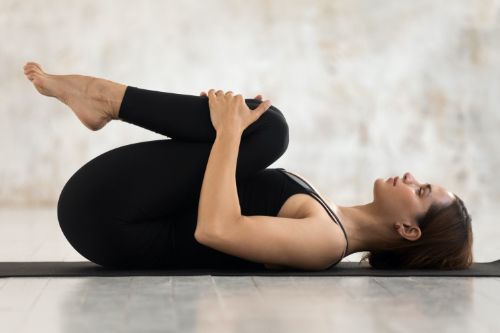
Next, bring your legs close to your chest one by one, and hug your legs together with both your arms. Inhale and exhale for 2-3 minutes in this position, close your eyes, and keep your spine flat on the mat to relax your whole body.
2. Shavasana (Corpse Pose): Continue to move from the Wind Release pose into Corpse position. Release both your legs back on the yoga mat and extend them on the floor. Spread your legs and arms slightly at your sides.
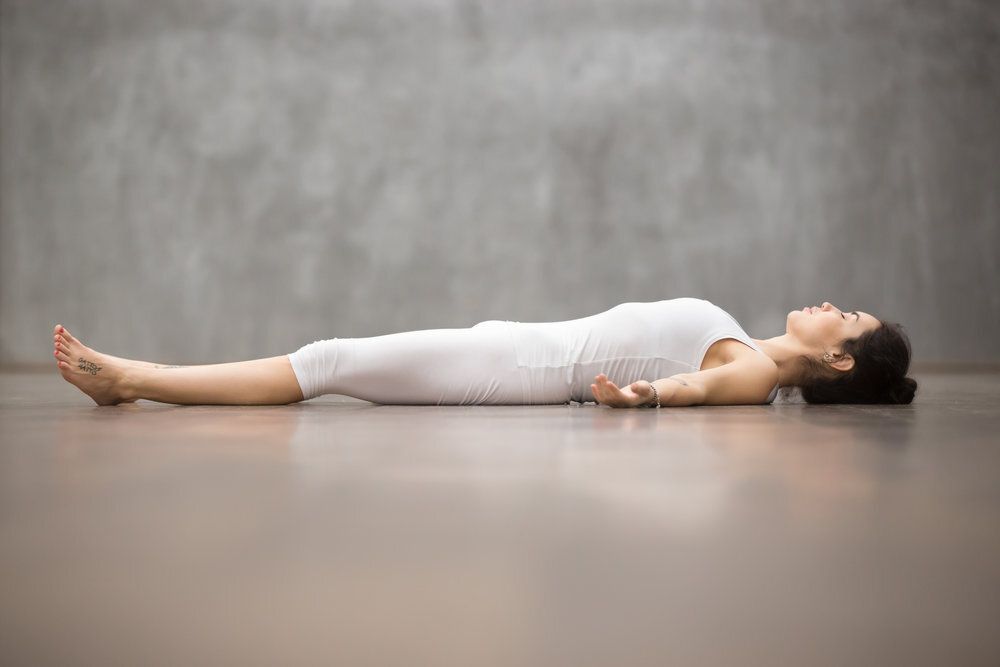
Close your eyes and take a few deep breaths in this position. Concentrate on the movement of your breath from the toes of your feet to the top of your head. Remember, the more focused you are, the better you can identify any muscle tension in your body and relax thoroughly.
Matsyasana Variations to Consider
Every yogi has a different level of physical endurance and mental strength, and you may want to take your Matsyasana practice a little deeper. Here some Fish pose variations to incorporate into your heart-opening yoga practice and make it more fun, easygoing, and challenging.
1. Fish Pose with Lotus Legs: Sit in Padmasana and lower yourself onto your back. Inhale, hold your alternate big toes, and press your elbows into the yoga mat.

With the support from your elbows, lift your chest, tailbone, spine, neck, and back of your head off the mat. Hold the pose with deep exhales for a few seconds, and then gently exit by relaxing your spinal arch.
2. Fish Pose with Arms Overhead: If you’re feeling strong in your spine and can hold Fish pose for more than a few seconds without any strain on the neck, try deepening the arch in your lower back and flexing your arms overhead while in the Matsyasana position.
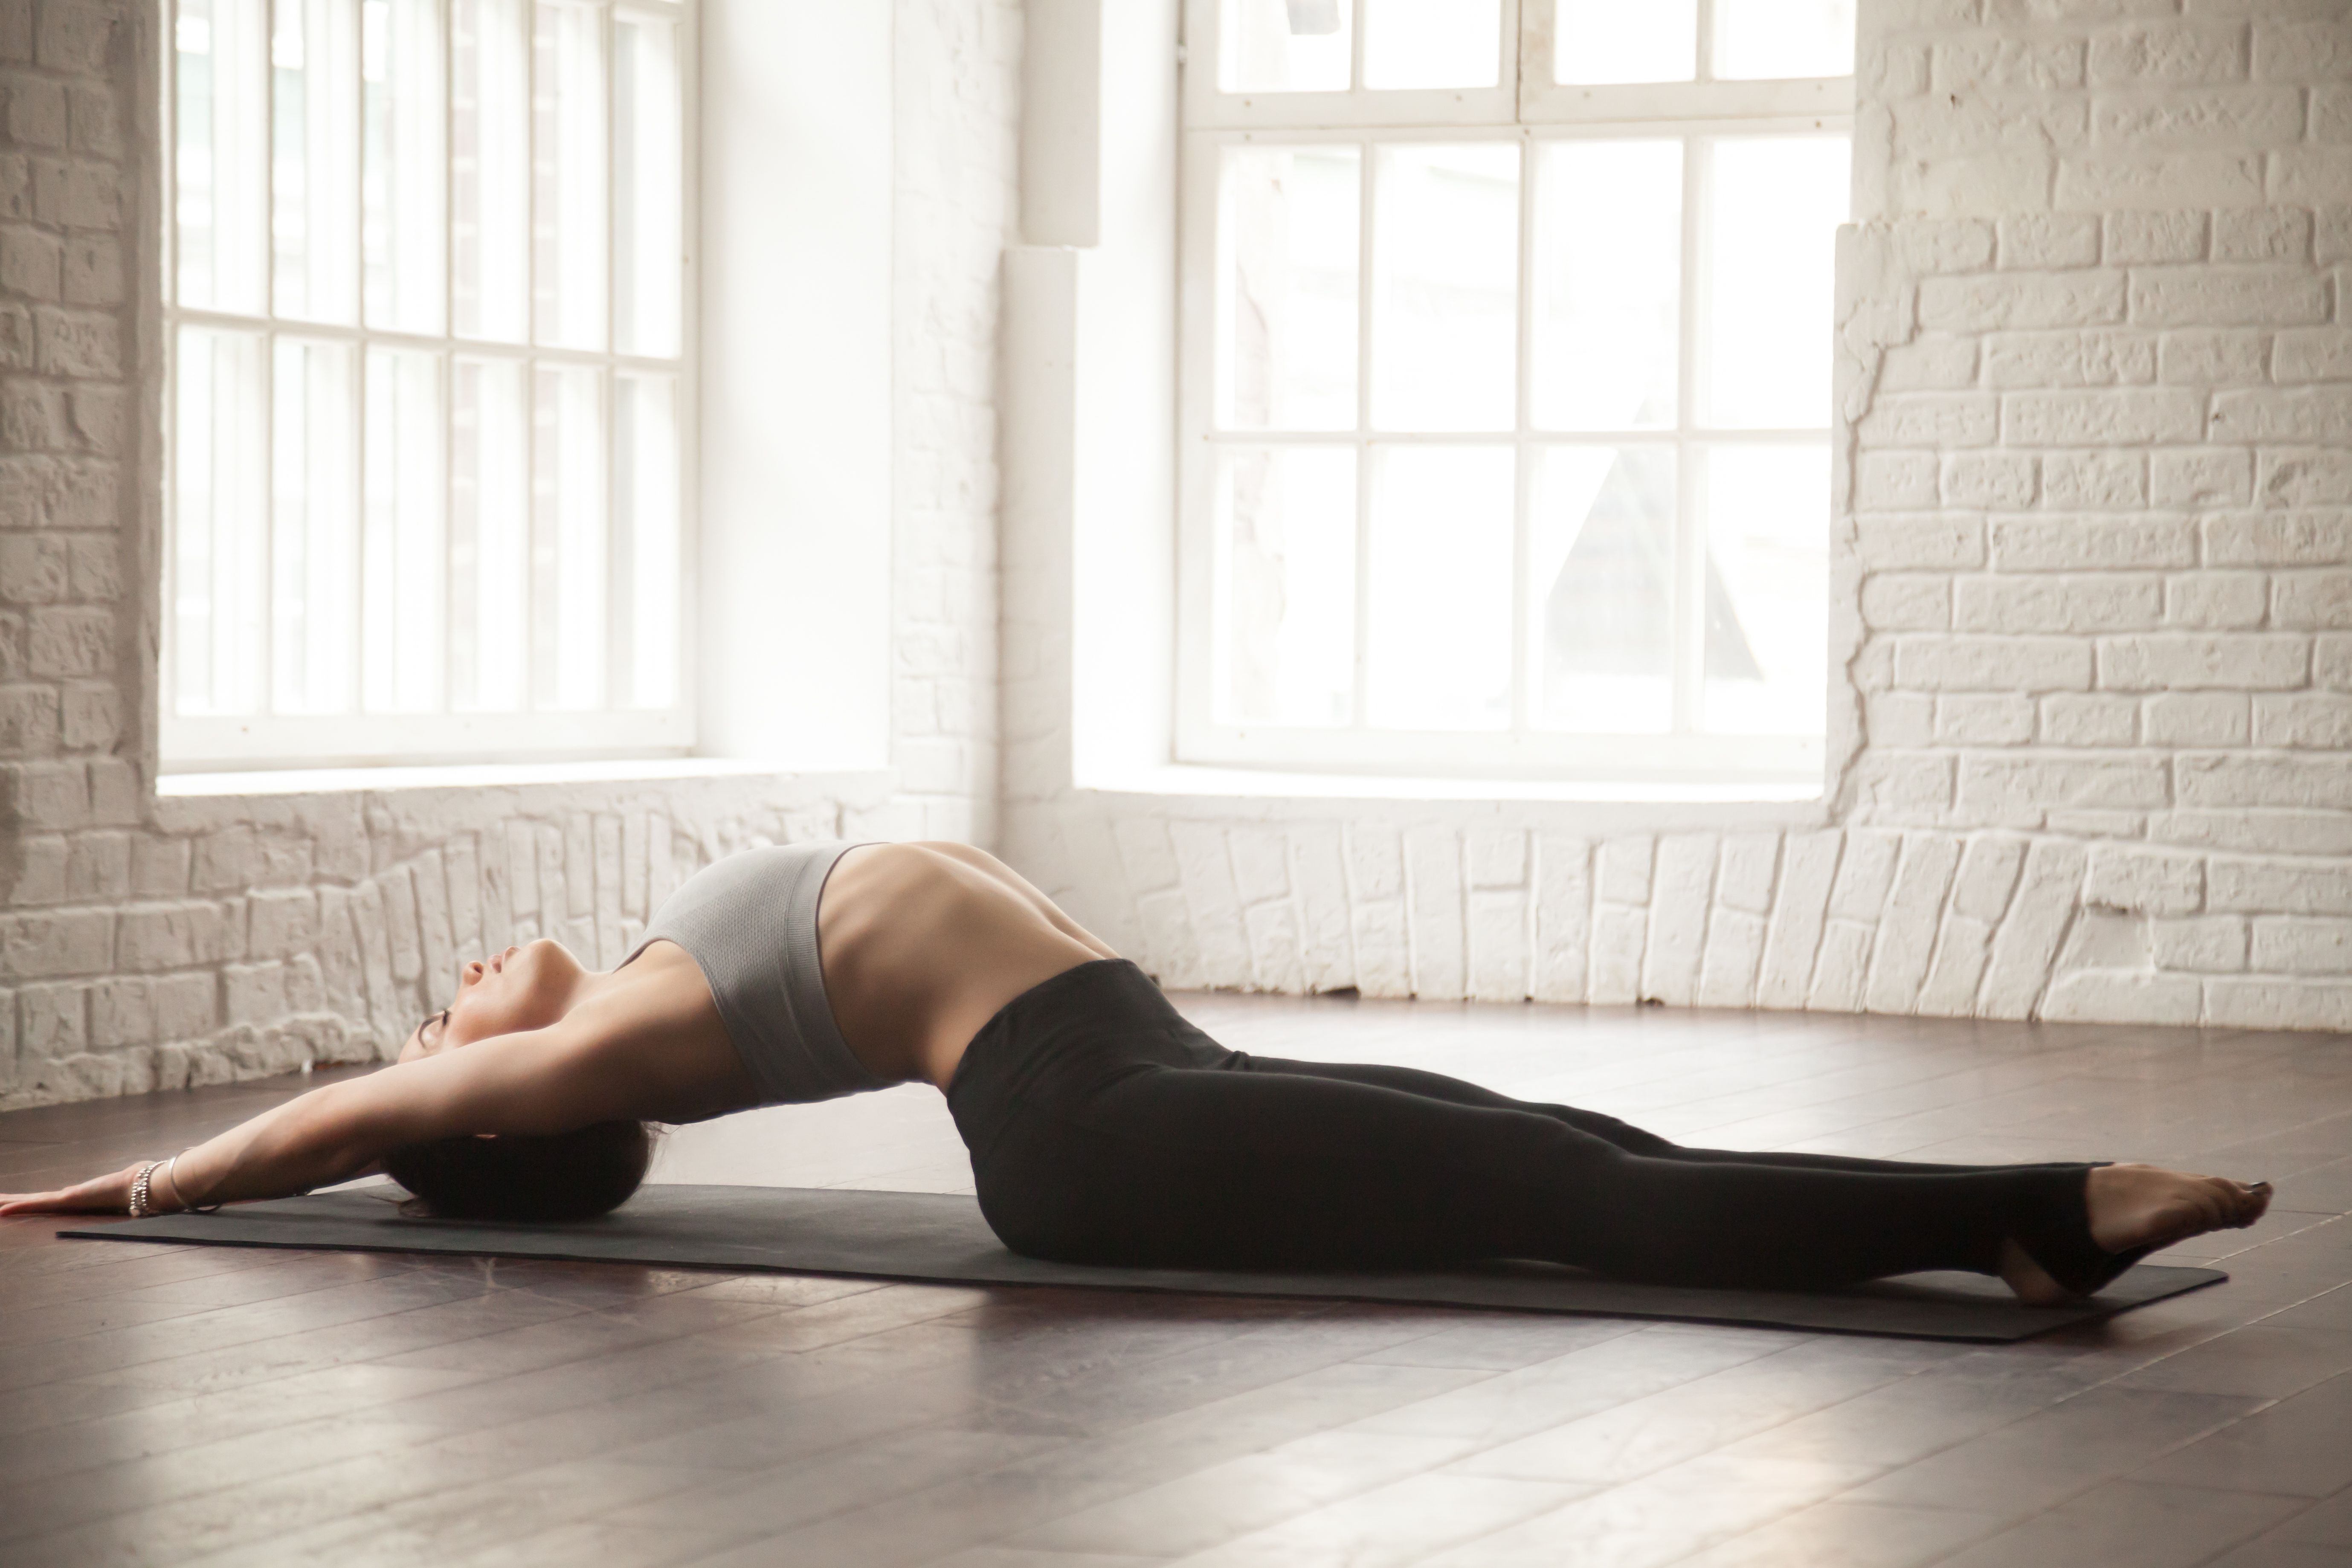
Hold this posture variation for 30 to 60 seconds or more, and notice a deep flex in your entire spine and core muscles.
3. Fish Pose with Raised Legs & Arms: Now that you’ve mastered the art of executing Fish pose with lotus legs and Fish pose with arms overhead, it’s time to engage and lift both your legs and arms off the mat.
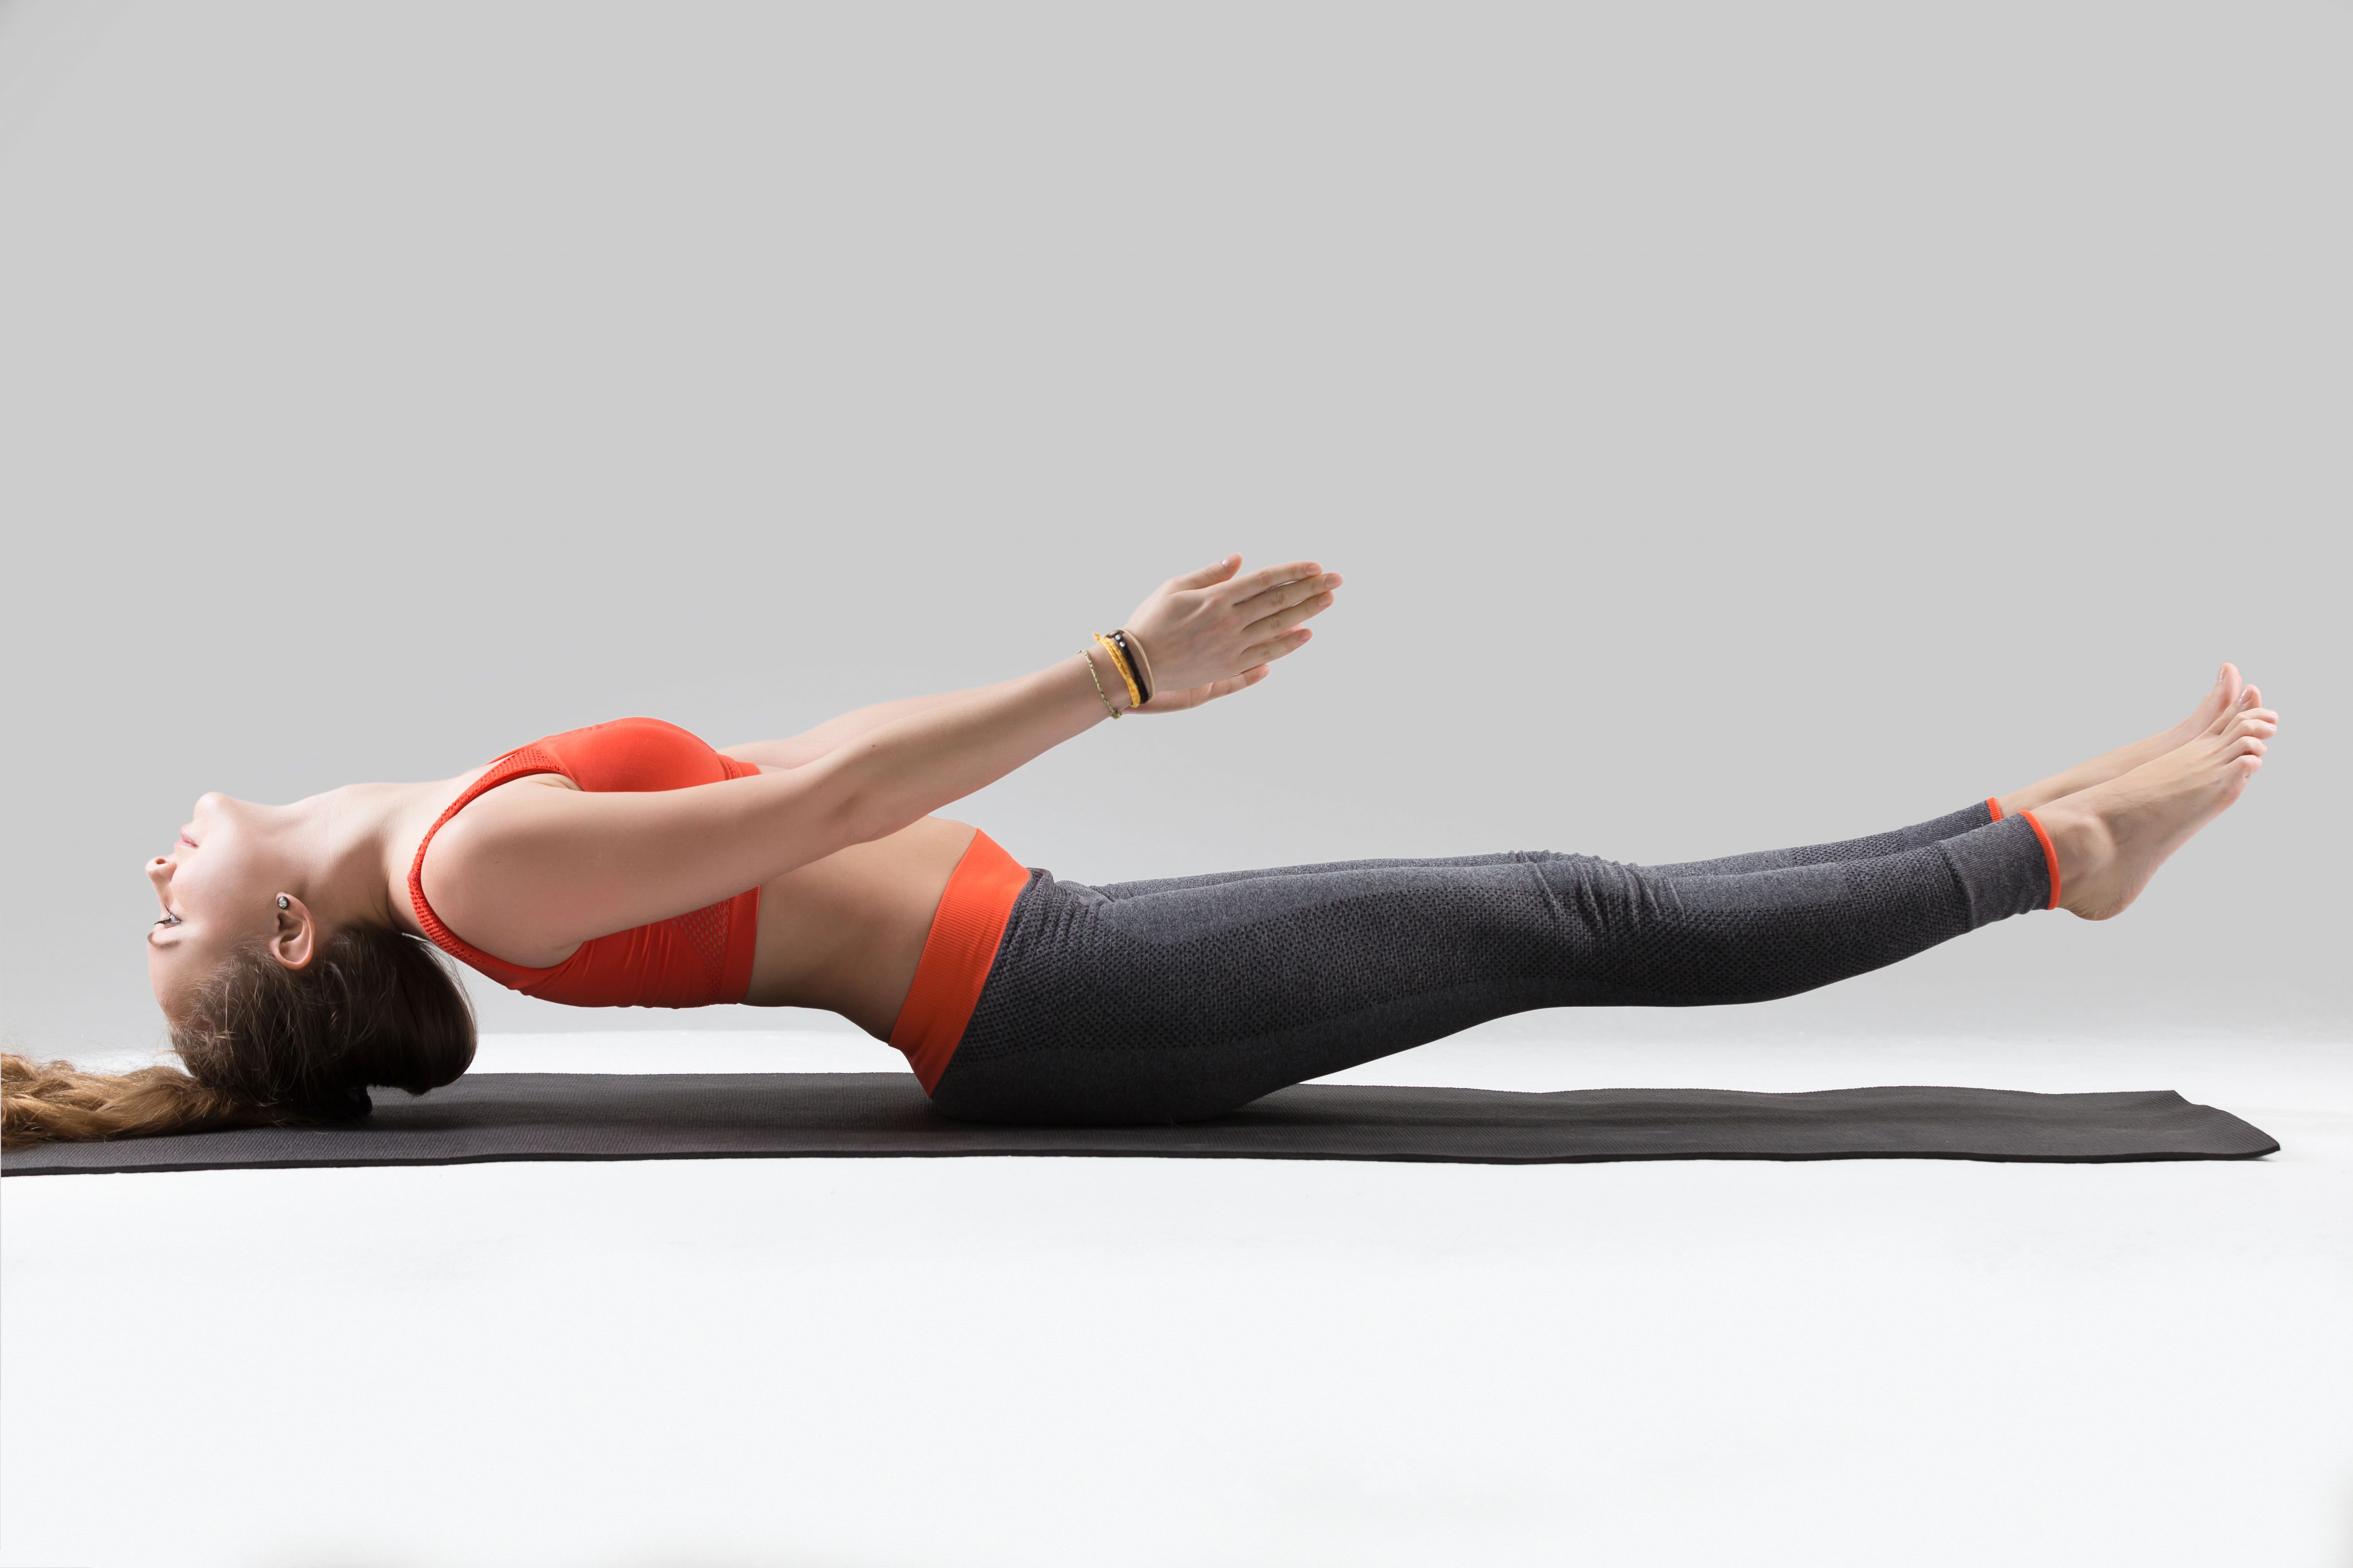
From Fish pose with overhead arms, slowly bring both your arms in front of you at an angle. Engage your core muscles and lift each leg one by one, holding this variation pose as long as you feel comfortable.
Among the many common benefits of Fish Pose, this variation will help burn lower abdominal fat, and tone your shoulders, legs, and arms.
Enjoy a Free 1-on-1 Session with a Coach!
Receive personalized guidance tailored to your unique fitness goals, live with a dedicated coach—no credit card required.
Frequently Asked Questions about Matsyasana
Yes, beginners can add the Matsyasana (Fish Pose) to their regular yoga practice for chest opening, neck strengthening, and increased spinal flexibility.
The benefits of Matsyasana include the following:
- Stimulates the functioning of the thyroid glands
- Boosts immunity
- Builds flexibility
- Strengthens the neck
- Alleviates mild low back pain
- Enhances digestive system functioning
Ardha Matsyasana or Half Lord of the Fishes pose is a seated spinal twist. This pose is for beginners and intermediate yogis who want to activate their lower back muscles for deeper backbend postures.
Saral Matsyasana or Easy Fish pose is an easy variation for the deep Matsyasana practice. Start by lying on your back and both arms at your sides. Press your fingers onto the yoga mat to support your chest, neck, and head to rise slightly above the mat. The beauty of this variation is that everyone can perform this without any risk of serious injury.
Matsyasana is a heart-opening and spine-stretching yoga pose that stretches your neck, low back, core, and mid back simultaneously.
Yoga practitioners with chronic back pain, degenerative disc disease, migraines, vertigo, osteoporosis, or any injury around the spine or neck should avoid performing Matsyasana.


.webp)
%20(7).jpg)
