What is Malasana (Garland Pose)?
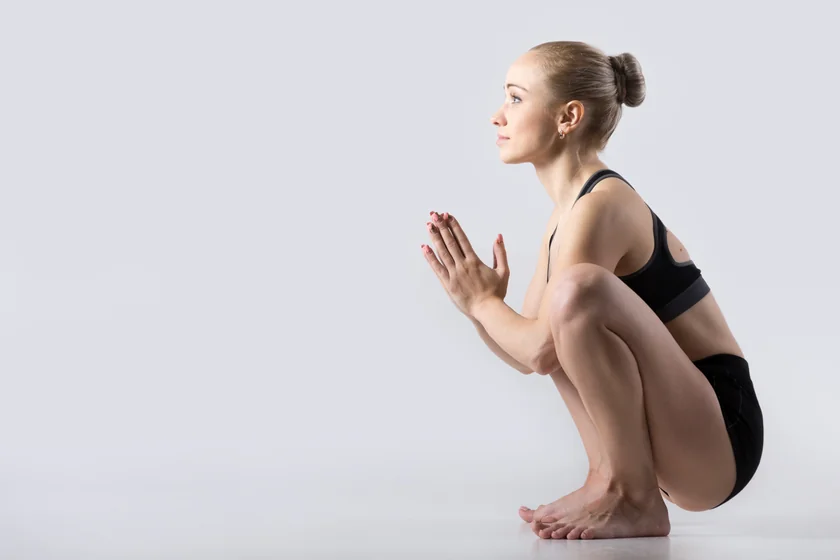
Malasana (Garland Pose) is a deep squat yoga pose that opens tight hips, releases tension in the lower back, and improves leg and ankle mobility.
This gentle, beginner-friendly pose can help with stiffness from prolonged sitting, support better posture, and even help you feel more calm and grounded when practiced regularly.
Malasana: Overview and Meaning of Garland Pose
Malasana, or Garland Pose, is a deep squat rooted in India’s ancient yogic and cultural traditions. It mirrors the natural resting position used in traditional Indian life — for cooking, eating, gardening, elimination, and even childbirth preparation.
Often practiced before meditation or pranayama, it steadies the body and focuses the mind, creating a sense of balance and calm. By activating the Muladhara (Root) Chakra, it fosters feelings of stability, security, and awareness. Spiritually, Malasana symbolizes humility and surrender. The circular shape of the pose, much like a garland, reflects unity, continuity, and the natural rhythm of life.
Anatomically, Malasana strengthens the glutes, quadriceps, calves, and deep hip rotators, while stretching the hip flexors, groin, lower back, and ankles — areas often tightened by prolonged sitting. The posture involves hip and knee flexion, ankle dorsiflexion, and gentle spinal elongation, with subtle engagement of the core and pelvic floor for support and balance.
Practiced regularly, Malasana enhances mobility, improves balance, supports digestion, and calms the nervous system, while restoring the body’s natural alignment and connection to breath.
At a Glance
- Sanskrit Name: Malasana
- Pronunciation: MAH-lah-sah-nah
- Pose Type: Deep squat / hip-opener
- Also Known As: Garland Pose, Yoga Squat
- Strengthens: Glutes, thighs, calves, pelvic floor, core
- Stretches: Hips, ankles, groin, lower back
Benefits of Malasana
The Garland Pose or yoga squat offers far more than a deep stretch. This ancient posture strengthens your lower body, supports digestion, benefits pelvic and reproductive health, and helps ground your mind and breath.
Let’s explore the wide-ranging Malasana squat benefits, grouped by category:
Physical Benefits of Malasana
- Strengthens the lower body: Builds strength in the glutes, quadriceps, and calves.
- Deeply opens the hips: This pose stretches the deep hip rotators, groin, and hip flexors.
- Improves ankle flexibility: Squatting encourages ankle dorsiflexion, which improves balance and gait.
- Supports pelvic health: The posture naturally engages the pelvic floor muscles, improving tone and circulation in the pelvic region. This is especially helpful for postpartum recovery.
- Aids digestion: Gently compresses the lower abdomen, stimulating digestion and potentially easing symptoms of bloating or constipation.
- Relieves lower back pain: Malasana helps reverse compression caused by desk work or poor posture.
- Enhances balance and body awareness: Improves proprioception (your awareness of body position in space), strengthening your balance and coordination over time.
Reproductive & Women's Health Benefits
- Prepares the body for childbirth: Malasana naturally opens the pelvic outlet, creating space and flexibility in the hips and sacrum.
- Tones the pelvic floor: Gentle engagement of the pelvic base muscles supports bladder health, bowel function, and reproductive organ alignment.
- Supports menstrual health: Regular practice may help regulate the menstrual cycle and reduce pelvic congestion.
- Eases pregnancy discomfort: For expectant mothers, Malasana can help relieve pressure in the lower back and hips, promoting circulation and reducing swelling.
Emotional and Spiritual Benefits
- Promotes grounding and stability: Malasana helps you feel centered and connected to the earth, easing feelings of restlessness or anxiety.
- Encourages emotional release: The deep hip opening invites the body to let go of stored emotions and tension, creating space for calm and ease.
- Activates the Root Chakra (Muladhara): By stimulating this energy center, the pose fosters a sense of safety, balance, and emotional resilience.
- Builds spiritual connection: Practicing Malasana regularly can deepen your sense of presence and remind you of your connection to the natural rhythms of life.
How to Do Malasana (Garland Pose): Step-by-Step Guide
Part 1: Preparing for Malasana
Before attempting Malasana, warm up the ankles, hips, and spine. These gentle preparatory poses will improve mobility, reduce strain, and help you sink deeper into the squat with proper alignment.
1. Ankle Circles
Gentle ankle movement loosens stiff ankles and prepares them for deep dorsiflexion.
- Stand tall and lift one foot.
- Roll the ankle in slow circles (10 times each direction).
- Switch sides.
2. Hip Circles
Hip circles help release tension in the groin and hip sockets.
- Stand with feet hip-width apart, hands on hips.
- Make wide, slow circles with the hips.
- Repeat 5–8 times in each direction.
3. Leg Swings
These mobilize the hip flexors and hamstrings.
- Stand near a wall for balance.
- Swing one leg forward and back like a pendulum.
- Repeat 10 times per leg.
4. Seated Spinal Twist
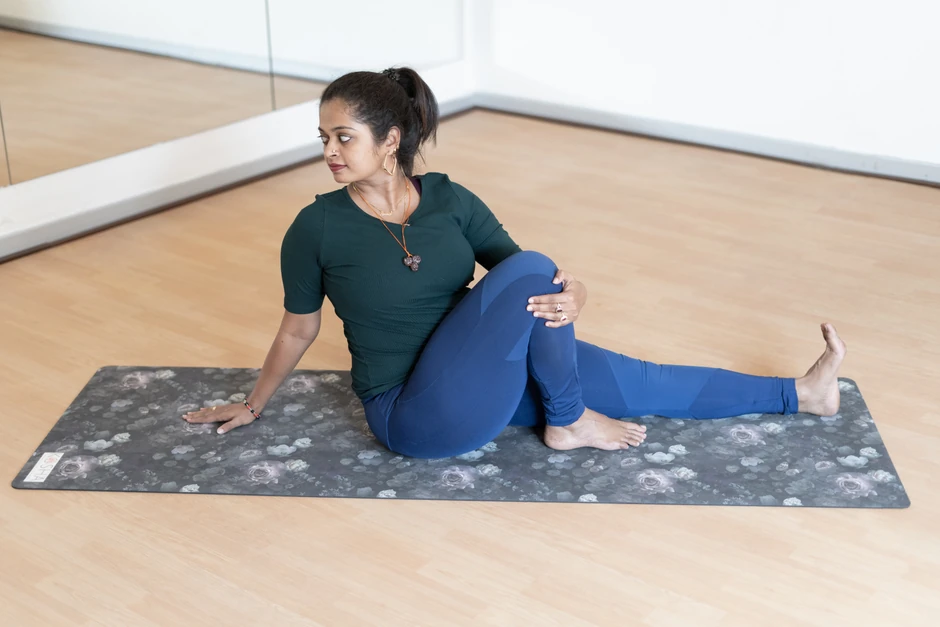
This gentle twist prepares the lower back and spine for upright posture.
- Sit cross-legged.
- Inhale and lengthen the spine.
- Exhale, twist gently to one side.
- Hold for 3–5 breaths.
- Switch sides.
5. Butterfly Pose (Baddha Konasana)
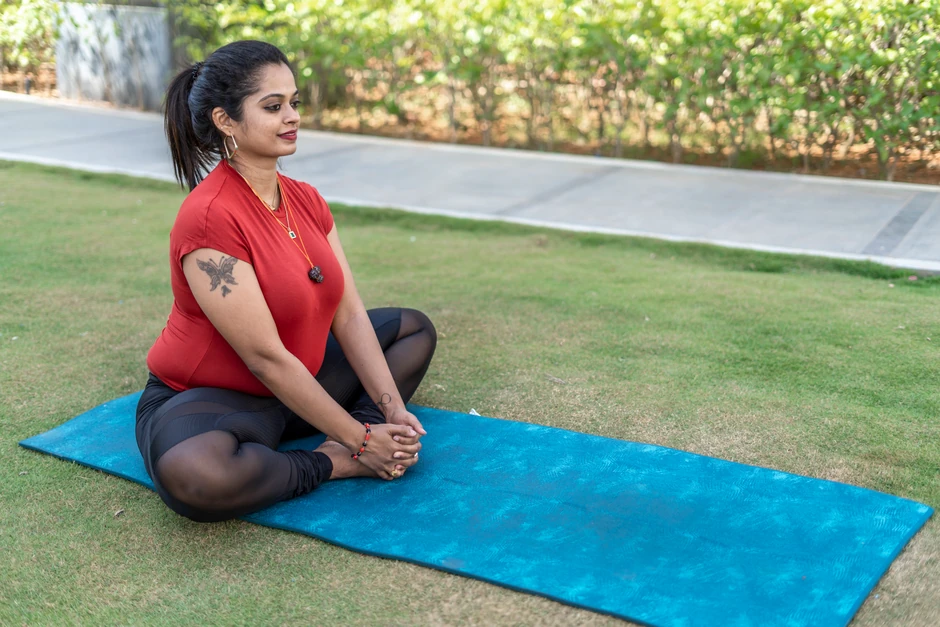
This pose gently opens the hips and inner thighs.
- Sit with soles of feet together, knees wide.
- Hold your feet, and gently flap your knees up and down.
- Hold for 30–60 seconds with relaxed breath.
Part 2: Step-by-Step Instructions for Malasana
- Stand with your feet slightly wider than hip-width and turn your toes out at about a 45-degree angle, letting your arms hang naturally by your sides. Take a few deep breaths to ground yourself and prepare for the squat.
- As you exhale, slowly bend your knees and lower your hips toward a squat, keeping your spine tall and chest lifted while distributing your weight evenly across both feet.
- Bring your hips as close to your heels as comfortably possible while allowing your thighs to separate naturally, tracking in line with your toes.
- Keep your heels grounded, using a rolled blanket or block if needed, and maintain a neutral spine without rounding your lower back.
- Bring your palms together at your heart in Anjali Mudra and place your elbows inside your knees, gently pushing the knees apart while pressing the knees inward against your elbows.
- Lengthen your spine upward from the base to the crown and lift your chest while keeping your shoulders relaxed.
- Engage your core and pelvic floor muscles to support the posture, and maintain a soft forward gaze with calm, steady breathing.
- Remain in the pose for 30–60 seconds if you’re a beginner, 1–2 minutes for intermediate practice, or up to 3–5 minutes for advanced practitioners, maintaining steady breath and focused awareness.
- To come out, place your hands on the floor for support, inhale, and slowly press into your feet to rise.
- Return to Tadasana (Mountain Pose) and take 2–3 deep breaths to reset your body and mind.
Part 3: Tips for Proper Alignment and Safety
- Keep heels grounded. Use a block, wedge, or rolled blanket under the heels if needed.
- Don’t let knees cave inward. Always track them over the toes.
- Engage your core and pelvic floor for better balance and lower-back support.
- Support your hips by sitting on a yoga block if your hips don’t comfortably lower to the heels.
- Use the wall for balance — either by facing the wall or using it behind you.
- Avoid hunching forward. Keep chest lifted and back elongated.
- Cool Down: After Malasana, cool down in:
- Supine Twist (Supta Matsyendrasana
- Supported Forward Fold (Paschimottanasana)
Learn Malasana step-by-step with a coach. Book a free 1-on-1 session today!
Malasana Variations
Garland Pose (Malasana) is accessible to beginners yet challenging enough for advanced practitioners. With the help of props, modifications, and creative transitions, you can adapt this deep squat to suit your body and evolve your practice over time.
Beginner Modifications
1. Supported Malasana
Builds strength gradually, removes pressure from knees and hips, and encourages better posture.
- Sit on a yoga block, bolster, or cushion under your sitting bones.
- Rest here, breathe deeply, and adjust the height as needed.
- Hold 2–3 minutes comfortably.
2. Wall-Assisted Malasana
Reduces effort in the core and ankles, making the pose more stable.
- Stand with your back lightly touching a wall and lower into Malasana, using the wall for balance.
- Keep chest lifted and knees aligned with toes.
- Hold and breathe steadily.
3. Heels-Elevated Malasana
Takes pressure off the ankles, allowing the spine to stay tall.
- Place a rolled blanket or yoga wedge under your heels if they lift off the floor.
- Squat into Malasana, keeping the spine long and knees tracking outward.
- Breathe steadily and hold.
Intermediate Variations
4. Malasana with Twist
Improves spinal mobility, aids digestion, and opens the chest.
- From Malasana, place one hand on the floor and lift the opposite arm toward the ceiling, twisting gently through the spine.
- Hold 30–45 seconds on each side, breathing slowly.
5. Dynamic Malasana
Builds leg strength, warms up joints, and enhances breath-coordination.
- Flow between standing and squatting; inhale to rise, exhale to lower into the squat.
- Repeat 8–12 times with mindful breathing.
6. Malasana Flow
Increases range of motion, coordination, and body heat.
- Move in a flowing sequence from Mountain Pose → Malasana → Forward Fold → Mountain Pose.
- Link movement with breath for a continuous flow.
Advanced Variations
7. Malasana on Tip Toes
Strengthens calves, challenges core stability, and improves balance.
- In Malasana, lift your heels off the mat and balance on the balls of your feet.
- Keep chest lifted, engage the core, and hold for a few breaths.
8. Malasana with Side Bend
Deepens lateral stretch, tones obliques, and increases hip flexibility.
- From Malasana, lean to one side, placing the hand on the floor next to your foot, stretching the opposite side.
- Hold 30 seconds, then switch sides.
Malasana (Garland Pose): Precautions and Contraindications
While Malasana (Garland Pose) offers many physical and therapeutic benefits, it’s important to approach the pose with awareness and modify or avoid it under certain conditions. Here’s what you should know to practice safely.
Avoid Malasana if you have:
- Acute Knee Injuries: Malasana puts deep pressure on the knees, which may worsen inflammation, pain, or instability in injured or healing joints.
- Severe Ankle Injuries: The squat requires considerable ankle dorsiflexion. If your ankle is recovering from a sprain, fracture, or surgery, avoid deep squatting without prior clearance.
- Recent Hip or Pelvis Surgery: This pose deeply engages and stretches the pelvic region. Practicing too soon post-surgery can strain healing tissues or misalign implants.
- Severe Lower Back Injury: Deep hip flexion can aggravate certain spinal conditions like herniated discs, sacroiliac joint dysfunction, or lumbar instability.
- Advanced Pregnancy Complications: While Malasana is often helpful during pregnancy, it should be avoided in high-risk pregnancies, placenta previa, or if advised against deep squatting by a healthcare provider.
- Severe Varicose Veins: Prolonged squatting may restrict blood flow and exacerbate venous pressure in the legs, especially in people with vascular concerns.
Practice with Caution in case of:
- Pregnancy (All Trimesters): Malasana is typically considered safe and beneficial during pregnancy, especially in the third trimester, for opening the pelvis. However, always monitor your comfort levels, avoid holding too long, and use props for support.
- Knee Osteoarthritis: The compression on the knees in Malasana can be intense. Support with a yoga block or bolster, and avoid forcing the depth.
- High Blood Pressure: Extended squatting may cause blood pooling or increase intra-abdominal pressure. Keep the hold gentle and brief, and avoid breath retention.
- Balance Disorders: Use a wall or chair for support if you're concerned about stability while descending or holding the squat.
- Limited Ankle Mobility: Props like a wedge or rolled blanket under the heels make the pose more accessible while reducing strain.
Safety Tips for Malasana
- Go slow: Let your body open gradually; avoid forcing depth to prevent strain.
- Use props: Elevate heels, sit on a block, or use wall support for comfort and alignment.
- Listen to your body: Stop if you feel knee pain, hip pinching, dizziness, or lower back discomfort.
- Warm up first: Mobilize hips, ankles, and spine before practicing.
- Progress gradually: Increase hold time and depth week by week, starting around 30 seconds.
- Get guidance: A qualified instructor can suggest modifications and ensure safe practice.
Book a free 1-on-1 session for personalized guidance on Garland Pose today!
Malasana (Garland Pose): Related Poses
These poses complement the hip-opening and grounding benefits of Malasana while offering new ways to stretch and strengthen the lower body:
1. Butterfly Pose (Baddha Konasana)
This seated pose gently opens the hips and inner thighs, preparing the body for deeper squats.
- Sit with your legs extended forward.
- Bend your knees, bringing the soles of your feet together.
- Hold your feet with your hands and let your knees drop toward the floor.
- Keep your spine tall and breathe deeply for 30–60 seconds.
2. Pigeon Pose (Eka Pada Rajakapotasana)
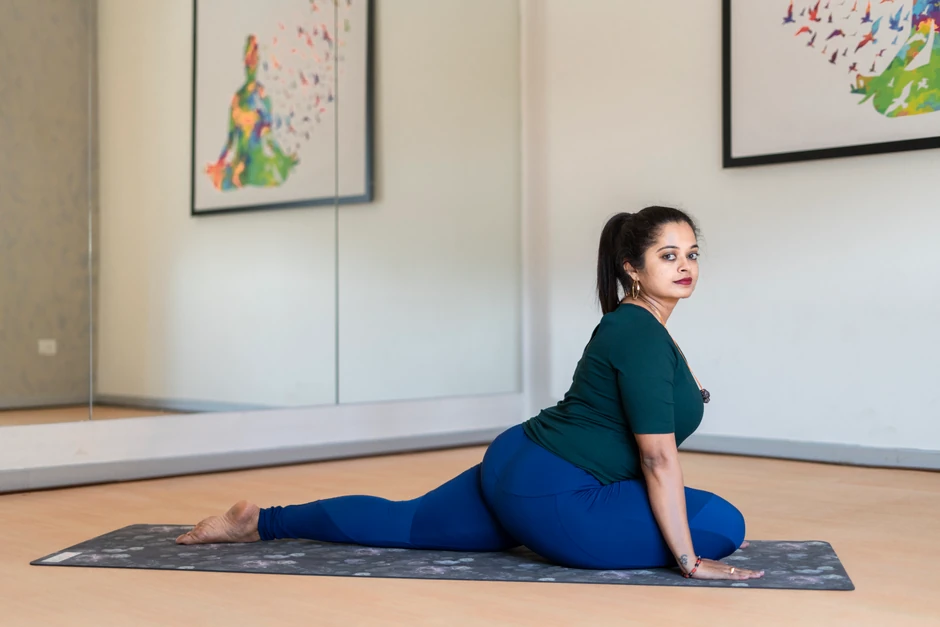
This deep hip opener targets the outer hips and glutes, relieving tension from prolonged sitting.
- Begin in a plank or downward dog position.
- Bring your right knee forward toward your right wrist and extend your left leg behind you.
- Square your hips forward and lengthen your spine.
- Hold for 30–60 seconds and switch sides.
3. Low Lunge (Anjaneyasana)
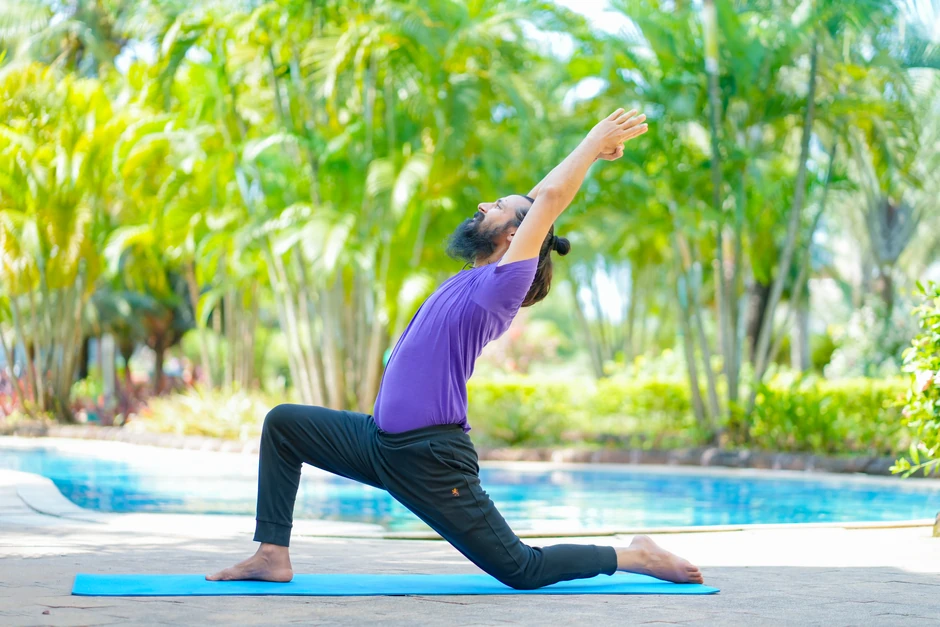
This pose stretches the hip flexors and strengthens the legs, supporting balance in squats.
- Step your right foot forward into a lunge, keeping the left knee on the mat.
- Sink your hips down while keeping your chest lifted.
- Reach your arms overhead or keep them on your front thigh.
- Hold for 20–30 seconds and repeat on the other side.
Enjoy a Free 1-on-1 Session with a Coach!
Receive personalized guidance tailored to your unique fitness goals, live with a dedicated coach—no credit card required.
Frequently Asked Questions
Malasana, or Garland Pose, is excellent for opening the hips, building leg strength, and improving flexibility in the ankles. It also stimulates the digestive organs, supports pelvic health, and helps counteract the stiffness caused by prolonged sitting or sedentary habits.
Yes! Malasana is beginner-friendly when practiced with the right modifications. Try using a yoga block or cushion under your hips, place a rolled blanket under your heels, or use a wall for balance. Focus on comfort over depth.
In most cases, yes. Malasana can help prepare the body for childbirth by opening the pelvis and releasing tension in the hips and lower back. However, it’s best to check with your doctor first, and always use props for support and safety.
The Malasana squat strengthens the glutes, thighs, and calves while deeply opening the hips. It improves ankle mobility, stimulates digestion, and engages the pelvic floor—making it beneficial for core stability and reproductive health.
Unlike gym-style squats focused on strength and repetition, Malasana is a static, grounding yoga pose. It emphasizes mobility, breath, and hip opening, often practiced with hands in prayer position (Anjali Mudra) and mindful stillness.
Yes. Malasana (Garland Pose) gently massages the abdominal organs, stimulates digestion, and improves bowel movement, making it helpful for relieving mild constipation.


.webp)
%20(7).jpg)
