What is Kurmasana (Tortoise Pose)?
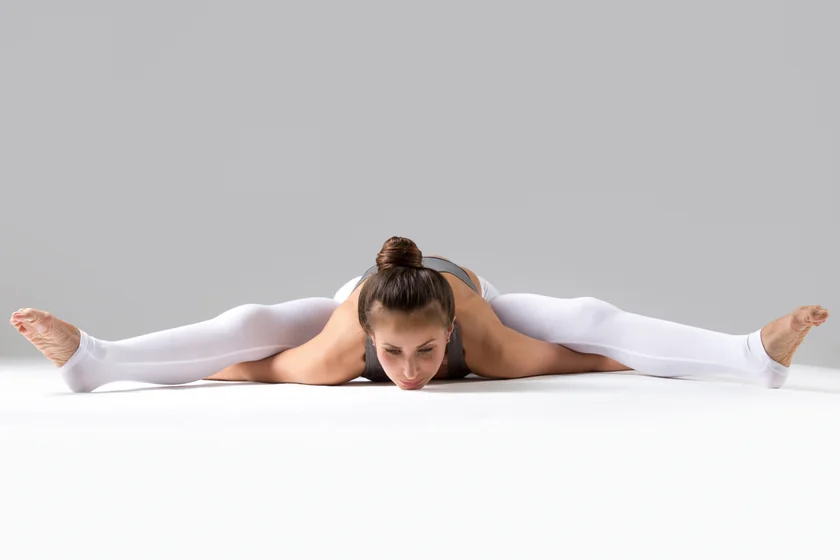
Kurmasana is also known as Tortoise Pose or Turtle Pose. It is a seated intense forward bending pose suitable for intermediate to advanced yoga practitioners with a high level of mobility and flexibility.
This pose involves starting from a seated wide leg stance, lengthening your spine, bending your knees, slowly dropping your upper body toward the floor, and sliding your arms below your knees.
The longer you can hold this position, the higher level of flexibility you’ll achieve in your spine, shoulders, hamstrings, and glutes.
Overview & Etymology
Kurmasana comes from Sanskrit words, 'Kurma' meaning Turtle or tortoise, and 'Asana' meaning pose or posture.
This pose is described as Uttana Kurmasana in ancient Hatha yoga texts like 7th-century Ahirbudhnya Saṃhitā and 19th-century Sritattvanidhi and Jogapradipika.
Later in the 20th century, B. K. S. Iyengar introduced the Tortoise pose as a modern yoga pose in his 1966 book Light on Yoga, and dedicated this to the 2nd avatar (incarnation) of Lord Vishnu, Kurma (Half-Human and Half-Tortoise).
Kurmasana symbolizes Patanjali's fifth element of Ashtanga yoga sutras -- Pratyahara.
Pratyahara is a stage in yoga where one learns to pull away their senses from this material world and shut down any distracting sensory stimulation, just like a tortoise does by pulling itself into its shell.
With this shutting down of material senses, you can learn to take control of your feelings and help your brain become more conscious of the supreme self.
Sanskrit Name: कूर्मासन Pronunciation: KOOR-MAH-SAH-NAH
Pose Type: Seated, Forward Bending Also known as: Tortoise Pose, or Turtle Pose
Strengthens: Spine, Back, and Arms Stretches: Spine, Shoulders, Hamstrings, and Glutes
Health Benefits of Kurmasana
Improves posture.
Boosts metabolism.
Reduces insomnia.
Tones the core and legs.
Therapeutic for the back.
Enhances physical flexibility.
Activates abdominal organs.
Improves blood circulation in the spine.
Lengthens and massages the lumbar region.
Alleviates mild symptoms related to sciatic nerve.
When to Avoid Performing Kurmasana
Avoid during pregnancy.
Avoid if you have sciatica.
Avoid if you have a herniated disc.
Avoid if you have chronic back pain.
Avoid if you have knee arthritis.
Avoid if you are recovering from a recent injury or surgery.
How to do Kurmasana (Tortoise Pose)
We have divided the Kurmasana practice into a few different phases to help you get started in your practice.
Part 1 - Preparatory Poses for Kurmasana
Tortoise pose is an advanced yoga posture that requires activation of your full body. Here are some warm-up poses to help you get ready:
1. Uttanasana (Standing Forward Bend) - Start with Mountain pose. Take a few breaths here to stabilize your core and lengthen your spine. Inhale as you stand with your feet hip-width apart and place your hands at the side of your waist.
.jpg")
Exhale and start to hinge your upper body forward. Stretch your arms overhead and let them touch the ground. Hold this position until your glutes and hamstrings feel activated, and your spine, arms, and shoulders feel more flexible and relaxed.
2. Upavistha Konasana (Wide-Angle Seated Forward Bend) - Sit on your mat and spread your legs wide on each side. Inhale, flex your arms overhead for a few seconds to activate your whole upper body.
.png")
Exhale and start to bend forward toward the ground. Rest your palms, forehead, chest, and core on the floor completely. Hold this pose for 2-3 minutes to get your spine, glutes, and shoulders stimulated with blood circulation.
3. Garudasana (Eagle Pose) - Start by standing on one leg. Cross your right knee over your left kneecap, and bend your left leg. If your flexibility allows, then wrap your left foot behind your right calf muscle, creating a complete eagle legs formation.
Keep your glutes in a neutral position, and elongate your spine by lifting your chest up.
.jpg")
Next, bring your right arm over your left and cross your elbows. Bring the palms of both your arms together to clasp each other tightly and form the eagle arms formation.
Keep your elbows at your shoulder level and hold this pose as long as it feels comfortable. Release and repeat on the other side. This is a great way to activate flexibility and strength in your limbs and core.
Part 2: Step-by-Step Instructions to Perform Kurmasana
The following are steps to practice Tortoise or Turtle pose:
Step 1- Start from a seated position. Bend and spread your legs out at the sides, so each leg makes a triangle with the ground.
Step 2- Bring your torso forward and close to the ground by bending from your low back. Don't rest your head entirely on the floor. Stay close to the ground for a few seconds.
Step 3- Bring your chest forward, roll your shoulders, and thread each arm under your legs at your sides. Scooch your arms slowly under your legs so that your shoulders are right below your knees.
Step 4- Breathe and hold this semi-tortoise pose for a few seconds. Withdraw all of your senses, exhale and then gently lower your legs, arms, chest, and forehead completely to the ground.
Step 5- Take deep breaths and focus on the stretch you feel in your whole body.
Step 6- Count 5 to 10 deep breaths and then slowly release the pose. Bend your legs slightly, release your arms from below your legs, and relax in Seated Forward Bend pose.
Breath Awareness:
Inhale: While sitting with your legs spread wide.
Exhale: When your torso is bending forward toward the ground
Inhale & Exhale: While holding the position for a few seconds.
Performance Duration for Beginners: Hold Kurmasana for 5 to 6 deep breaths.
Performance Duration for Advanced: Hold Kurmasana for 5 to 10 deep breaths or as long as it feels comfortable.
Part 3: Things to Keep in Mind
The Tortoise pose practice requires a lot of awareness among all of your senses. Misalignment can lead to negative after-effects, so here are a few posture cures to keep in mind while performing Kurmasana:
Avoid straining your knees: Your feet should be flexed, but do not lock your knee joints to achieve this. Locking your knee joints while strengthening your legs can put unnecessary pressure on your knee joints. This can lead to severe injury or even damage to your knees. To prevent this, maintain a soft bend in your knees and bring your legs straight to the ground very slowly.
Release slowly: Since your spine, neck, and shoulders are in a very compromised position, it’s important to be mindful of your technique while releasing this pose. Releasing too quickly can increase your chance of injury, so focus on your breathing and release the pose very gently.
Part 4: Relaxing Poses After Kurmasana
Here are a few counter yoga poses you can perform after your Tortoise pose practice for faster recovery and a healthy spine.
1. Halasana (Plough Pose): Lie on your back with your legs and feet together and palms facing down on either side. Press down with your hands on the mat, lift your legs up, and then over your head. Ensure that your toes touch the floor. You can also put your hands on your low back to stabilize your core.
.jpg")
Breathe here in this position for a few seconds. Finally, exhale as you press your palms again into the ground to unroll your spine back on the mat. Lie in Corpse pose for a few seconds until your whole body relaxes. This will allow your lower back, shoulders, traps, and neck to rest.
2. Ananda Balasana (Happy Baby Pose): Continue from Corpse position. Lie on your back, ensuring that there is no gap in between your tailbone and the ground. Lift your legs up, making a 90-degree angle with the ground. Bend your legs, and grab the outer edges of both of your feet on each side.
.jpg")
Now, push down toward the floor, so your knees are aligned with your armpits. Hold this pose until you feel relaxed in your spine and lower back. You can also gently rock from side to side, making it a super Happy Baby pose for faster recovery.
Kurmasana Variations to Consider
Below are some posture variations for beginners and advanced yogis to try during their Tortoise pose practice:
1. Ardha Kurmasana (Half Tortoise Pose): This is a beginner-friendly variation of Tortoise pose. Start by sitting in Vajrasana position. Inhale deeply and flex your arms.
.jpg")
Next, with an elongated exhale, bend your upper body forward and rest your arms and forehead on the ground. This variation will build strength in your spine and legs for the main pose practice.
2. Kurmasana with arms at the back:
Get into the main Tortoise pose, focus on your breathing, and slowly stretch your arms behind you so both of your hands can clasp together.
.png")
This is an intermediate-to-advanced level variation, which will help you increase upper body flexibility, especially in your shoulders.
3. Supta Kurmasana (Reclining Turtle Pose): Get into the basic Kurmasana position and prep up your whole body for this advanced variation by taking a few deep breaths. Exhale while holding your palms behind your back.
.jpg")
Stay focused, keep breathing, gently take one leg at a time and wrap each foot behind your neck. Hold this deep twisting variation for 10 to 30 seconds, then release.
Relax in Seated Forward Bend and repeat the same process with a change in the leg placement.

Enjoy a Free 1-on-1 Session with a Coach!
Receive personalized guidance tailored to your unique fitness goals, live with a dedicated coach—no credit card required.
Frequently Asked Questions about Kurmasana
Beginners should not perform Kurumasana when just getting started with their practice. Instead, beginners should focus on their full body flexibility and try to modify the Tortoise pose with props to increase their level of flexibility.
The different preparatory poses in Kurmasana include Mountain pose Standing Forward Bend, Wide-Angle Seated Forward Bend, and Eagle pose.
Uttana Kurmasana or Upside-Down Tortoise pose will strengthen your legs, engage your core, relax your spine, stimulate your adrenal gland, and massage your kidneys and reproductive organs.
Supta Kurmasana, or Sleeping Tortoise pose, is performed by getting into the primary Tortoise position and staying there for five deep breaths to stabilize your mind and body. Then, gently externally rotate your hips and try to bring your legs over your head. Clasp your hands behind your back while controlling your breath.
Half Tortoise pose, Sleeping Tortoise pose, and Upside-Down Tortoise pose are three commonly practiced variations in Kurmasana.
Practitioners with herniated discs, sciatica, chronic low back pain, and inflammatory knee arthritis should avoid the Kurmasana pose. Also, women who are pregnant or postpartum should temporarily avoid this practice.
Related Articles on Padmasana

Yin vs Restorative Yoga: What’s the Difference?
Yin vs Restorative Yoga explained. Compare intensity, hold times, props, and benefits. Learn the key differences and choose the right slow yoga style for you.
.webp)
Detox Yoga Sequence: Refresh and Renew After Holiday Indulgence
Refresh and renew after holiday indulgence with this 12-pose detox yoga sequence. Gentle twists and mindful stretches for digestion, circulation, and energy.
%20(7).webp)
Yoga for Gut Health: How This Ancient Practice Heals Your Gut-Brain Connection
Discover how yoga improves gut health through the gut-brain connection. Learn 8 poses to balance microbiomes, reduce inflammation, and heal your digestive system.