What is Janu Sirsasana (Head-to-Knee Pose)?
Head-to-Knee Pose, also known as Janu Sirsasana, is a seated forward fold that combines hamstring stretching with gentle hip opening. Pronounced JAH-new shear-SHAHS-uh-nuh, this pose is commonly practiced in Hatha, Yin, and Ashtanga yoga to improve flexibility in the legs and hips while helping the body and mind relax.
Head-to-Knee Pose: Overview and Meaning of Janu Sirsasana
Head-to-Knee Pose comes from the Sanskrit words janu (knee), sirsa or shirsha (head), and asana (pose). The name describes the general direction of the fold, where the torso moves toward the extended leg. In practice, however, the focus is not on bringing the head to the knee, but on maintaining length through the spine and folding in a controlled, comfortable way.
Janu Sirsasana is rooted in traditional Hatha Yoga and became more widely practiced through modern systems like Ashtanga Yoga, where variations A, B, and C are included in the Primary Series. Today, it is commonly practiced across Hatha, Yin, and restorative yoga because of its adaptable and calming nature. In active sequences, it prepares the body for deeper forward folds, while in slower practices, it is often held longer to support flexibility, relaxation, and recovery.
Anatomically, Head-to-Knee Pose combines hamstring stretching, hip opening, and spinal lengthening. The extended leg receives a deep stretch through the back of the thigh, while the bent leg opens the inner thigh and groin. As the torso folds forward, the spine lengthens and the body settles into a supported, asymmetrical position. This combination makes the pose both effective and accessible, while also helping highlight differences between the two sides of the body.
At a Glance
- English Name: Head-to-Knee Pose
- Sanskrit Name: जानु शीर्षासन (Janu Sirsasana)
- Pronunciation: JAH-new shear-SHAHS-uh-nuh
- Pose Type: Seated forward fold, hip opener, hamstring stretch
- Level: Beginner to Intermediate
- Duration: 1–5 minutes per side
- Best Time: After warm-up or hip-opening practice, during seated sequences, or in evening practice
- Main Benefits: Stretches hamstrings, opens hips and groins, lengthens the spine, calms the nervous system
- Chakras: Root (Muladhara), Sacral (Svadhisthana), Solar Plexus (Manipura)
Benefits of Head-to-Knee Pose (Janu Sirsasana)
Head-to-Knee Pose is a deeply effective seated forward fold that combines hamstring stretching, hip opening, and spinal lengthening while encouraging the body to relax and slow down.
Physical Benefits
This pose works through the legs, hips, spine, and abdomen in a balanced way.
- Stretches the hamstrings and improves flexibility: The extended leg receives a deep stretch through the back of the thigh, helping improve overall mobility.
- Opens the hips and groin: The bent leg creates space through the inner thigh and hip, supporting better range of motion.
- Lengthens the spine and eases lower-back tension: A supported forward fold can help release tightness in the back body.
- Supports digestion: Gentle compression through the abdomen may help stimulate digestive function.
- Relieves muscular tension: Can help reduce tightness in the hips, legs, and lower back when practiced with control.
Mental and Emotional Benefits
Like many forward folds, Janu Sirsasana has a naturally calming effect.
- Calms the nervous system: The forward-folding shape encourages the body to settle and relax.
- Reduces stress and mental fatigue: Helps create a more grounded and restful state.
- Improves focus and inward awareness: Encourages attention to move away from external distractions.
- Builds patience and body awareness: The asymmetry of the pose highlights differences between sides, promoting mindful practice.
Energetic and Holistic Benefits
In traditional yoga, the Head-to-Knee Pose is associated with grounding and inward focus.
- Supports grounding and stability: The seated base and forward fold create a steady, rooted feeling.
- Encourages release and relaxation: The hip and groin opening is often linked with letting go of stored tension.
- Activates the abdominal center: Gentle compression supports internal awareness and balance.
- Promotes pratyahara (inward focus): Helps shift attention inward and reduce sensory overload.
Because this pose includes forward folding and knee rotation, it should be practiced with care if you have hamstring injuries, knee pain, or lower-back issues.
Want to experience the full benefits of guided forward folds? Book a free 1-on-1 session with a certified Indian yoga teacher today.
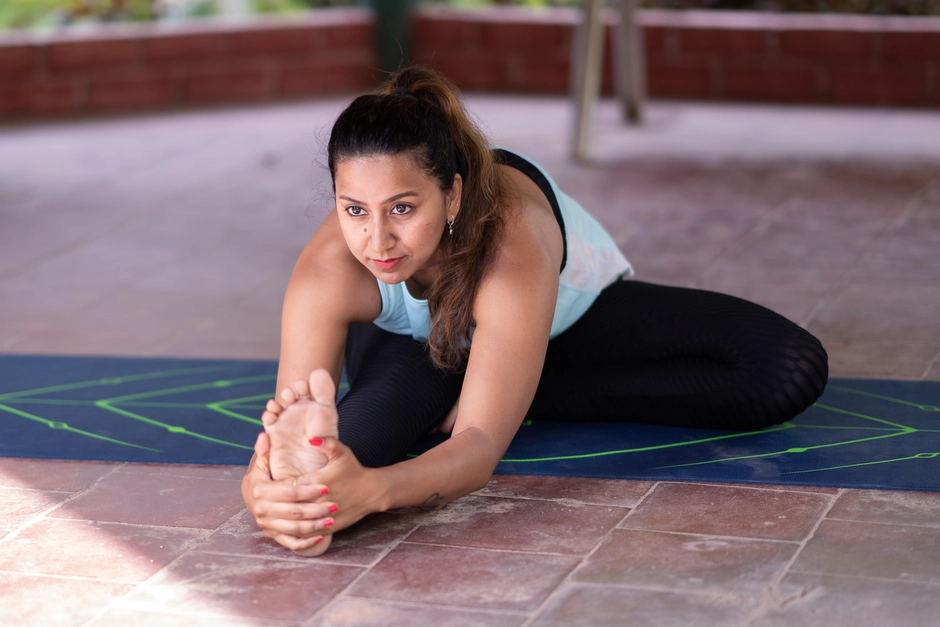
How to Do Head-to-Knee Pose (Janu Sirsasana): Step-by-Step Guide
This step-by-step guide will help you practice Head-to-Knee Pose with better alignment and less strain. The goal is not to force depth, but to lengthen the spine and fold in a way your body can comfortably support.
Part 1: Preparing for the Pose
To practice comfortably, make sure your hips and hamstrings are supported. Sit on a folded blanket if your lower back rounds, and keep a strap nearby if reaching the foot strains your posture. A short warm-up with gentle hip openers and hamstring stretches can make the pose more effective.
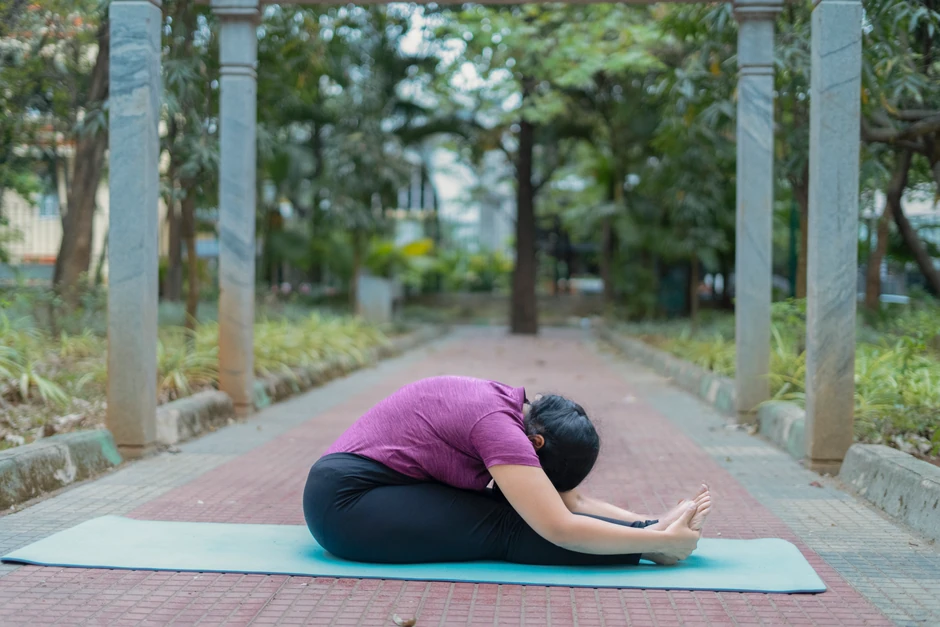
Part 2: How to Do Head-to-Knee Pose: Step-by-Step Instructions
- Start in Staff Pose (Dandasana) with both legs extended. Sit on a folded blanket if needed to keep the spine upright.
- Bend your right knee and place the sole of the foot against the inner left thigh. Let the knee relax naturally without forcing it down.
- Turn your torso toward the extended leg and gently flex the foot. Keep the leg active without locking the knee.
- Inhale and lengthen the spine, reaching upward to create space through the torso.
- Exhale and hinge forward from the hips, leading with the chest. Place your hands on the shin, ankle, foot, or a strap.
- Pause where you can maintain length in the spine and steady breathing. Soften the shoulders, neck, and face. Hold for:
- Beginners: 30–60 seconds
- Intermediate: 1–3 minutes
- Restorative/Yin: 3–5 minutes
- To come out, inhale and lift the torso slowly. Straighten the bent leg and return to Staff Pose before switching sides.
Common Mistakes and Alignment Tips
- Rounding the spine reduces effectiveness and strains the lower back.
Tip: Sit on a blanket and lead with the chest. - Forcing the bent knee down can strain the knee joint.
Tip: Let the knee rest naturally or support it. - Locking the extended leg can stress the knee.
Tip: Keep the leg active with a slight softness. - Pulling with the arms creates tension in the shoulders and neck.
Tip: Use the hands or strap for support, not force. - Collapsing the chest: Limits breath and spinal length.
Tip: Think of folding forward, not downward.
Practiced with patience and support, Head-to-Knee Pose becomes a steady, therapeutic forward fold that builds flexibility while helping the body and mind relax.
Build flexibility to perform Janu Sirsasana with ease in these free and guided group classes.
Janu Sirsasana Variations
Head-to-Knee Pose can be adapted for different levels of flexibility, hip mobility, and comfort. Some variations make the pose more accessible for beginners, while others deepen the hip opening or add a twist through the side body.
Beginner Modifications
1. Elevated Hips
Helps the pelvis tilt forward more easily, making the pose safer and more comfortable for tight hips and hamstrings.
- Sit on one or two folded blankets in Staff Pose.
- Bend one knee and place the foot against the inner thigh.
- Lengthen the spine and fold forward over the extended leg.
- Stay lifted through the chest as you breathe.
2. Strap Around the Extended Foot
Allows you to keep a long spine without straining to reach the foot.
- Loop a yoga strap around the ball of the extended foot.
- Hold one end of the strap in each hand.
- Inhale to lengthen the spine and exhale to fold forward.
- Use the strap for support rather than pulling aggressively.
3. Micro-Bend in the Extended Knee
Protects the hamstring and knee joint when the back of the leg feels very tight.
- Extend one leg forward.
- Keep a slight bend in that knee rather than locking it straight.
- Lengthen the spine and fold forward.
- Maintain the soft bend as long as it supports the pose.
Classical Variations: Janu Sirsasana A, B, and C
4. Janu Sirsasana A
The classic version balances hamstring stretch, hip opening, and forward folding in the most accessible form.
- Sit with one leg extended and the other bent to the side.
- Place the bent foot against the inner thigh of the extended leg.
- Inhale to lengthen the spine.
- Exhale and fold forward over the straight leg.
5. Janu Sirsasana B
Deepens hip opening and groin release by changing the position of the bent leg.
- Bend one knee and bring the heel underneath the same-side sitting bone.
- Let the body sit partially on the heel.
- Extend the opposite leg straight forward.
- Lengthen the spine and fold over the extended leg.
6. Janu Sirsasana C
Adds deeper ankle, foot, and hip work while intensifying the seated setup.
- Bend one knee and tuck the toes of that foot under.
- Sit carefully on the heel or ball of the foot as appropriate.
- Extend the opposite leg forward.
- Fold toward the extended leg with steady breath and patience.
Props and Accessibility
- Sit on a folded blanket if the pelvis tips backward.
- Use a strap if reaching the foot rounds the spine.
- Place a blanket under the bent knee if the hip feels tight or unsupported.
- Rest on a bolster or blocks for a more restorative version.
- Keep a micro-bend in the extended knee if the hamstring feels strained.
- Move into Janu Sirsasana B and C gradually, only after the classic version feels steady and comfortable.
These variations make Head-to-Knee Pose more adaptable and sustainable, whether you are building flexibility, calming the mind, or exploring deeper classical forms.
Head-to-Knee Pose (Janu Sirsasana) Precautions & Contraindications
Head-to-Knee Pose is generally calming and therapeutic, but it still needs to be practiced with care—especially if you have hamstring, knee, hip, or lower-back sensitivity. The goal is steady length and support, not forcing the fold.
Avoid the head-to-knee pose if you have:
- Acute hamstring strain or tear
- Acute knee injury or severe knee pain
- Herniated disc or severe disc irritation, especially if forward bending worsens symptoms
- Severe or uncontrolled sciatic pain
- Acute lower-back injury
- Diarrhea or significant abdominal discomfort
- Late pregnancy without appropriate modifications
Practice With Caution and Modifications in case of:
- Tight hamstrings: Sit on a folded blanket, use a strap around the foot, and avoid pulling yourself deeper than your breath can support.
- Knee sensitivity: Support the bent knee with a blanket or bolster and never push it toward the floor.
- Lower-back sensitivity: Elevate the hips more than usual, keep the fold smaller, and focus on spinal length rather than depth.
- Hip tightness: Let the bent knee stay higher if needed and support it fully. The hip should open gradually, not by force.
- Pregnancy: Use a wider leg position, keep the torso lifted or supported, and avoid compressing the belly. Later in pregnancy, a more open or side-supported version is usually safer. Read our complete prenatal yoga guide here.
- Ankle discomfort in B or C variations: Stay with Janu Sirsasana A until the hips, knees, and ankles are ready for deeper classical forms.
General Safety Guidelines
- Sit on support if your pelvis rounds backward.
- Lengthen the spine before folding.
- Hinge from the hips rather than collapsing through the waist.
- Keep the bent knee supported if needed.
- Use props freely.
- Breathe naturally throughout.
- Ease out immediately if you feel sharp or unstable sensation.
When to Consult a Healthcare Provider
Speak with a healthcare professional before practicing if you have:
- A current or recent hamstring injury.
- Ongoing knee pain or instability.
- Disc issues or recurring lower-back pain.
- Sciatica that worsens in forward folds.
- Pregnancy with pelvic or abdominal discomfort.
- Any condition that makes seated forward folding painful or unsafe.
Progressing Safely
A good progression usually looks like this:
- Start with Janu Sirsasana A using a blanket and strap.
- Add torso support for longer holds.
- Build comfort in the hips and hamstrings gradually.
- Explore B and C variations only after A feels steady and pain-free.
- Approach Parivrtta Janu Sirsasana separately, since it emphasizes side bending rather than a straight fold.
Head-to-Knee Pose becomes more therapeutic when it is adapted to your body. A smaller, better-supported version is far more effective than a deeper shape reached with strain.
To make the most of your practice, book a free 1-on-1 session today!
Related Yoga Poses
These poses complement Janu Sirsasana by improving hamstring flexibility, hip mobility, and forward-fold depth.
1. Paschimottanasana (Seated Forward Fold)
A symmetrical forward fold that deepens hamstring stretch and spinal lengthening.
- Sit with both legs extended straight in front.
- Inhale and lengthen the spine upward.
- Exhale and hinge forward from the hips.
- Hold the shins, ankles, or feet.
- Keep the chest lifted and breathe steadily.
2. Triang Mukhaikapada Paschimottanasana (Three-Limbed One-Legged Forward Fold)
Adds a deeper quadriceps and knee stretch along with a forward fold.
- Sit with one leg extended and the other folded back beside the hip.
- Keep both hips grounded evenly.
- Inhale to lengthen the spine.
- Exhale and fold over the extended leg.
- Hold and breathe, then switch sides.
3. Kurmasana (Tortoise Pose)
An advanced forward fold that increases hip opening and inward focus.
- Sit with legs extended and slightly apart.
- Bend the knees and slide the arms under the legs.
- Extend the legs forward while lowering the torso.
- Rest the chest and head toward the floor.
- Stay relaxed and breathe deeply.
4. Parivrtta Janu Sirsasana (Revolved Head-to-Knee Pose)
A side-bending variation that opens the ribs, spine, and hips.
- Sit with one leg extended and the other bent.
- Turn slightly toward the bent leg.
- Inhale and reach the arm upward.
- Exhale and side-bend over the extended leg.
- Keep both sides of the waist long and breathe steadily.

Enjoy a Free 1-on-1 Session with a Coach!
Receive personalized guidance tailored to your unique fitness goals, live with a dedicated coach—no credit card required.
Frequently Asked Questions
Janu Sirsasana helps stretch the hamstrings, open the hips and groins, lengthen the spine, and calm the nervous system. It may also support digestion, reduce stress, improve sleep readiness, and ease mild lower-back or menstrual discomfort when practiced with proper support.
Parivrtta Janu Sirsasana, also called Revolved Head-to-Knee Pose, is a side-bending and twisting variation of the pose. Instead of folding straight over the extended leg, the torso arcs away from it, and the top arm reaches overhead. This version emphasizes the side body, rib cage, and shoulder opening more than the traditional forward fold.
In active yoga practice, the Head-to-Knee Pose is often held for 30 seconds to 1 minute or about 5–10 breaths per side. In slower or restorative practice, it may be held for 1–3 minutes, and in Yin Yoga it can be held for 3–5 minutes with support.
Yes. Head-to-Knee Pose is very accessible for beginners when props are used well. Sitting on a folded blanket, using a strap around the foot, supporting the bent knee, or resting the torso on a bolster can make the pose much safer and more comfortable.
Janu Sirsasana is an asymmetrical seated forward fold with one leg bent and one leg extended, so it combines hamstring stretching with hip opening. Paschimottanasana is a symmetrical forward fold with both legs straight. Because one knee is bent, Janu Sirsasana is often more accessible and can feel gentler on the lower back and hamstrings.
Related Articles on Padmasana

Yin vs Restorative Yoga: What’s the Difference?
Yin vs Restorative Yoga explained. Compare intensity, hold times, props, and benefits. Learn the key differences and choose the right slow yoga style for you.
.webp)
Detox Yoga Sequence: Refresh and Renew After Holiday Indulgence
Refresh and renew after holiday indulgence with this 12-pose detox yoga sequence. Gentle twists and mindful stretches for digestion, circulation, and energy.
%20(7).webp)
Yoga for Gut Health: How This Ancient Practice Heals Your Gut-Brain Connection
Discover how yoga improves gut health through the gut-brain connection. Learn 8 poses to balance microbiomes, reduce inflammation, and heal your digestive system.