What is Hanumanasana (Monkey Pose)?
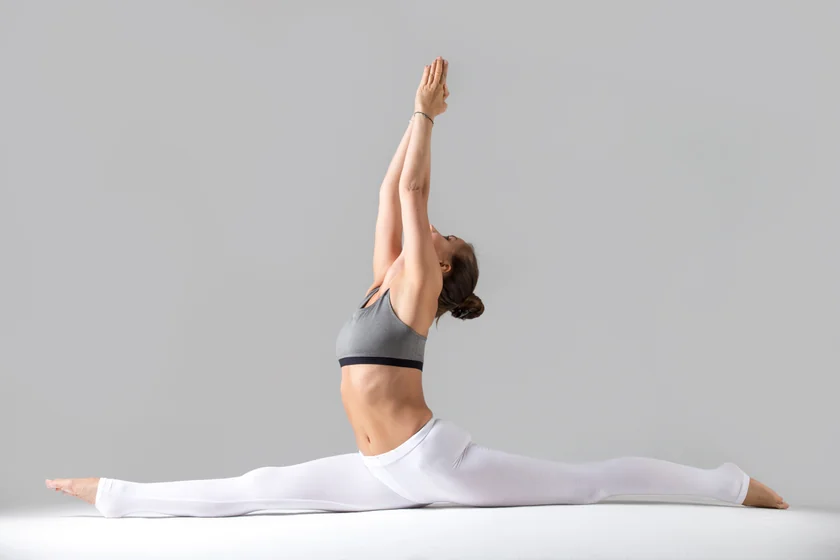
Hanumanasana, or Monkey Pose, is an excellent hip-opener yoga pose for advanced-level yogis. This pose will increase the blood circulation in your legs and help you gain flexibility and strength in your leg muscles.
This pose is not ideal for beginners and should only be performed by intermediate-to-advanced yogis with good hip opening strength in their lower body.
You’ll start from a seated position by activating your inner thighs and glutes. While focusing on your breath, you’ll gently extend your legs on both sides as far as your body allows.
Monkey pose increases blood flow in the legs and helps relieve tension.
Overview & Etymology
The name Hanumanasana comes from the Sanskrit words 'Hanuman' meaning Hindu Monkey God, and 'Asana' meaning pose or posture.
In the Hindu epic Ramayana, Hanuman is one of the main characters. Hanuman is the son of Vayu (The Wind God) and nymph Anjana, and he is known as a passionate devotee of Lord Ram.
Lord Hanuman was blessed with magical powers, like transforming his body from extremely small to enormous. He could travel across oceans by flying, was powerful like a rock, and flexible like a monkey.
So, to symbolize Lord Hanumans' mobility, strength, and flexibility, the Seated Split pose is named after him.
There is no detailed description of Hanumanasana in any ancient Hatha yoga texts, which tells us that Monkey pose is a modern yoga pose. It was first introduced in the late 20th century in the 1970 book ‘First Steps to Higher Yoga’ by Swami Yogesvarananda.
Sanskrit Name: हनुमानासन Pronunciation: hah-nu-mahn-ahs-anna
Pose Type: Seated Splits, Hip-Opener Also known as: Monkey Pose
Strengthens: Inner Thighs, Hip-Flexors, Glutes, Groin, Hamstrings, and Spine
Stretches: Inner Thighs, Hip-Flexors, Glutes, Groin, and Hamstrings
Health Benefits of Hanumanasana
Improves posture.
Enhances flexibility.
Tones the leg muscles.
Boosts the nervous system.
Soothes the spine, back, and neck.
Opens the psoas muscle and groin.
Stretches, strengthens, and lengthens the body.
Stimulates the functions of reproductive organs.
Enhance blood circulation in the spine and tailbone area.
Activates the Sacral and Root chakras for improved hormonal balance.
When to Avoid Performing Hanumanasana
Avoid if you have severe lower back pain.
Avoid if you are experiencing heavy menstrual pain.
Avoid if you have recently undergone surgery or you’re recovering from an injury.
Avoid if you have inflammatory hip-joint arthritis or a weak tailbone.
Avoid practicing this pose alone as a beginner. Ask for professional guidance.
How to do Hanumanasana (Monkey Pose)
Hanumanasana is a powerful lower-body stretch that can be overwhelming to learn. So, we’ve provided a step-by-step posture guide. Take a look below:
Part 1 - Preparatory Poses for Hanumanasana
Warm up by stimulating blood circulation in your glutes, hamstrings, inner thighs, ankles, and spine.
1. Malasana (Yogi Squat) - This pose is excellent for activating the entire lower body, as well as the spine. Start by standing in Mountain pose for a few deep breaths. Squat deeply with your legs wider than shoulder-width apart.
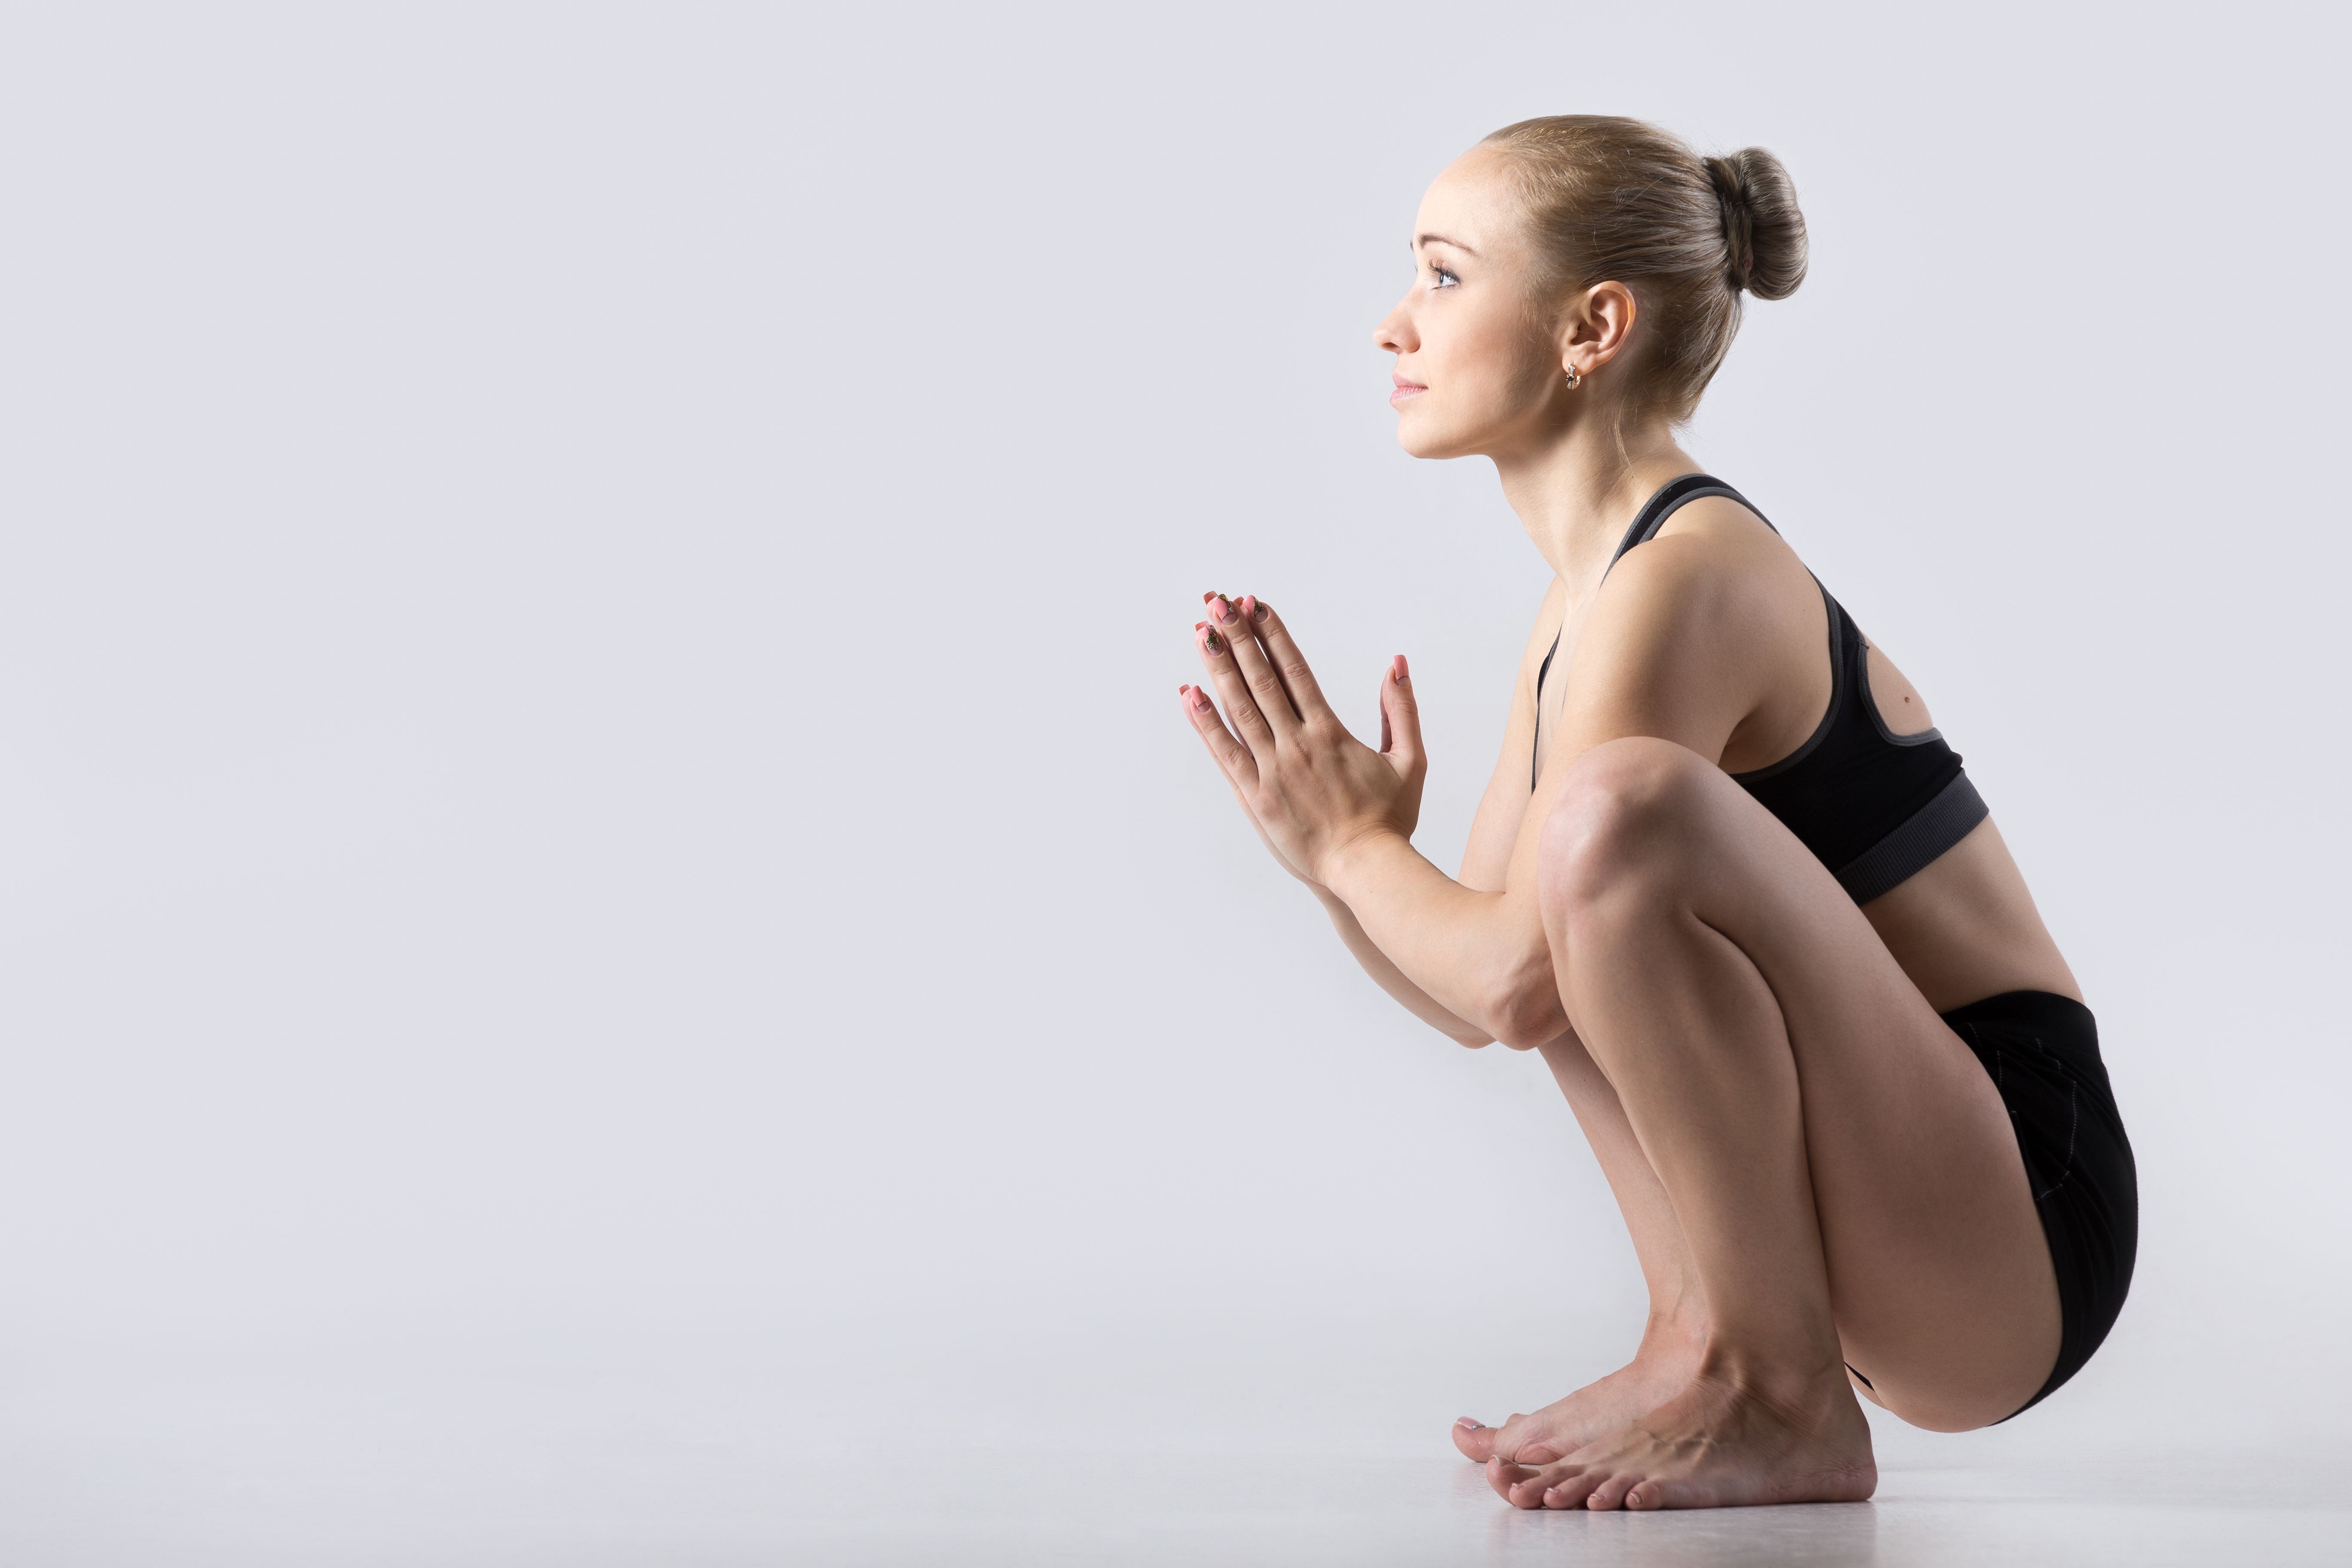
Keep your spine straight, bring your arms close to your chest in Anjali Mudra, and make sure your elbows are pushing your legs out to increase the intensity of the stretch. Maintain this pose for 1 to 2 minutes, then release it.
2. Anjaneyasana (Low Lunge Pose) -
Stand in Mountain pose, and then step your right leg forward, bend both legs and squat down in a low lunge position by placing your left leg behind you on the mat.
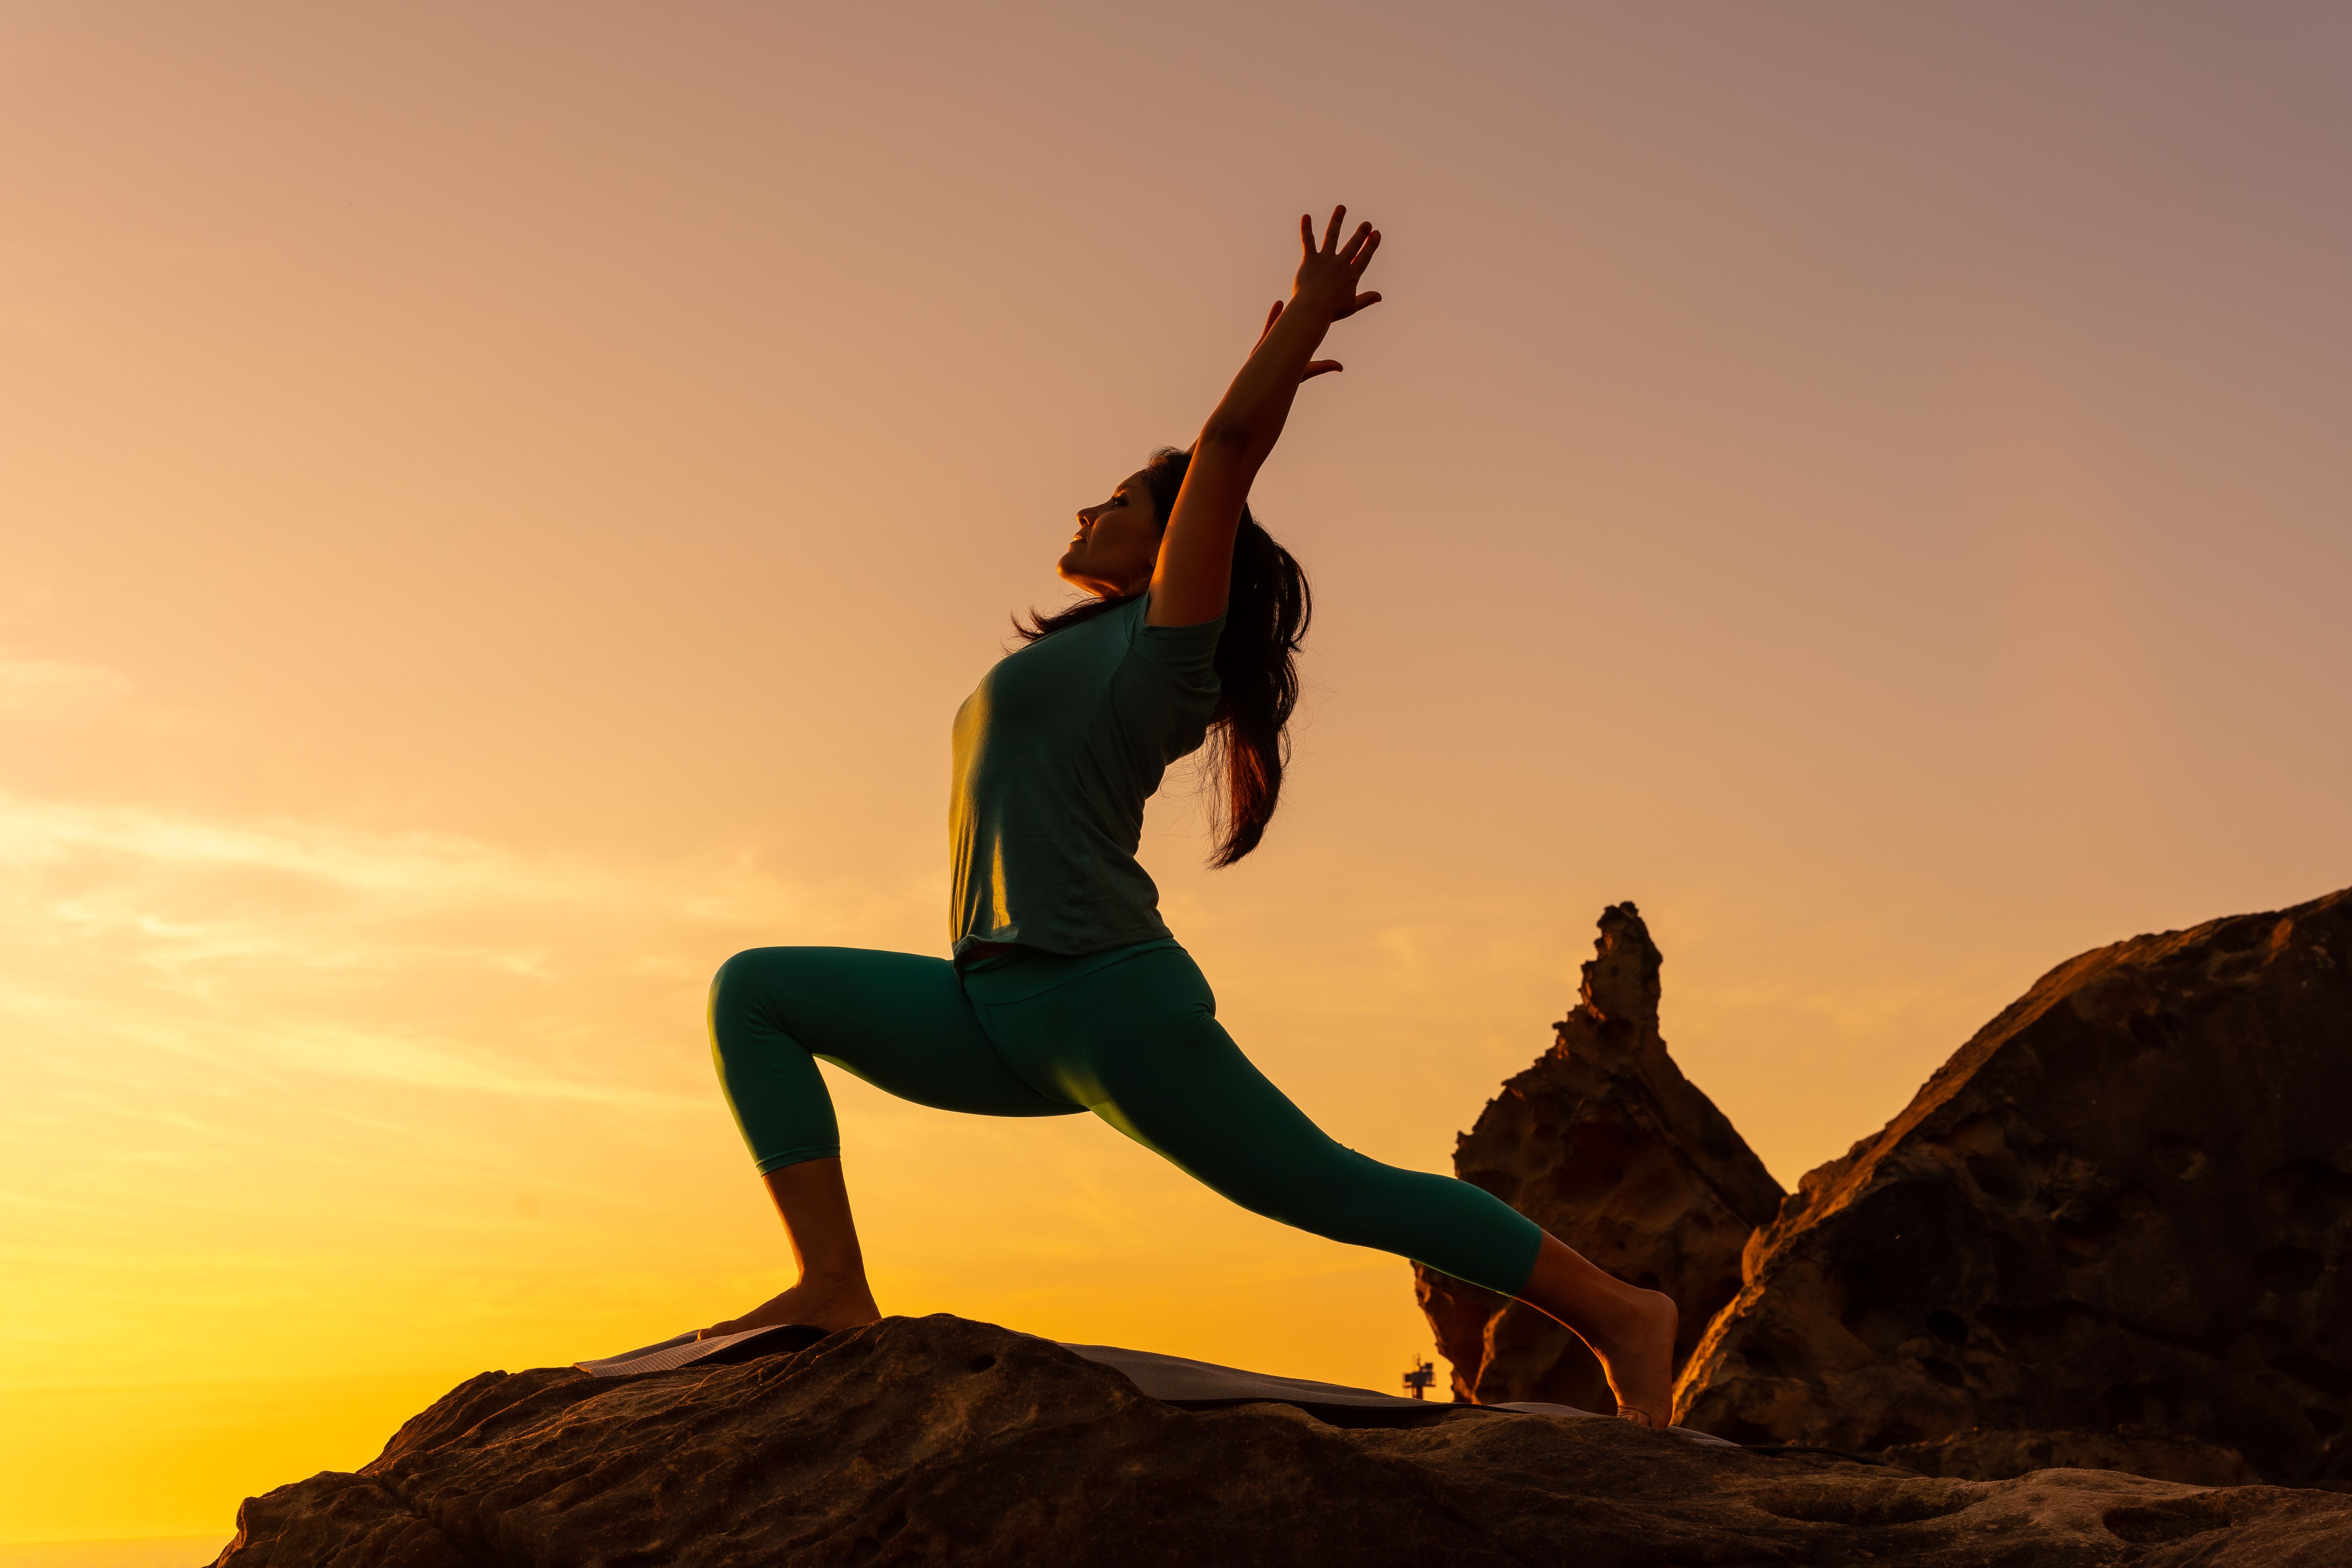
Inhale and extend both arms over your head and feel your upper and lower body opening up. Repeat this on the other side and then release.
Part 2: Step-by-Step Instructions to Perform Hanumanasana
The following are steps to practice Monkey pose:
Step 1- Start in Samasthiti, inhale, and lift your arms up in Mountain pose.
Step 2- Exhale and bend forward into Uttansana. Gently lift halfway up and look forward.
Step 3- Next, inhale and exhale as you extend your feet behind you one by one into Plank pose.
Step 4- Inhale deeply, curl in your toes and lift your hips into Downward-Facing Dog.
Step 5- Step your right foot forward, place your left knee on the ground and get into Cescent Moon pose. Keep your back straight, hips square, and spine straight in this pose.
Step 6- Keep breathing, and gently straighten your right leg in front. Place your glutes square on the mat and extend both legs straight on each side.
Step 7- Take a deep breath, straighten your spine, and extend your arms overhead and join your palms.
Step 8- Hold this pose for 5 to 10 deep breaths, then release. Repeat the same on your left side, and then relax in Child's pose.
Breath Awareness:
Inhale - When in Mountain pose, Downward-Facing Dog pose, Crescent Moon pose, and when your arms are overhead in Monkey pose.
Exhale - While relaxing in Uttansana or a Child’s pose.
Inhale & Exhale - While transitioning in the flow or holding the stretch for a longer duration.
Performance Duration for Beginners: Hold Monkey pose for 15 to 30 seconds.
Performance Duration for Advanced: Hold Monkey pose for 60 to 90 seconds.
Part 3: Things to Keep in Mind
It’s important to keep a few things in mind before practicing Monkey pose:
Avoid overextending: If your hamstrings or inner thighs feel too tight to stretch in the Hanumanasana pose, avoid overextending your muscles. Make sure your legs, groin, and glute muscles are warmed up and open.
Keep your hips square: Keeping your hips square means that when your glutes are placed on the ground in the split position, both glutes are touching the ground. Also make sure your spine is aligned straight so that your upper body weight is equally distributed on each of your glute muscles.
Tighten your core: Loose core muscles can create a shaky foundation, making it hard to hold the stretch for longer. An engaged core will help you stabilize your seated Monkey position and support your transition into Over-Head Extended Arms Hanumanasana with more control.
Part 4: Relaxing Poses After Hanumanasana
Follow the below counterpose sequences to unwind tension from your legs and spine after your Hanumanasana pose practice:
1. Eka Pada Kapotasana (Sleeping Pigeon Pose) - From a Downward-Facing Dog stance, bring your right leg forward in between your palms. Bend your right leg so your shin is aligned straight with your yoga mat. Keep your left leg straight and extended behind you.
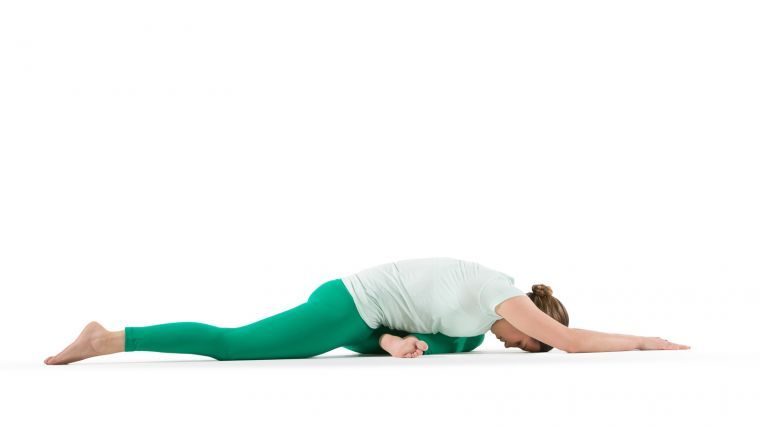
Square your glutes and place them on the mat. Squeeze your inner thighs together, inhale and extend both arms overhead. Now, exhale and bend your torso forward over your front leg on the ground.
Hold the pose on each side until your spine and glutes feel cozy and relaxed.
2. Ananda Balasana (Reclining Happy Baby Pose) - This pose will help you release any remaining tension in your legs, pelvis, or glutes, and bring your spine back to its neutral shape.
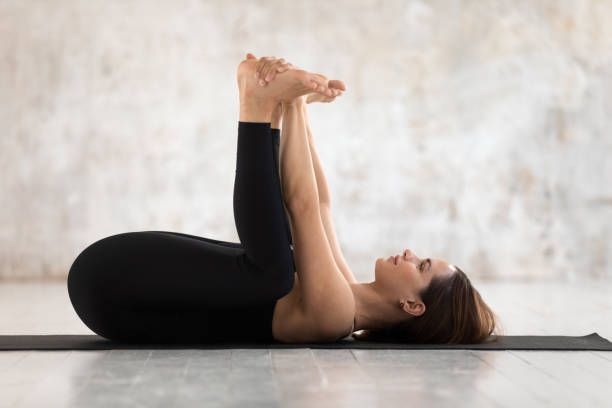
Inhale, lie down on your back, and grab the outside edges of your feet while bending your legs. Exhale and press your back, core, and legs close to the ground.
Hold here for a few seconds. If your glutes or tailbone feels stiff, add a rocking motion to your Happy Baby posture to loosen up any tight areas.
Hanumanasana Variations to Consider
Depending upon your level of ability, choose a Monkey pose variation that works for you:
1. Ardha Hanumanasana (Half Monkey Pose) - This is an easy variation of Hanumanasana. From the Downward-Facing Dog pose, bring your left foot forward between your palms. You can also use yoga blocks under your palms if you need to minimize the intensity of this stretch.
Bend and place your leg behind you on the floor. With your left leg straight in front, sit slightly back toward your right heel.

Feel the stretch in your pelvis, spine, hamstrings, inner thighs, and glutes as you lean your torso over your left leg. If you’re a beginner, perform this on each side for 20 to 30 seconds.
2. Half Monkey Pose (Forward Bend Variation) - Continue performing Ardha Hanumanasana, inhale and extend both arms overhead. Exhale and extend your torso over your left leg in front.

Beginners will find this stretch to be an excellent way to activate their glutes and hamstrings. It is recommended to hold this pose regularly for 30 to 90 seconds on each side for better flexibility.
3. Full-Monkey Pose (Forward Bend Variation) -
You'll love this variation if you're an advanced yogi who’s looking for a challenge. Start from seated Hanumanasana pose, inhale and extend both arms over your head, and hold the pose here for a few seconds.
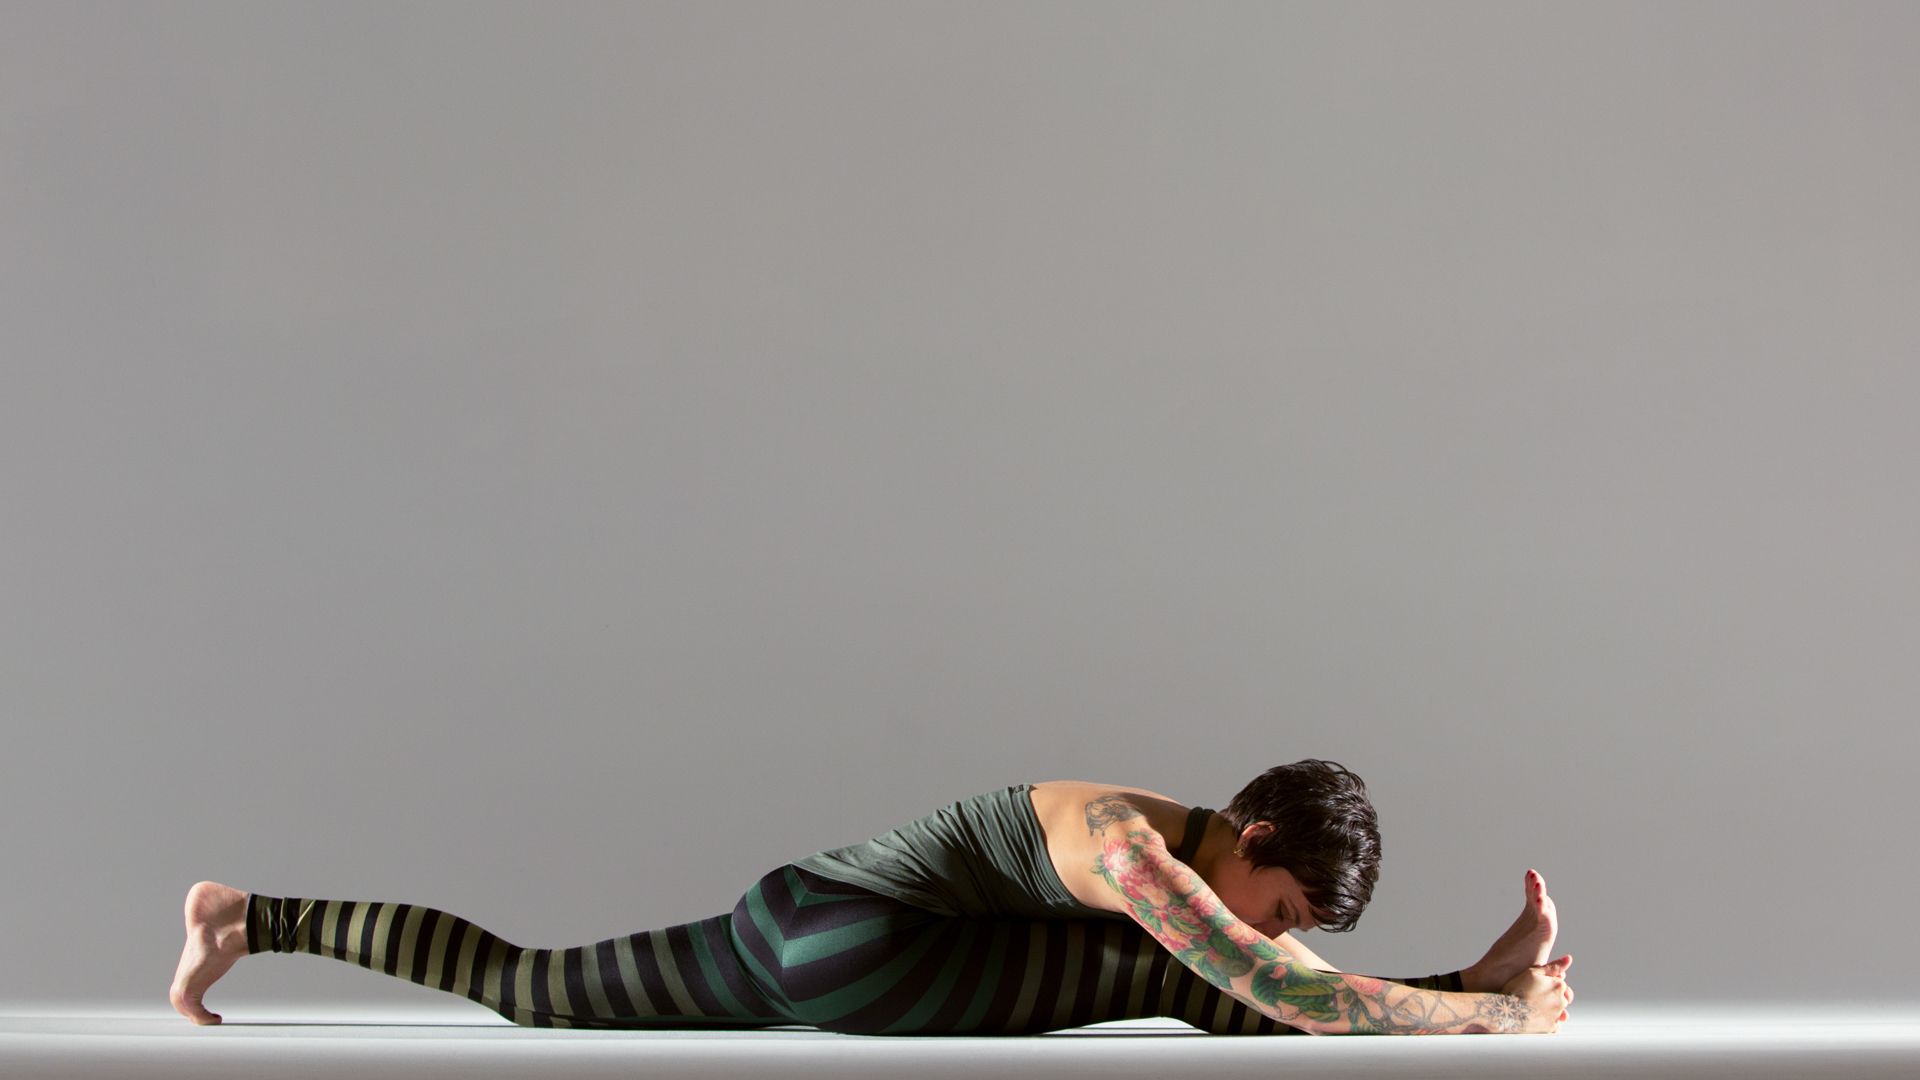
Finally, exhale and start to lean forward. Reach your head to your knee and hold your front foot with your hands. Hold this variation for 60 to 90 seconds on each side.

Enjoy a Free 1-on-1 Session with a Coach!
Receive personalized guidance tailored to your unique fitness goals, live with a dedicated coach—no credit card required.
Frequently Asked Questions about Hanumanasana
Hanumanasana is good for opening your glutes, activating blood circulation in your legs and spine while massaging your abdominal organs, and enhancing the functioning of your reproductive organs.
Hanumanasana is an advanced lower body stretch that requires deep hip-opening capabilities. That’s why beginners should not dive straight into performing the Hanumanasana pose, but instead start by performing more warm-up glute activation poses or hip-opening yoga sequences to gain strength and flexibility for the main Monkey Pose.
Paschimottanasana, Anjaneyasana, Eka Pada Rajakapotasana, Lizard Pose, Janu Sirsasana, and Ardha Hanumanasana are all recommended preparatory poses for Hanumanasana. Practicing these preparatory poses in sequences of 60 to 90 seconds each, will help open and activate your pelvic muscles for the primary pose.
The following are some benefits of the Hanumanasana pose:
- Tones the leg muscles.
- Stretches the back muscles.
- Activates the glutes, groin, and spine.
- Stretches the inner thighs and hamstrings.
- Stimulates the digestive and reproductive systems.
- Improves posture to increase lower body mobility and flexibility.
Hanumanasana variations include beginner-friendly variations like Ardha-Hanumanasana or Half-Splits pose, along with some advanced variations like Hanumanasana with a forward bend. If you’re feeling strong in your spine and legs, try performing Hanumanasana with a backbend.
Ardha Hanumanasana or Half Monkey Pose is an easy variation of Monkey pose.
Start from Downward-Facing Dog and bring your left foot forward between your palms. Bend your extended leg behind you and place it on the floor. Now, sit back toward your right heel while extending your left leg straight in front of you. Elongate your torso over your left leg, touch your head to your knee, and feel the stretch in your pelvis, spine, and glutes.


.webp)
%20(7).jpg)
