What is Garbha Pindasana (Embryo in Womb Pose)?

Garbha Pindasana, or the Embryo Pose, is a seated balancing yoga asana. This pose is for intermediate to advanced yoga practitioners because it requires immense core strength to stabilize this posture.
In this pose, the legs are interlocked in Padmasana, and the knees are lifted towards the body. Garbha Pindasana resembles the shape of an embryo or fetus resting inside the womb.
Embryo Pose is also used as a meditative asana in Hatha and modern yoga practice, which helps increase your level of concentration. This pose channels Prana to higher spiritual levels, helping you gain more clarity while awakening the soul.
Overview & Etymology
Garbha Pindasana is a combination of Sanskrit words – 'Garbha' meaning womb, 'Pinda' meaning embryo or fetus, and 'Asana' meaning posture.
This pose is an ancient yoga asana, and you can read about it in 17th century Bahr al-Hayāt (Ocean of Life), a Persian book that explains meditative yoga asanas.
The Garbha Pindasana is also very similar to Uttana Kurmasana (Turtle Pose) from the 19th century Sritattvanidhi (book including 122 Hatha Yoga postures), but the difference is that Turtle Pose is performed while reclining on the ground.
Sanskrit Name: ङर्भ Pइण्डआसन Pronunciation: gaar-BAAH-peen-duh-AHS-anna
Pose Type: Seated Balance Also known as: Embryo in Womb Pose, Embryo Pose
Strengthens: Back, Glutes, and Core Stretches: Glutes, Pelvis, and Hamstrings
Health Benefits of Garbha Pindasana
Relaxes the spine.
Increases core strength.
Increase the flow of Prana.
Improves pelvic range of motion.
Relaxes the glutes and sitting bones.
Massages the digestive organs and improves digestion.
Benefits pregnant women in opening the pelvic area for labor.
Enhances mindfulness and focus, increasing spiritual intuitiveness.
Activates the Manipura chakra, which detoxifies organs, like the spleen and liver.
When to Avoid Performing Garbha Pindasana
Avoid after childbirth.
Avoid during menstruation.
Avoid if you have a slipped disc.
Avoid if you have a pelvic or spinal injury.
Avoid after the first trimester of pregnancy.
Avoid if you have weak ankle and knee joints.
Avoid if you have had abdominal or hip surgery recently.
How to do Garbha Pindasana (Embryo in Womb Pose)
We have divided the embryo pose practice into four parts: warm-up, main practice, follow-up, and things to keep in mind. This approach will help you find your balance faster in this seated yoga pose without injury.
Here are the four phases to get started with Garbha Pindasana.
Part 1 - Preparatory Poses for Garbha Pindasana
The embryo pose uses your abdominal muscles for balance, opens your pelvis, and it helps to increase the mobility in your knees. The following preparatory asanas will help you activate your knees, hips, and spine.
1. Sukhasana (Easy Pose) - Sit on your yoga mat in Staff Pose and gently bend your knees. Now, inhale as you cross your shins together and spread your sitting bones evenly on the ground.

Exhale and bring mindful awareness to your spine’s alignment. Sit with your spine upright, and avoid slouching your shoulders. Hold this pose with your eyes closed for five minutes.
2. Padmasana (Lotus position) - Sit in Staff Pose and bend your right knee. Bring your right foot over to your left thigh and repeat this same process on the left side.
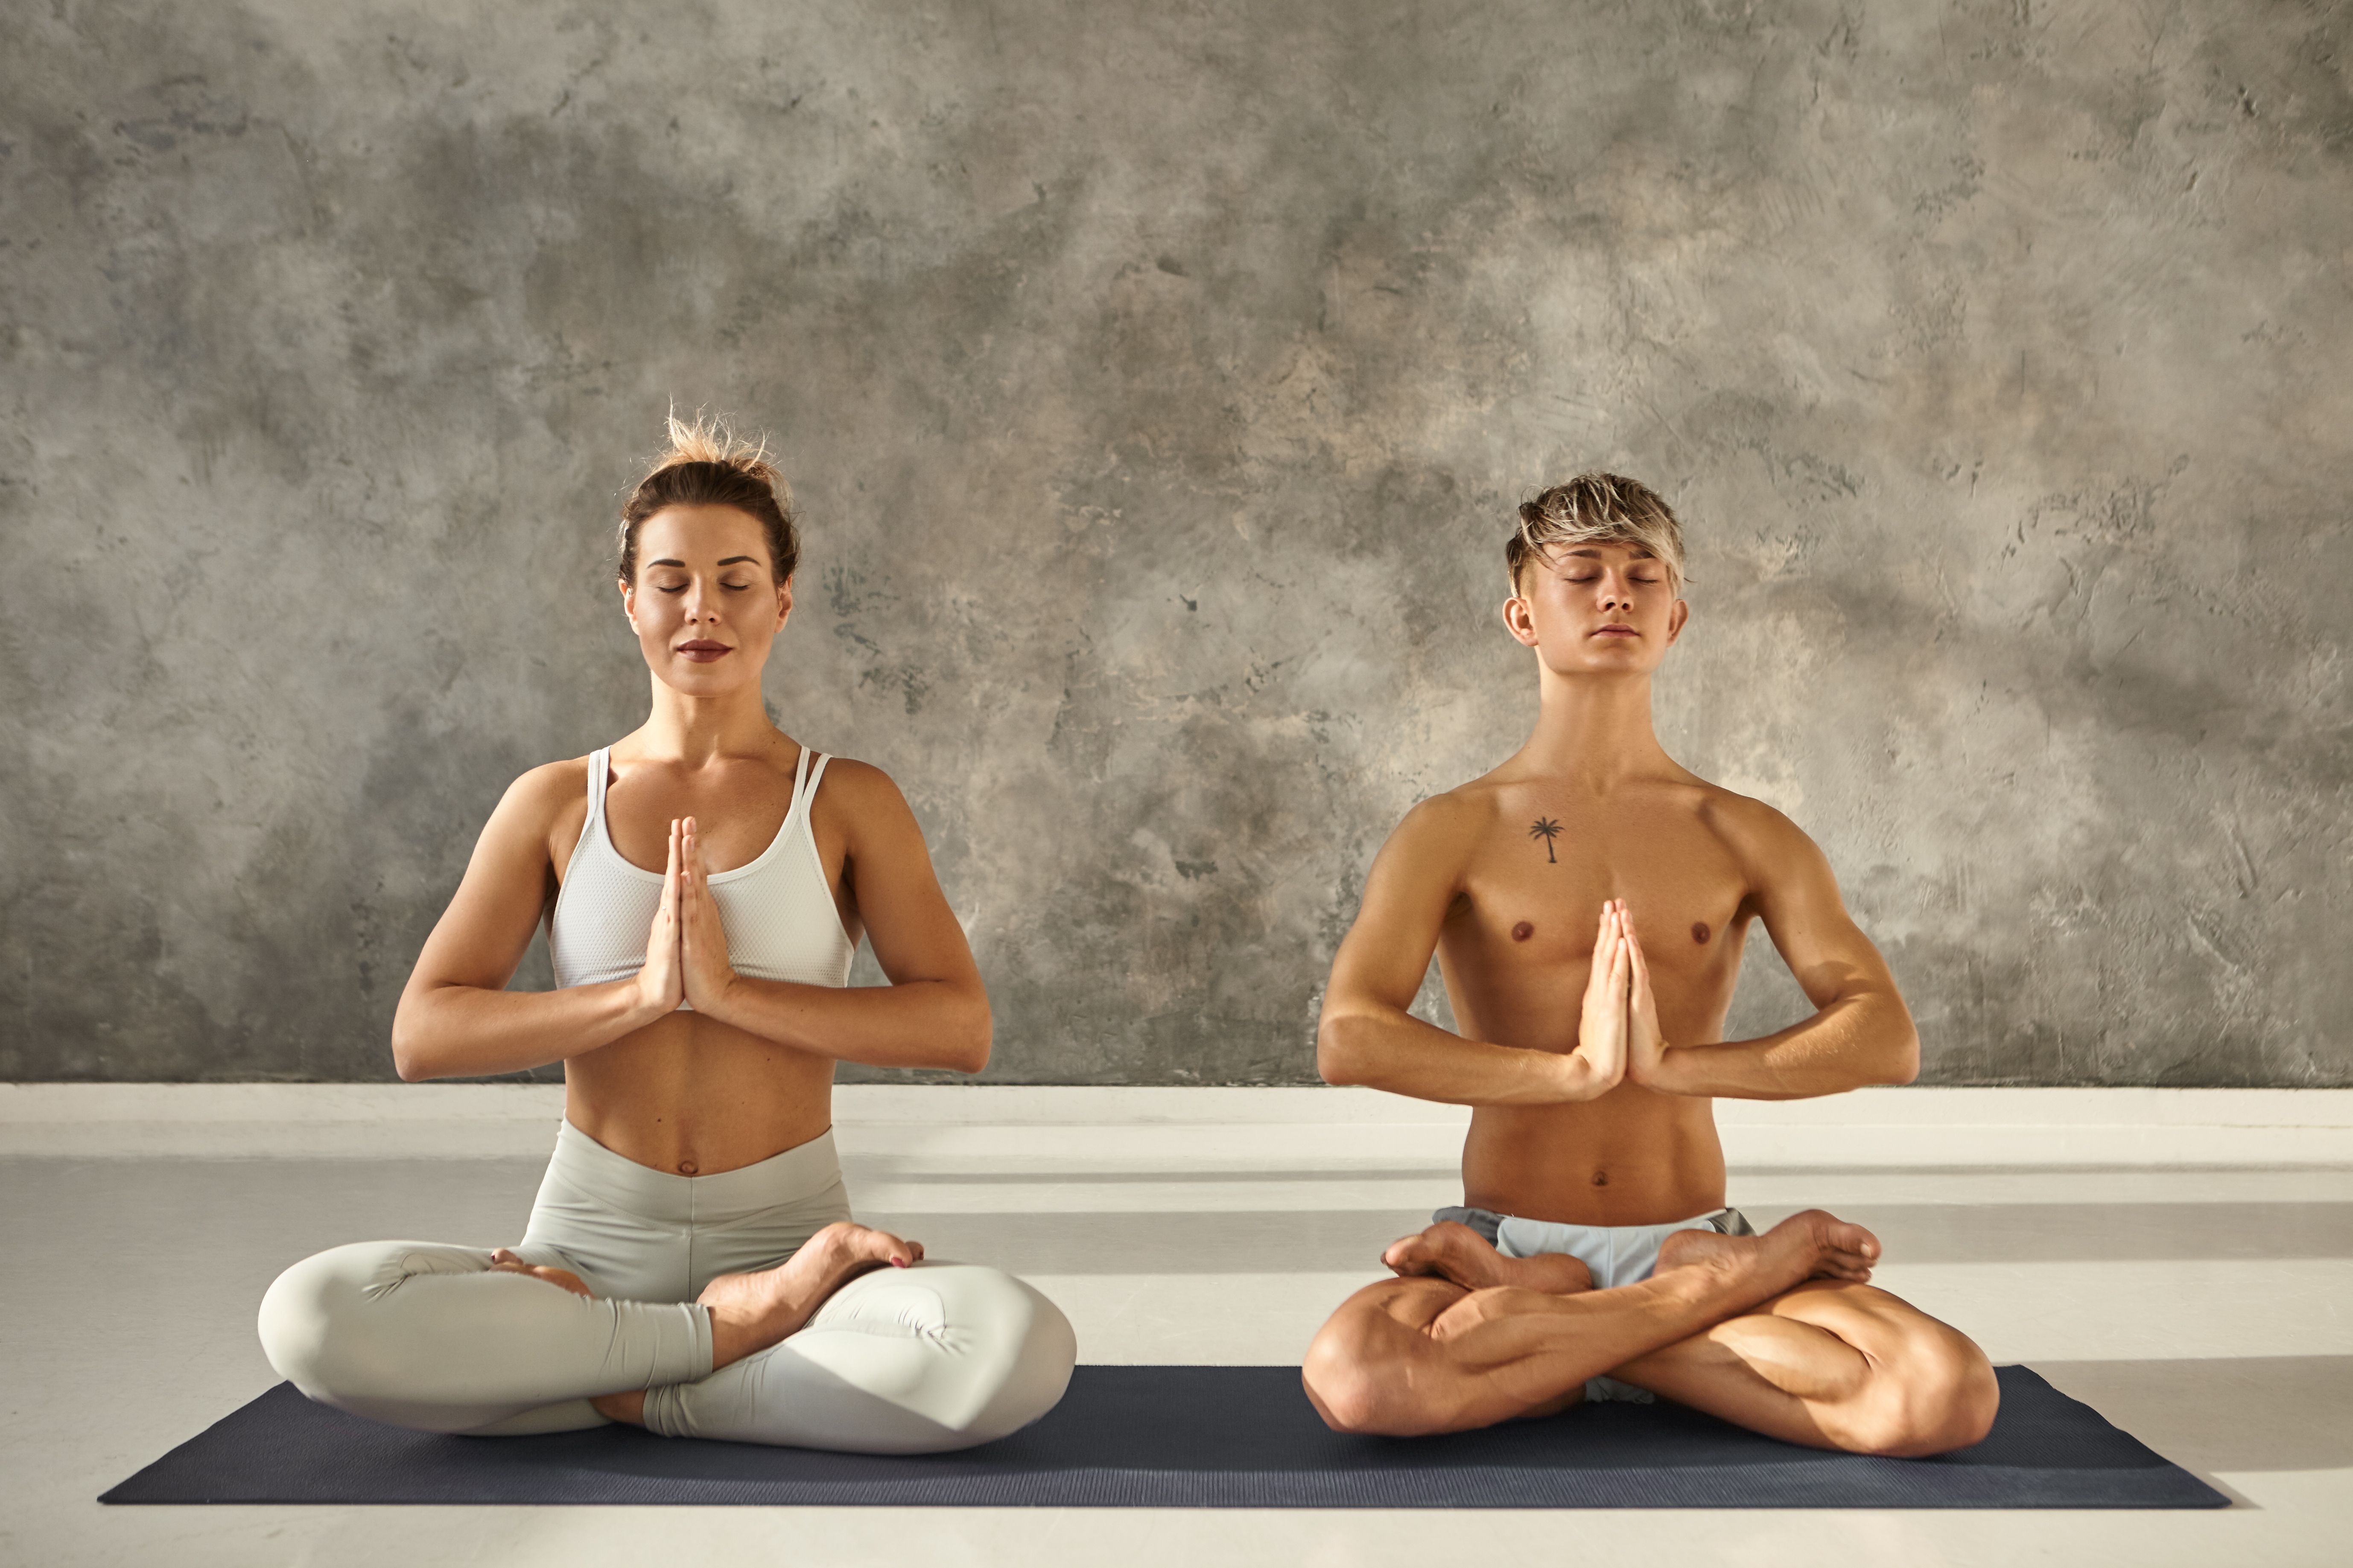
Both your legs must appear crossed on the floor, and your feet should be resting on your opposite thighs. Now, close your eyes and maintain this hold with an straight spine for 2 to 5 minutes. You can chant a mantra or practice pranayama in this pose as well.
3. Gomukhasana (Cow Face Pose) - Start by getting into Dandasana and gently bend your right knee. Place your right leg under your left butt and over the right knee, and stack your left knee. Keep your feet aligned with your hip flexors.
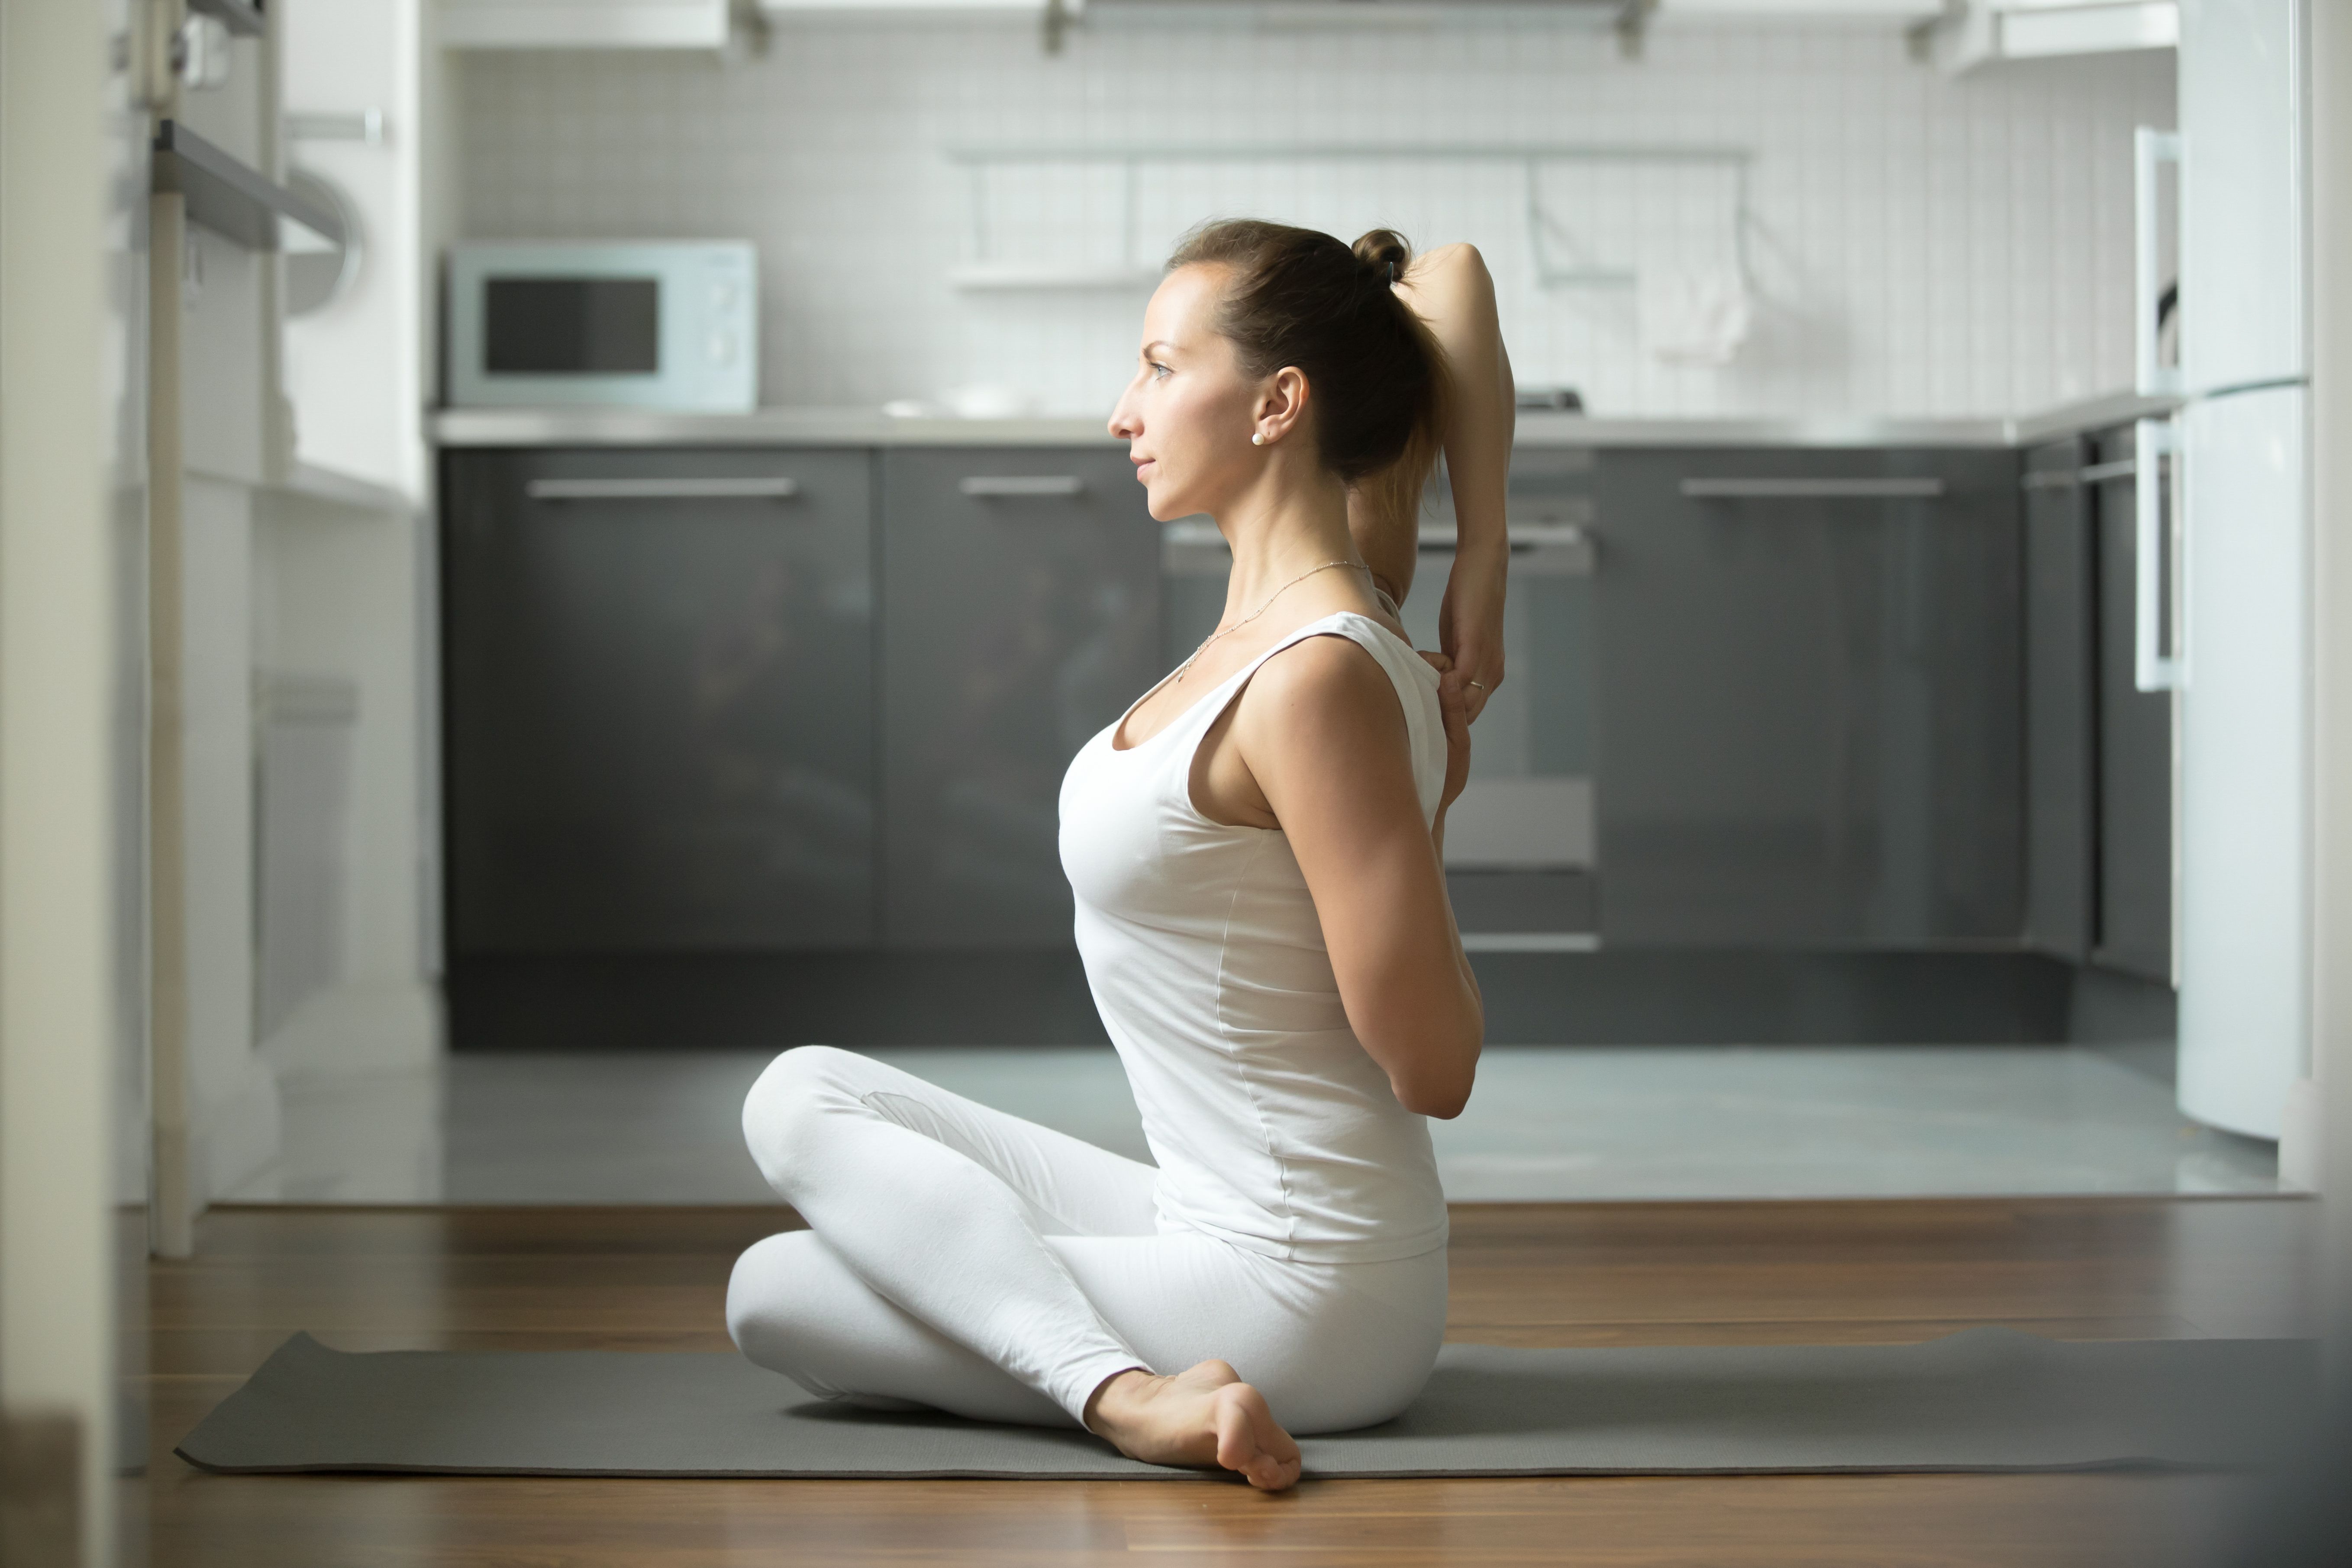
Raise one arm overhead to reach behind your back and bring your other arm from below to get behind your back. Now, clasp and hold your fingers together and stay in this posture for a few minutes. Again, repeat the process by exchanging the placement of your arms and legs.
Part 2: Step-by-Step Instructions to Perform Garbha Pindasana
Below are steps to follow to get perform the Embryo Pose:
Step 1: Get into Padmasana and stay here for a few minutes while practicing some deep breathwork.
Step 2: Inhale, tighten your core and lift your legs off the mat in the same Padmasana formation.
Step 3: Now, pass your arms between the gap of your thighs and focus on balancing your body on your coccyx (a triangular arrangement of bone below your sacrum).
Step 4: Exhale and bring your arms close to your face or ears. Lock your legs with the support of your forearms.
Step 5: Focus on maintaining your balance in the Embryo Pose by closing your eyes and working on keeping your breathing steady.
Step 6: After one minute, let go of your arms and exchange the placement of your legs, repeating the same process once more.
Step 7: Finally, release the pose and bring your legs back into seated Padmasana.
Breath Awareness:
Inhale: When your legs are lifted off the yoga mat in Padmasana formation.
Exhale: When your arms pass through the gap to lock your limbs together.
Performance Duration for Beginners: Hold Embryo Pose for 30 to 60 seconds.
Performance Duration for Advanced: Hold Embryo Pose for 1 to 3 minutes.
Part 3: Things to Keep in Mind
If this is your first time performing Embryo Pose, follow the below posture cues for the best outcome:
- Focus on your breathing: If you cannot balance the hold in Embryo Pose for very long, you may have an inconsistent breathing pattern. This is a challenging asana practice, and requires total concentration on balancing different muscle groups along with proper breathwork.
Do not try this as a beginner: Many beginners will find this pose to be too difficult to execute, which is why we highly recommend first building a foundational core strength and working on pranayama before getting started with this pose.
Part 4: Relaxing Poses After Garbha Pindasana
After practicing Embryo Pose, it’s important to relax your body with the below counter-poses:
1. Matsyasana (Fish Pose): From the last step of Embryo Pose, get into Staff Pose and start reclining your upper body onto your yoga mat.
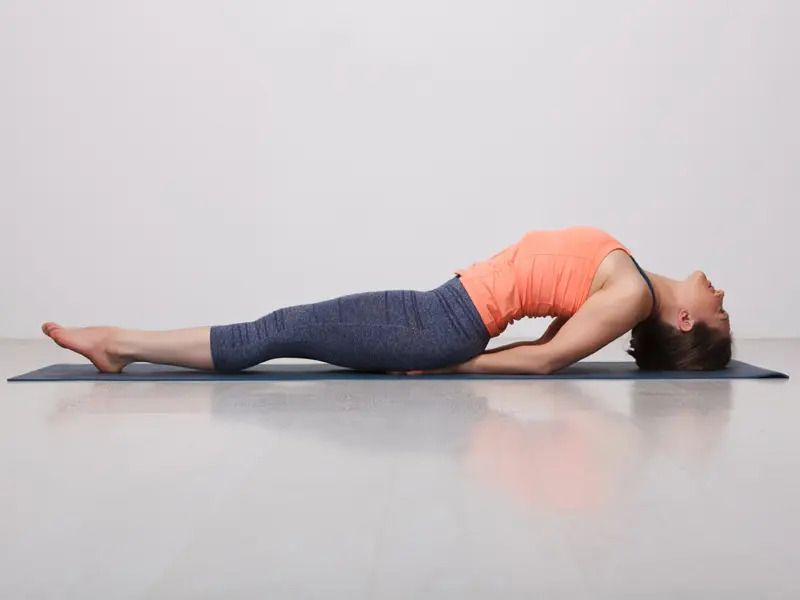
Bring your elbows close together and place your forearms below your tailbone. Breathe in and lift your neck, chest, and low back off the mat. Hold this pose for a minute, and then relax into the Corpse Pose later.
2. Balasana (Child's Pose): After releasing Embryo Pose, inhale and transition into a tabletop pose. Spread your knees wide on the mat, exhale deeply, and bring your belly to rest in between your thighs.

Rest your chest on the mat and keep your arms stretched out in front. Hold this pose until your low and upper back muscles release any tension.
3. Supta Baddha Konasana (Reclining Bound Angle Pose): After Garbha Pindasana, transition into a seated Bound Angle Pose. Now, slowly start to recline your back onto the mat. Make sure to exhale as you lower your back.
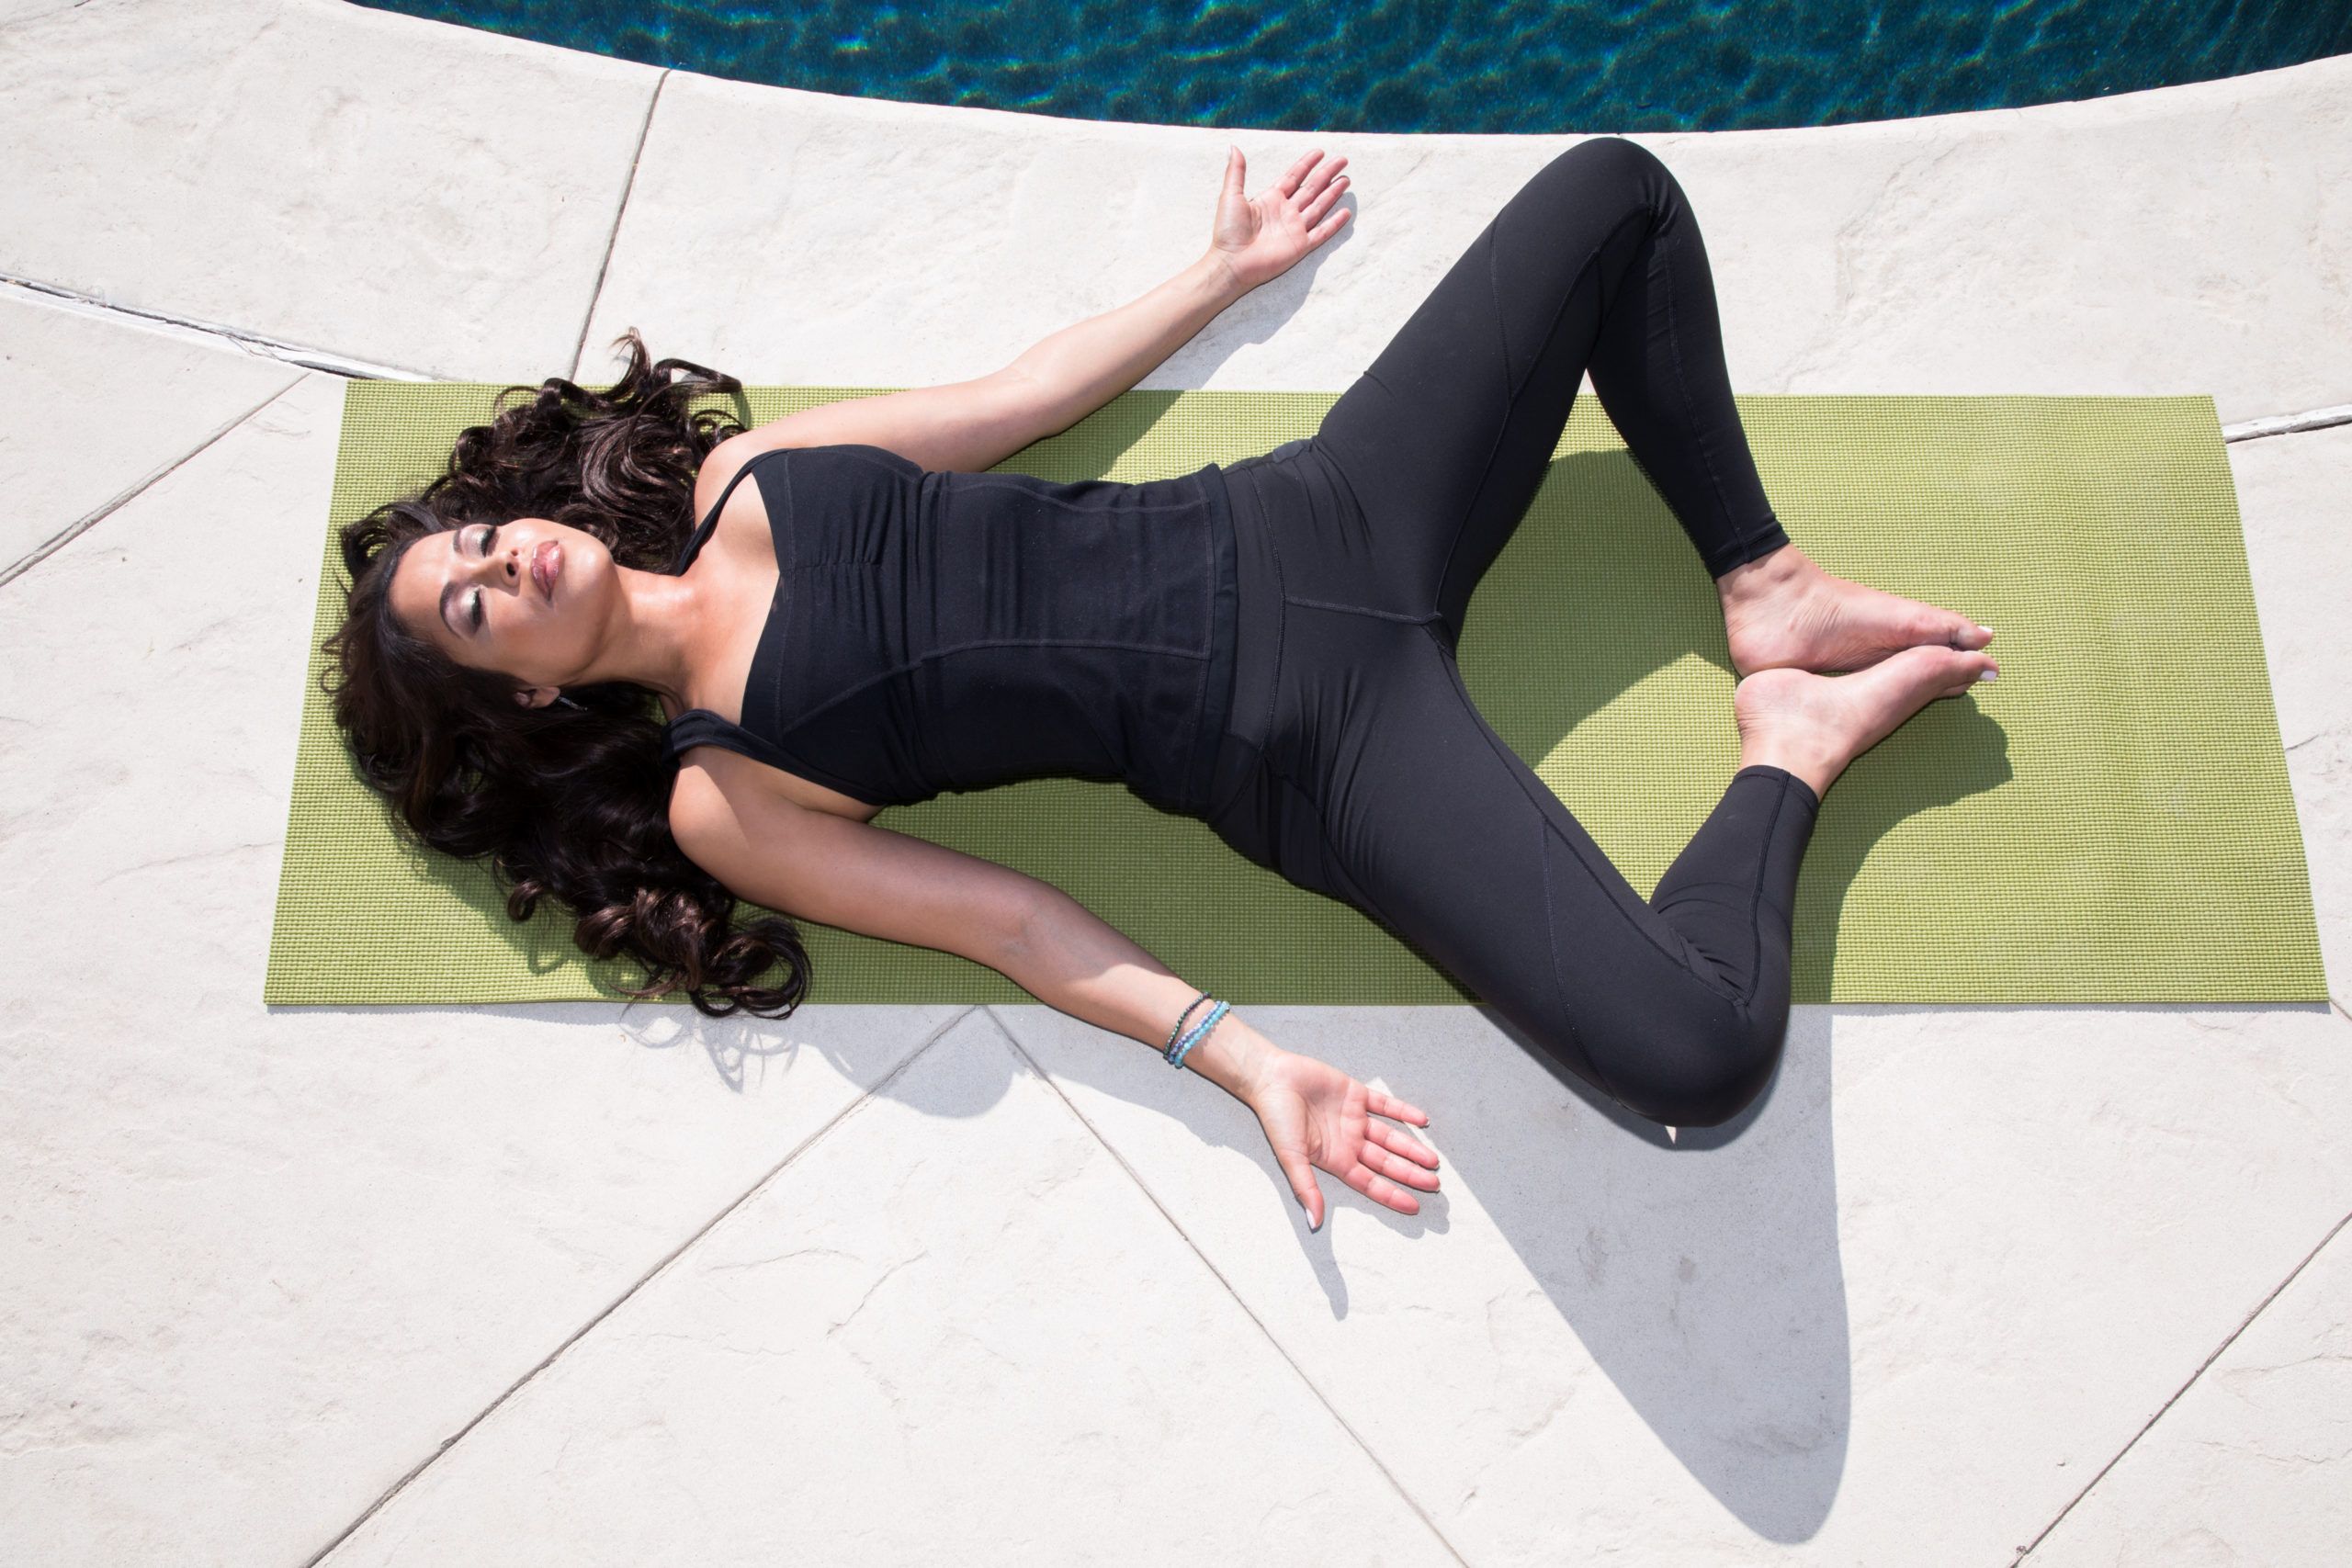
Keep breathing as you widen your knees away from your hips and relax your pelvic floor and your spinal column. Stay in this pose until all of your exhausted muscles feel at ease.
Garbha Pindasana Variations to Consider
The following are some posture variations that intermediate yogis can try to advance their practice:
1. Try Different Formations: The Embryo Pose can be executed with various formations, like with your face resting on your palms, hands in Anjali Mudra, or hands holding your ears – all of these are different types of forearm variations.

Choose which formation works best for you, while maintaining body balance and challenging your mindfulness.
2. Sarvangasana Garbha Pindasana: This pose is also known as the reclining version of regular Garbha Pindasana because in this pose, you will balance your bodies on your shoulders.

Simply lie down on your back, interlock your limbs together in Embryo Pose, and hold it for a few seconds. This pose will increase the blood supply in your brain and help to activate your neck area.

Enjoy a Free 1-on-1 Session with a Coach!
Receive personalized guidance tailored to your unique fitness goals, live with a dedicated coach—no credit card required.
Frequently Asked Questions about Garbha Pindasana
Garbhasana is a yoga pose that symbolizes an embryo in the womb. It comes from the Sanskrit words "Garbha," which means womb or embryo resting in the womb, and "Asana," which means posture.
This is a seated yoga balance pose, and it requires high core strength to maintain the posture for long durations, meaning it's typically practiced by intermediate and advanced yogis.
Most beginners cannot perform Garbha Pindasana pose because of the seated balance – it requires a strong core and low back. So, it's best to first work on core and back strengthening asanas and then practice Garbha Pindasana.
Even as a beginner, if you want to try Garbha Pindasana, use some modified variations to avoid injury.
Garbha Pindasana should not be performed while menstruating, during pregnancy, or post-childbirth. It's also not recommended if you have a slipped disc, weak pelvic joints, undergone a recent surgery, or if you are injured.
Below are some health benefits of Garbha Pindasana:
- It soothes the mind.
- Enhances core balance.
- Allows your pelvic area to open up.
- Improves reproductive health.
- It relaxes and soothes the lumbar spine.
- Helps in improving abdominal organ functioning.
In yogic practices, there are a few variations for Garbha Pindasana. You can experiment with various forearm formations (finger holding ears, face resting on palms, etc.), or you can try the reclining version of Embryo Pose, also known as the Sarvangasana Garbha Pindasana.


.webp)
%20(7).jpg)
