What is Bhekasana (Frog Pose)?
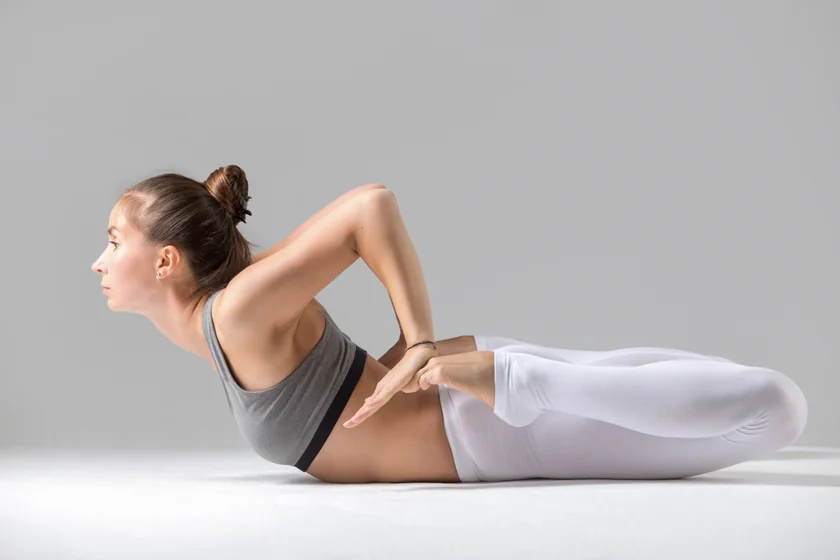
Bhekasana, or Frog Pose, is an intermediate-to-advanced level yoga pose for activating your spine and improving flexibility throughout your body.
Bhekasana looks similar to Bow pose, since both start from a prone position. What makes Frog pose different from Bow pose is your elbows point to the ceiling while pushing your toes toward the ground at the sides of your glutes.
This is an excellent pose for people suffering from stomach-related issues, back pain, or weakness in their spine.
Overview & Etymology
Bhekasana is a combination of two words from the ancient Sanskrit Hindu language. It translates to 'Bheka,' which means Frog, and 'Asana,' which means pose.
This pose was first described by Swami Vishnudevananda in the 20th century, in his book Illustrated Book of Yoga. There is no detailed description of Bhekasana as a yogic practice in medieval Hatha yoga texts.
However, in Indian culture, frogs are known to symbolize luck, fertility, and consciousness.
Frogs are also referred to in Sanskrit as 'Manuka,' which is the title of an ancient Upanishad named 'Mandukya.'
Mandukya can be found in the sixth Upanishad, and the text mainly discusses the syllable 'Om' or 'Aum,' presenting the theory of four states of consciousness and proclaiming that Aum represents Brahman (a human who's united with the supreme lord and is mindful of life).
The Upanishad teaches us how to leap from the first to the fourth step of self-awareness via regular meditation without difficulty – just like Rishi Varuna did when he took the form of a frog.
Sanskrit Name: भेकासन Pronunciation: Bhe-kaa-Suh-nuh
Pose Type: Lying Backbend, Chest Opener Also known as: Frog Pose
Strengthens: Spine, Neck, Shoulder, Back, Diaphragm, Glutes, and Abdomen
Stretches: Spine, Shoulders, Throat, Back, Abdomen, Chest, Throat, and Quads
Health Benefits of Bhekasana
Lengthens the spine.
Opens the chest muscles.
Activates the quadriceps.
Improves flexibility throughout.
Activates the glutes and front thighs.
Stretches the back, neck, and shoulders.
Strengthens the back, neck, and shoulders.
Boosts reproductive health by balancing hormones.
Improves flow of blood circulation and calms the body.
Enhances abdominal organ function, including the pancreas and kidneys.
When to Avoid Performing Bhekasana?
Avoid post-surgery.
Avoid if you have knee or hip arthritis.
Avoid if you have serious heart problems.
Avoid if you have chronic lower back pain.
Avoid temporality if you are pregnant or menstruating.
Avoid if you have any neck, shoulder, spine, or back injuries.
How to do Bhekasana (Frog Pose)
Bhekasana is an intermediate-to-advanced level yoga pose, but this doesn’t mean that beginners shouldn’t try it.
By following this detailed guide, we can help you build strength and flexibility so you can perform Bhekasana flawlessly.
Part 1 - Preparatory Poses for Bhekasana
Activate your core, legs, and lower back muscles with the following warm-up poses:
1. Vajrasana (Thunderbolt Pose) - Get into a kneeling position, with your knees, ankles, and toes touching the ground. Place your palms on your kneecaps, and gaze in front by keeping your spine straight.
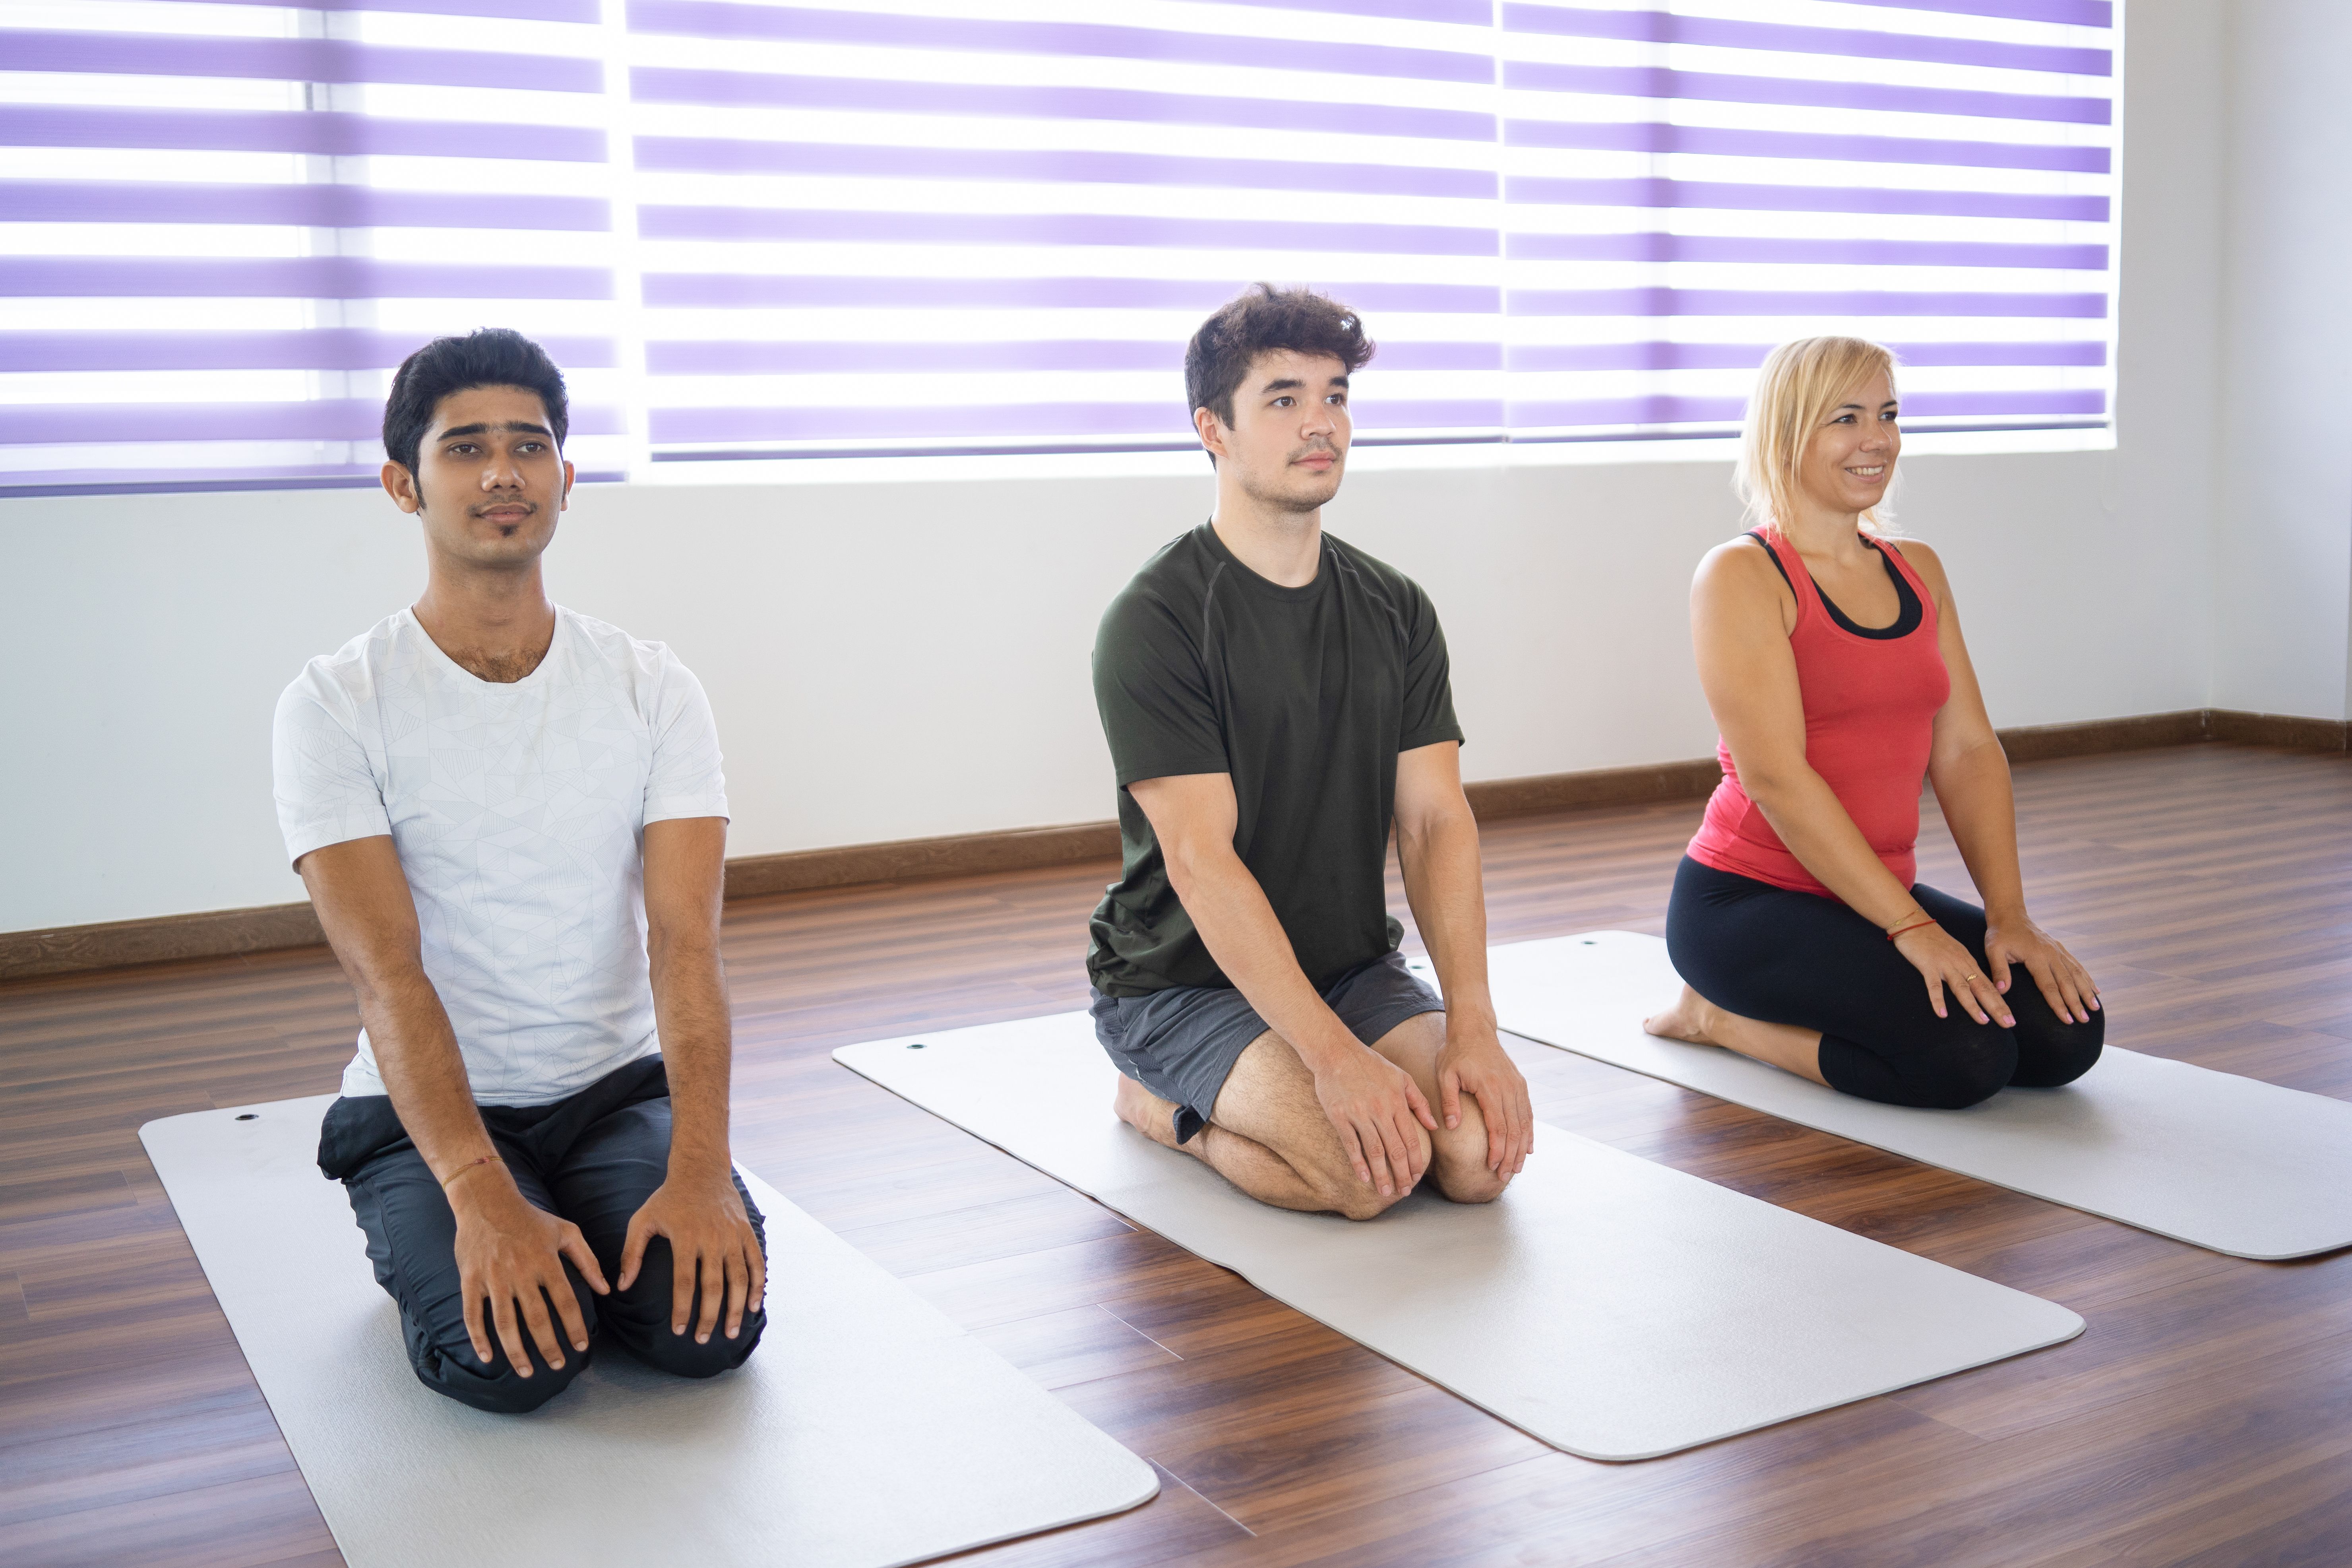
Close your eyes, breathe in and out 10 to 15 times and focus on your breathing throughout the practice. This pose helps to activate your quads, front thighs, abdomen, glutes, and calf muscles.
2. Salabhasana (Locust Pose) - Lie down on your stomach and place your chin on the floor. Make a fist of your palms and place them underneath your groin area. Breathe in with some momentum and lift your legs off the mat as high as possible, keeping your legs straight and feet touching.

Hold this pose here for 30 to 60 seconds for a few rounds, and feel your tailbone area gently opening. Regular practice of this pose will help you build flexibility in your lower back and increase your core strength as well.
Part 2: Step-by-Step Instructions to Perform Bhekasana
The following are steps to practice Frog pose:
Step 1- Lie down on your stomach and extend your legs straight back. Take a few deep breaths here.
Step 2- Inhale and exhale, bend your right knee, reach back with your arm to hold your right foot, and gently pull your foot forward.
Step 3- While pulling your right foot forward, make sure your body doesn’t start to drift sideways. Keep your foot moving forward right beside your glute.
Step 4- If you could pull your foot forward easily and feel flexible enough, gently rotate your shoulder forward while keeping your elbow pointing toward the sky.
Step 5- Inhale deep, lift and open your chest as you would do in Cobra pose.
Step 6- Simultaneously, pull your foot down toward the ground while feeling an intense flex in your quad and front thigh.
Step 7- Stay here for a few deep breaths, exhale and release your right leg.
Step 8- Perform this stretch individually on each leg for 2 to 3 rounds, and once you feel loose and warmed up, you can now flex both legs together in Bhekasana.
Step 9- While flexing both legs, hold the pose until it feels comfortable and then relax.
Breath Awareness:
Inhale & Exhale - Before starting the practice and while bending your legs.
Inhale - When your chest needs to lift up and expand, and when your back arches into a backbend.
Exhale - While releasing Bhekasana posture.
Performance Duration for Beginners: Hold Frog pose for 15 to 30 seconds.
Performance Duration for Advanced: Hold Frog pose for 60 to 90 seconds.
Part 3: Things to Keep in Mind
Beware of the following pose cues before you get started with Frog pose:
Focus on breath control: Try not to hold your breath anywhere throughout the Bhekasana practice. This is a very energy-draining pose, and you need to breathe to sustain your energy for a longer duration in order to get a deep stretch.
Do not overarch your lower back: Maintain a flat back with a firm and engaged core. This helps prevent your lower back from overarching or overextending.
Do not overextend your legs: While pulling your legs close to the ground, if you feel any knee pain, exit the pose right immediately. Make sure nothing in your upper legs, quads, or knees hurts while you sink deeper into the pose.
Part 4: Relaxing Poses After Bhekasana
Relax your back, legs, and spine in the following counterpose sequence to prevent injury:
1. Makarasana (Crocodile Pose) - Lie on your yoga mat with your chin, chest, and abdomen touching the ground. Stretch out your legs together at full length. Bring one hand beneath your opposing shoulder and grip the shoulder firmly.
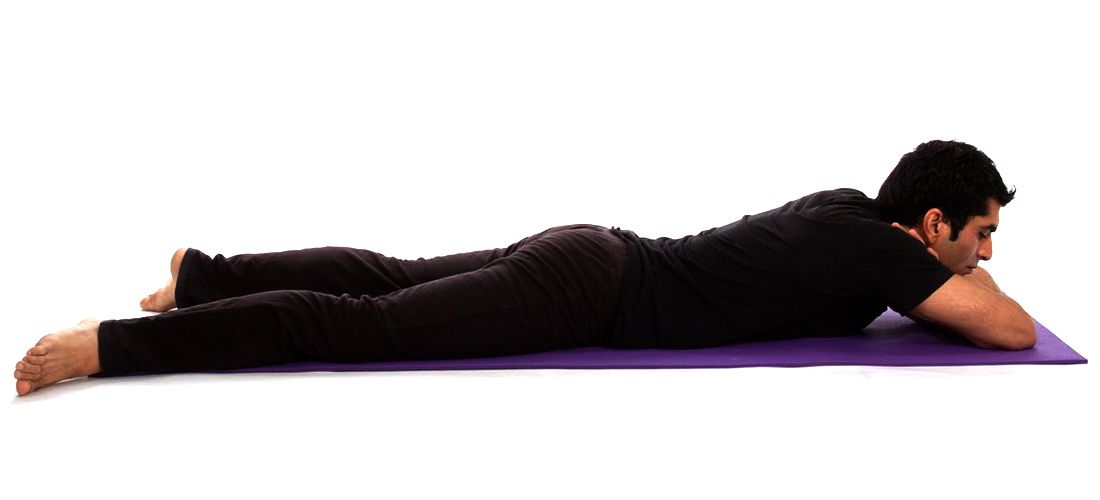
Repeat the same on the other side. Spread both legs wide apart and rest your chin on your upper arms. Hold this pose for 10 to 15 deep breaths until your spine and legs return to a neutral position.
2. Sasangasana (Rabbit Pose) - Begin seated with your knees hip distance apart. Bring the top of your head down close to your knees as much as possible. Now, cup your heels behind your back back with your palms and lift your glutes toward the ceiling.
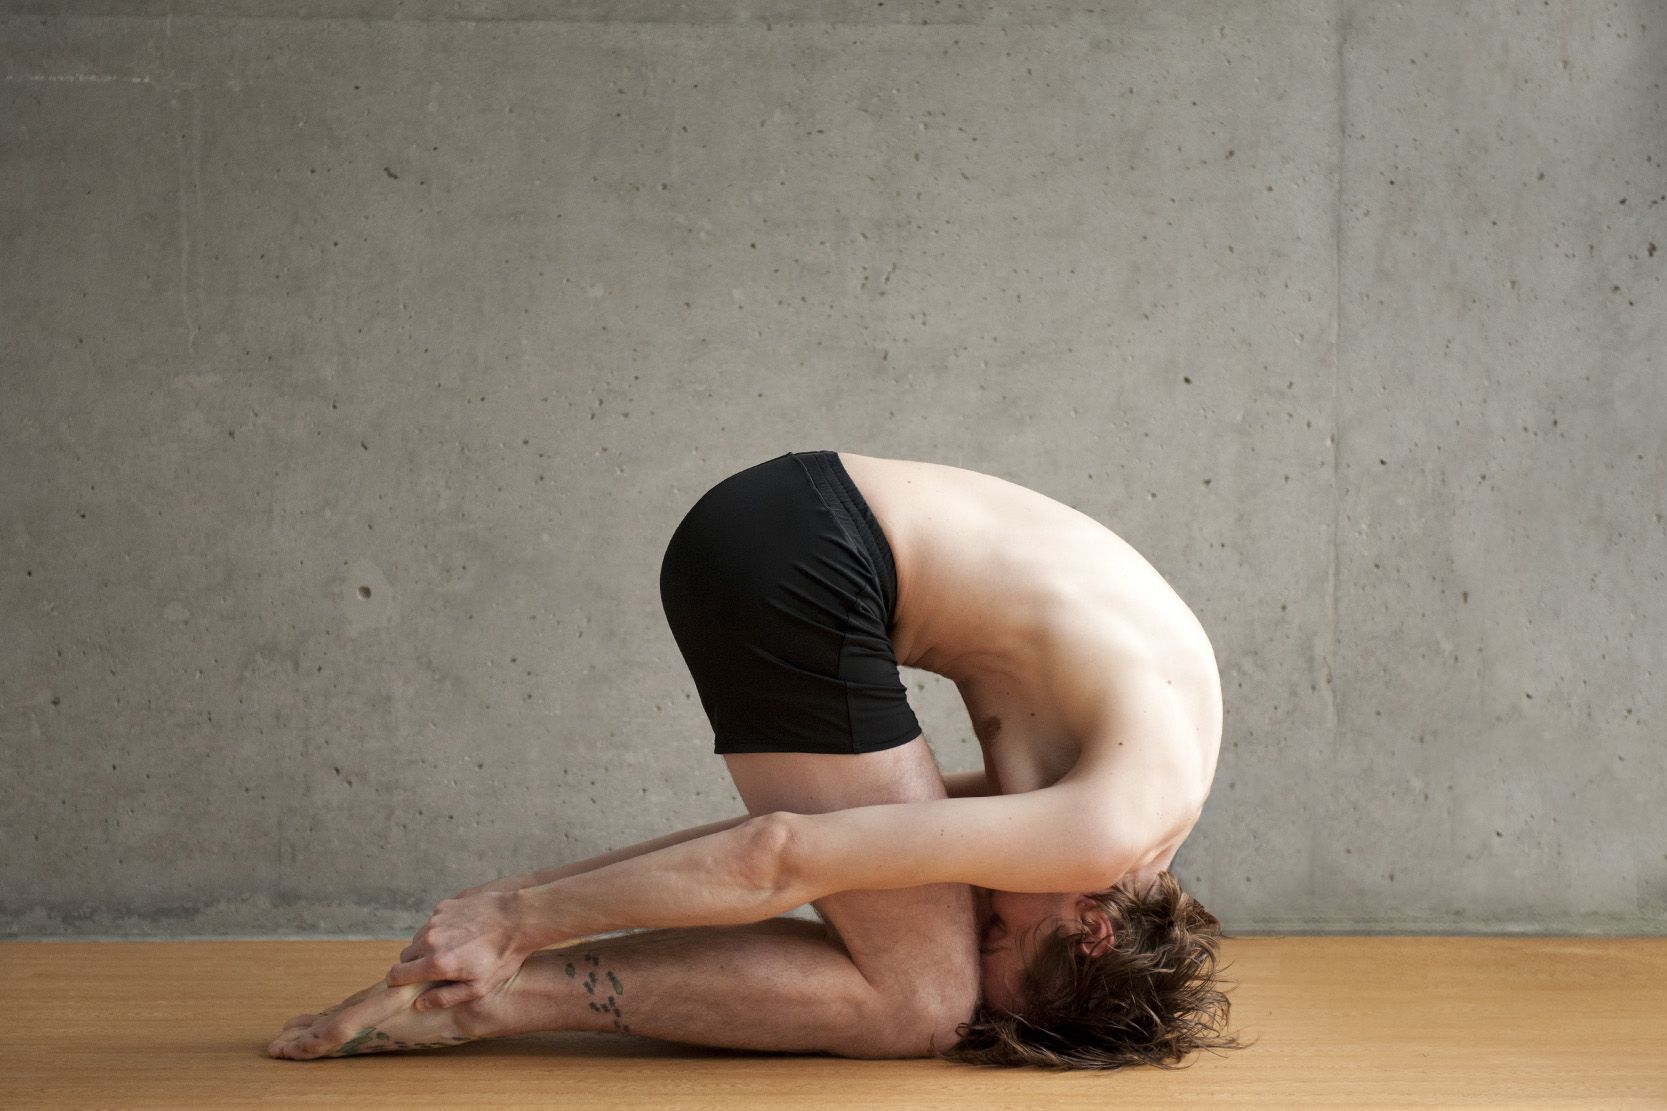
Feel your neck, spine, and glutes relaxing in this counter pose and hold it until the tension from your body is completely released. When you’re ready to release, bring your glutes down and sit straight in Thunderbolt pose.
Bhekasana Variations to Consider
There is no one-size-fits-all approach when it comes to the way yoga practitioners perform an asana. To fit your personal yoga style and pace of learning, here are a few variations for you to try in Bhekasana.
1. Viparita Salabhasana (Superman Pose): Lie on your stomach, with your forehead resting on the ground. Stretch your arms to the front, inhale and lift up your four limbs along with your chest and thighs in the air.

Focus on your breathing, and keep your core centered in this pose while maintaining mind-muscle coordination. If you're a beginner struggling to find strength in your core and back muscles for your Bhekasana practice, try this variation to build strength and stability.
2. Ardha Bhekasana (Half Frog Pose): Start from Sphinx pose, bend your left leg and pull your heel towards your left buttock. Now, with your left hand, reach back and grab your toes.
Depending upon your level of flexibility, pull your left heel inward, and slowly rotate your left finger forward by pointing your elbows toward the ceiling.
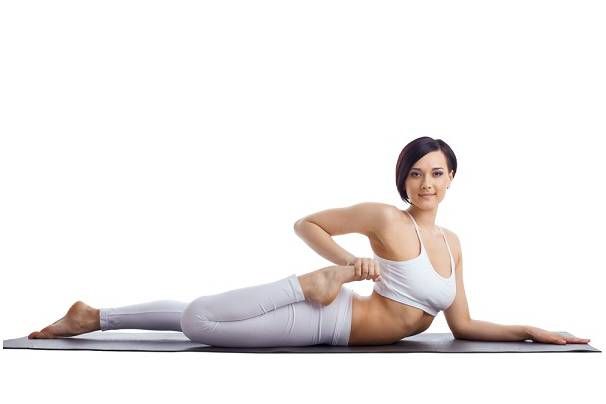
If it’s challenging for you to hold Bhekasana without tumbling to your side, this is an excellent variation to work on your muscles individually and gain equal strength on both sides for the primary practice.
3. Gherandasana I (Sage Gheranda Pose) - If you want to take your Bhekasana to the next level, try this variation:
Start by getting into Sphinx pose, bend your right leg, catch your right foot with your right hand, and lift your right knee off the mat by rotating your shoulder. Next, repeat the same on your left side as well.

Now, focus on your breath, bend your left foot close to the ground, and extend your right arm holding your right foot up toward the ceiling. Hold this for 30 seconds on each side, then gently release the pose.
Enjoy a Free 1-on-1 Session with a Coach!
Receive personalized guidance tailored to your unique fitness goals, live with a dedicated coach—no credit card required.
Frequently Asked Questions about Bhekasana
Bhekasana is good for strengthening your lower back while gently activating your shoulders, chest, and front thighs.
Yes, beginners can perform Bhekasana’s easy variations and modifications after some initial core, back, and leg conditioning.
However, if performing this pose causes any low back pain or stiffness in the legs, you should avoid this pose.
Vajrasana, Salabhasana, Salamba Bhujangasana, and Viparita Salabhasana are all great yoga poses to prepare or warm up all the necessary muscles in your body for Bhekasana.
Among many popular benefits of Bhekasana, here are a few:
- Great chest and spine opener.
- Increase core and lower back strength.
- Improves legs and shoulders flexibility.
- Boosts the functioning of reproductive and digestive system organs.
There are multiple variations in Bhekasana pose for intermediate-to-advance level yogis to try in their backend practice, like Ardha Bhekasana, Gherandasana I, and Gherandasana II.
In Sanskrit, Ardha means half, and Bheka means frog. Ardha Bhekasana or Half Frog pose is an easy back-bend variation for the full Bhekasana pose. It is regarded as a warm-up pose for the Bhekasana since only one leg is bent at once in this variation.


.webp)
%20(7).jpg)
