What is Astavakrasana (Eight-Angle Pose)?

Astavakrasana, or Eight-Angle Pose, is a modern arm balancing yoga asana. This pose requires immense power in the core, back, and arms to balance the body sideways on your arms for even a couple of seconds. This is not a pose for everyone since it demands advanced arm and core strength.
During the eight-angle pose practice, your arms are bent like Chaturanga arms, and your body is balanced sideways on one arm at a time. This pose is perfect for building mind-to-muscle connection, and at the same time, it helps you tone your whole body.
If you're excited to learn this powerful asana, find someone to spot you and get on the mat right away
Overview & Etymology
The name Astavakrasana comes from Sanskrit words, like 'Astavakra,' who was a handicapped sage and also the spiritual guru of King Janaka.
The sage's name ‘Astavakra’ literally translates to "eight curvature," associated with the eight handicap bends in his body. The next word is 'Asana,' which means posture or pose.
The eight-angle pose is not mentioned in any ancient Hatha yoga texts. This was first mentioned in the 19th-century book Vyayama Dipika (a book about gymnastics).
Later, it was adopted by Krishnamacharya in Mysore, which his students took up; one of them introduced this pose officially as a modern yoga pose in his 20th-century book 'Light on Yoga,' his name was B.K.S Iyengar.
Sanskrit Name: अष्टावक्रासन Pronunciation: ah-STAH-vah-KRAH-sah-nah
Pose Type: Arm Balance Also known as: Eight-Angle Pose
Strengthens: Arms, Wrist, Shoulders, Glutes, and Core
Stretches: Forearms, Wrist, Shoulders, Traps, Legs, and Spine
Health Benefits of Astavakrasana
- Increases body balance.
- Improves core strength.
- Enhances flow of Prana (energy).
- Enhances focus and concentration.
- Stretches the glutes, hamstrings, quads, and calves.
- High concentration improves mind-to-muscle connection.
- Tones the arms, shoulders, thighs, abdominals, and glutes.
- Strengthens the wrists, shoulders, back, traps, and forearms.
When to Avoid Performing Astavakrasana
- Avoid if you have a herniated disc.
- Avoid holding the pose for too long.
- Avoid if you have elbow or wrist arthritis.
- Avoid if you have inflammatory knee arthritis.
- Avoid if you have had a severe injury or surgery.
- Avoid during pregnancy and the menstrual cycle.
- Avoid if you’re a beginner and have no professionals around to assist.
How to do Astavakrasana (Eight-Angle Pose)
We’ve divided this detailed guide for Astavakrasana into four main parts, take a look below.
Part 1 - Preparatory Poses for Astavakrasana
The eight-angle pose requires a strong core, flexible wrists, and mobile shoulders. Here are a few preparatory yoga poses to help you prepare:
1. Phalakasana (Plank Pose): Get into a tabletop position and take a few breaths here. Next, inhale and step back each leg one by one. Your toes must be touching, your glutes, back, and neck must be in one line, and your palms should be pressing into the mat.

Hold this plank position for 1 to 3 minutes regularly to strengthen all your core muscles as well as your shoulders and wrists.
2. Paripurna Navasana (Full Boat Pose): Come to a seated position on your sit bones, with your hands behind you. Make sure your legs are together with both knees bent. Inhale and expand your chest, and at the same time, contract your navel to tighten your core muscles.
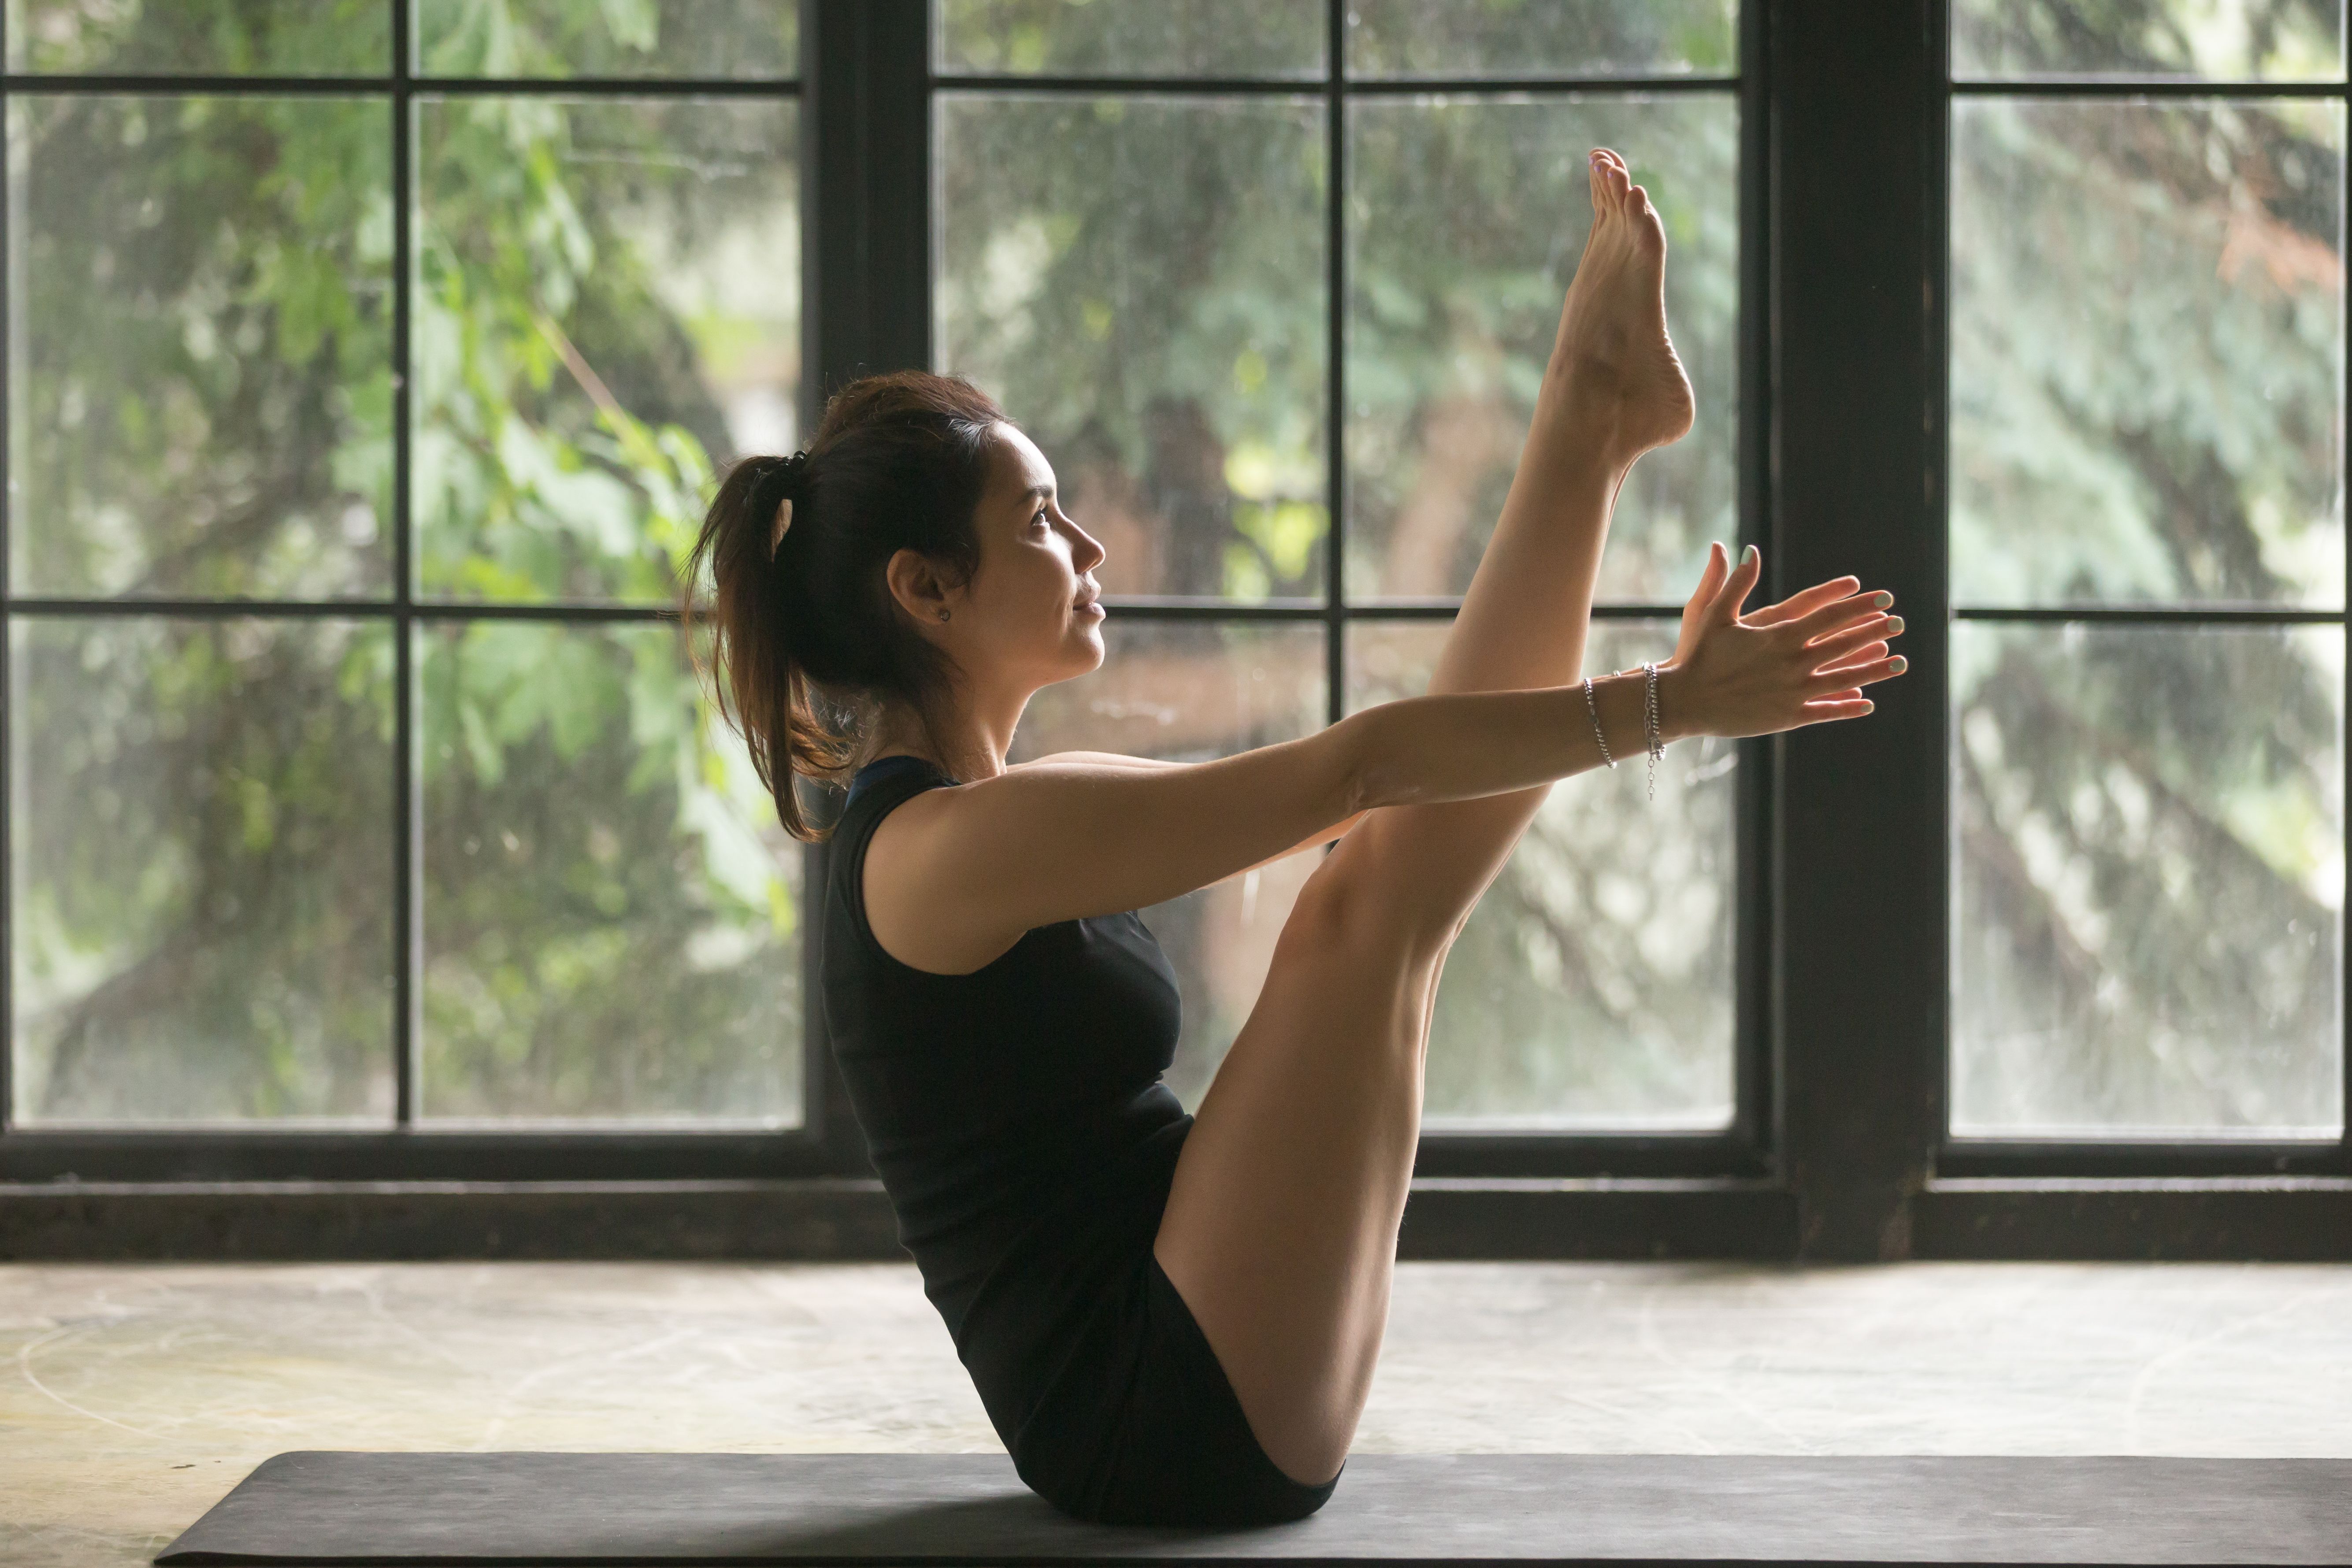
Descend very slightly so that you can balance on your sit-bones. Exhale, and lift your legs straight up while keeping your feet pointed. If you want to challenge yourself more, lift your arms from behind to bring them in line with your pointed legs and hold the pose here for a few seconds.
3. Chaturanga Dandasana (Four-Limbed Staff Pose): Start from a plank position, and take a few breaths here. Now, start shifting your body forward by getting on your toes, so your shoulders are past your wrists.
.webp)
Now, gently bend your elbows, keeping them close to your ribs. Bring your body down until your elbows are bent at a 90-degree angle. Hold the pose here to increase your back, shoulder, and wrist strength.
Part 2: Step-by-Step Instructions to Perform Astavakrasana
The following are steps to practice the eight-angle pose:
Step 1- Start by sitting in Staff pose. Keep your legs extended in front of you and your hands at your side.
Step 2- Bend your right leg and hold your right foot with both hands. Bring your foot close to your chest, cradle your leg sideways, and check for any muscle tightness.
Step 3- Take a few deep breaths and bring your right knee over your right arm. Make sure you flex your right leg high, making a 90-degree angle with the ground.
Step 4- Curve your right leg over your right shoulder, keep your left leg extended in front, place both hands at your sides on the mat, and prepare for the 'Elephant Trunk Pose'.
Step 5- Take a few breaths and get comfortable here. Now, inhale deep, tighten your core, and bend your left leg to hook your left foot around your right leg.
Step 6- With focus and an elongated exhale, press into your mat with your fingers as you lift your lower body off the mat.
Step 7- Bend your arms at a 90-degree angle (like in Chaturanga Dandasana), hinge your upper body forward, and keep your legs sideways in the air parallel to the floor.
Step 8- Maintain your body balance by concentrating on your senses, muscles, and breath. Hold this pose here for a few seconds while breathing slowly.
Step 9- Release by resting your pelvis on the yoga mat and returning to Staff pose for a few breaths. Finally, repeat the same on the other side.
Breath Awareness:
- Inhale: Before lifting off the mat, while engaging your core, pelvis, and fingers.
- Exhale: While lifting your pelvis off the mat and getting into Chaturanga arms.
Performance Duration for Beginners: Hold Astavakrasana for 10 to 30 seconds on each side.
Performance Duration for Advanced: Hold Astavakrasana for 30 to 90 seconds on each side.
Part 3: Things to Keep in Mind
Every perfect arm balance posture requires awareness of alignment, so here are some posture cues for you to follow while executing the eight-angle pose:
- Keep your core tight: A weak core symbolizes the need to strengthen your abs, thighs, and back muscles, before trying Astavakrasana. Without an engaged core, you won't be able to lift your lower body off the mat.
- Check your hands' placement: Place the palms of your hands right below your shoulders. Avoid placing them too close to your glutes, as this will allow you to bend your elbows for Chaturanga arms formation smoothly.
Part 4: Relaxing Poses After Astavakrasana
Here are a few counter-poses you can try after Astavakrasana for faster recovery.
1. Wrist Rotations: Balancing your whole body on your wrists for long durations can restrict blood circulation. This may affect your safety and mobility of your wrist joints.

So, right after your arm balance practice, make a fist with your palms and start to circle your fist in a clockwise motion, and then repeat counter-clockwise. Repeat this 100 times in each direction for smooth blood circulation throughout.
2. Cow Face Arms Stretch Pose: If you're feeling tension in the elbows, neck, shoulders, and spine post-practice, this asana is for you.
Start by extending your right arm overhead, straight in the air. Bend your right arm and bring its palm behind your back. Now, get your left arm behind from the lower left side of your abdomen and try to reach for your right hand's fingers.

Once both fingers are interlocked together, inhale deep, expand your chest and straighten your spine. Hold this stretch for a few minutes to relax your shoulders, spine, and upper back. Release, exchange arms position, and repeat on the other side.
3. Balasana (Child’s Pose) - Kneel at the edge of your mat and sit on your heels so that your big toes touch each other. Ensure that your thighs are hip-width apart. Inhale deep, extend both arms overhead and start to bend your upper body forward.

Exhale while you bring your hands, head, and chest onto the mat, and relax your upper body entirely with a few deep breaths. Hold this position for 3 to 5 minutes for deep relaxation.
Astavakrasana Variations to Consider
These intermediate-level pose variations will help you build strength and mind-muscle connection over time for the main pose:
1. Eka Hasta Bhujasana (Elephant's Trunk Pose): This is a foundation pose for beginners to master before getting into the eight-angle arm balance. Start by sitting in Staff pose and bend your right leg. First, bring your right foot close to your chest, then flex it straight at a 90-degree angle with the ground.
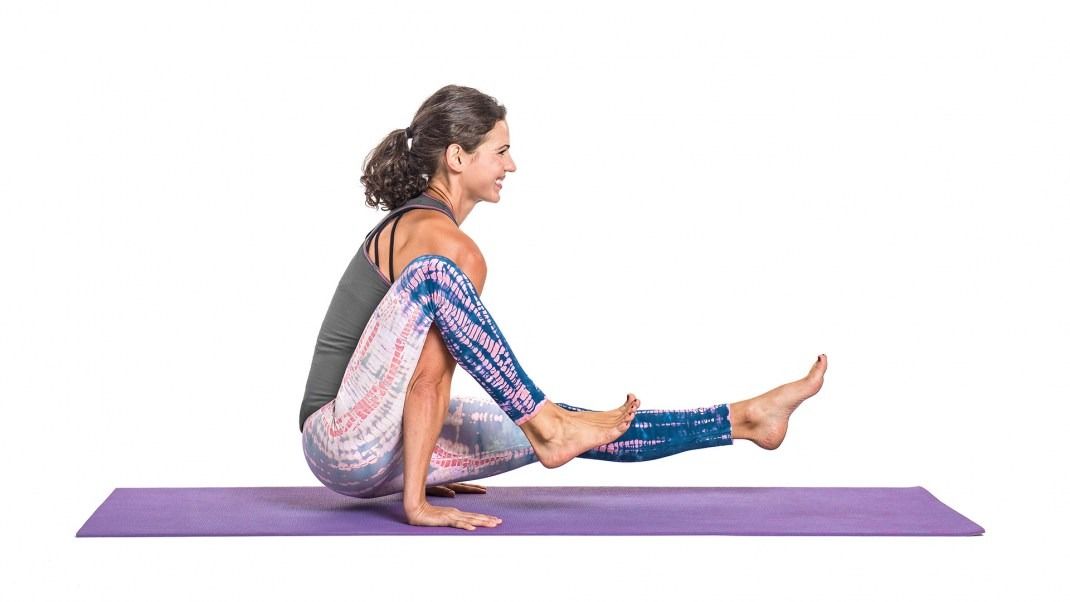
Thread your right arm under your right knee, let your right knee bend, and rest on your right shoulder. Keep your left leg in front and place both palms at the side of your glutes.
Now, engage your core, press into the yoga mat with your palms, and lift your lower body off the mat. Hold this elephant trunk-like pose for 3 to 5 breaths, then release, relax and repeat on the other side.
2. Ardh Parsva Kakasana (Half-Side Crow Pose): If you cannot hold your pelvis up every time you try to extend your legs sideways, this variation is for you. Don’t extend your legs immediately – practice the side Crow pose and build a mind-muscle connection for stabilizing your pelvis in an asymmetrical arm-balance with bent legs.
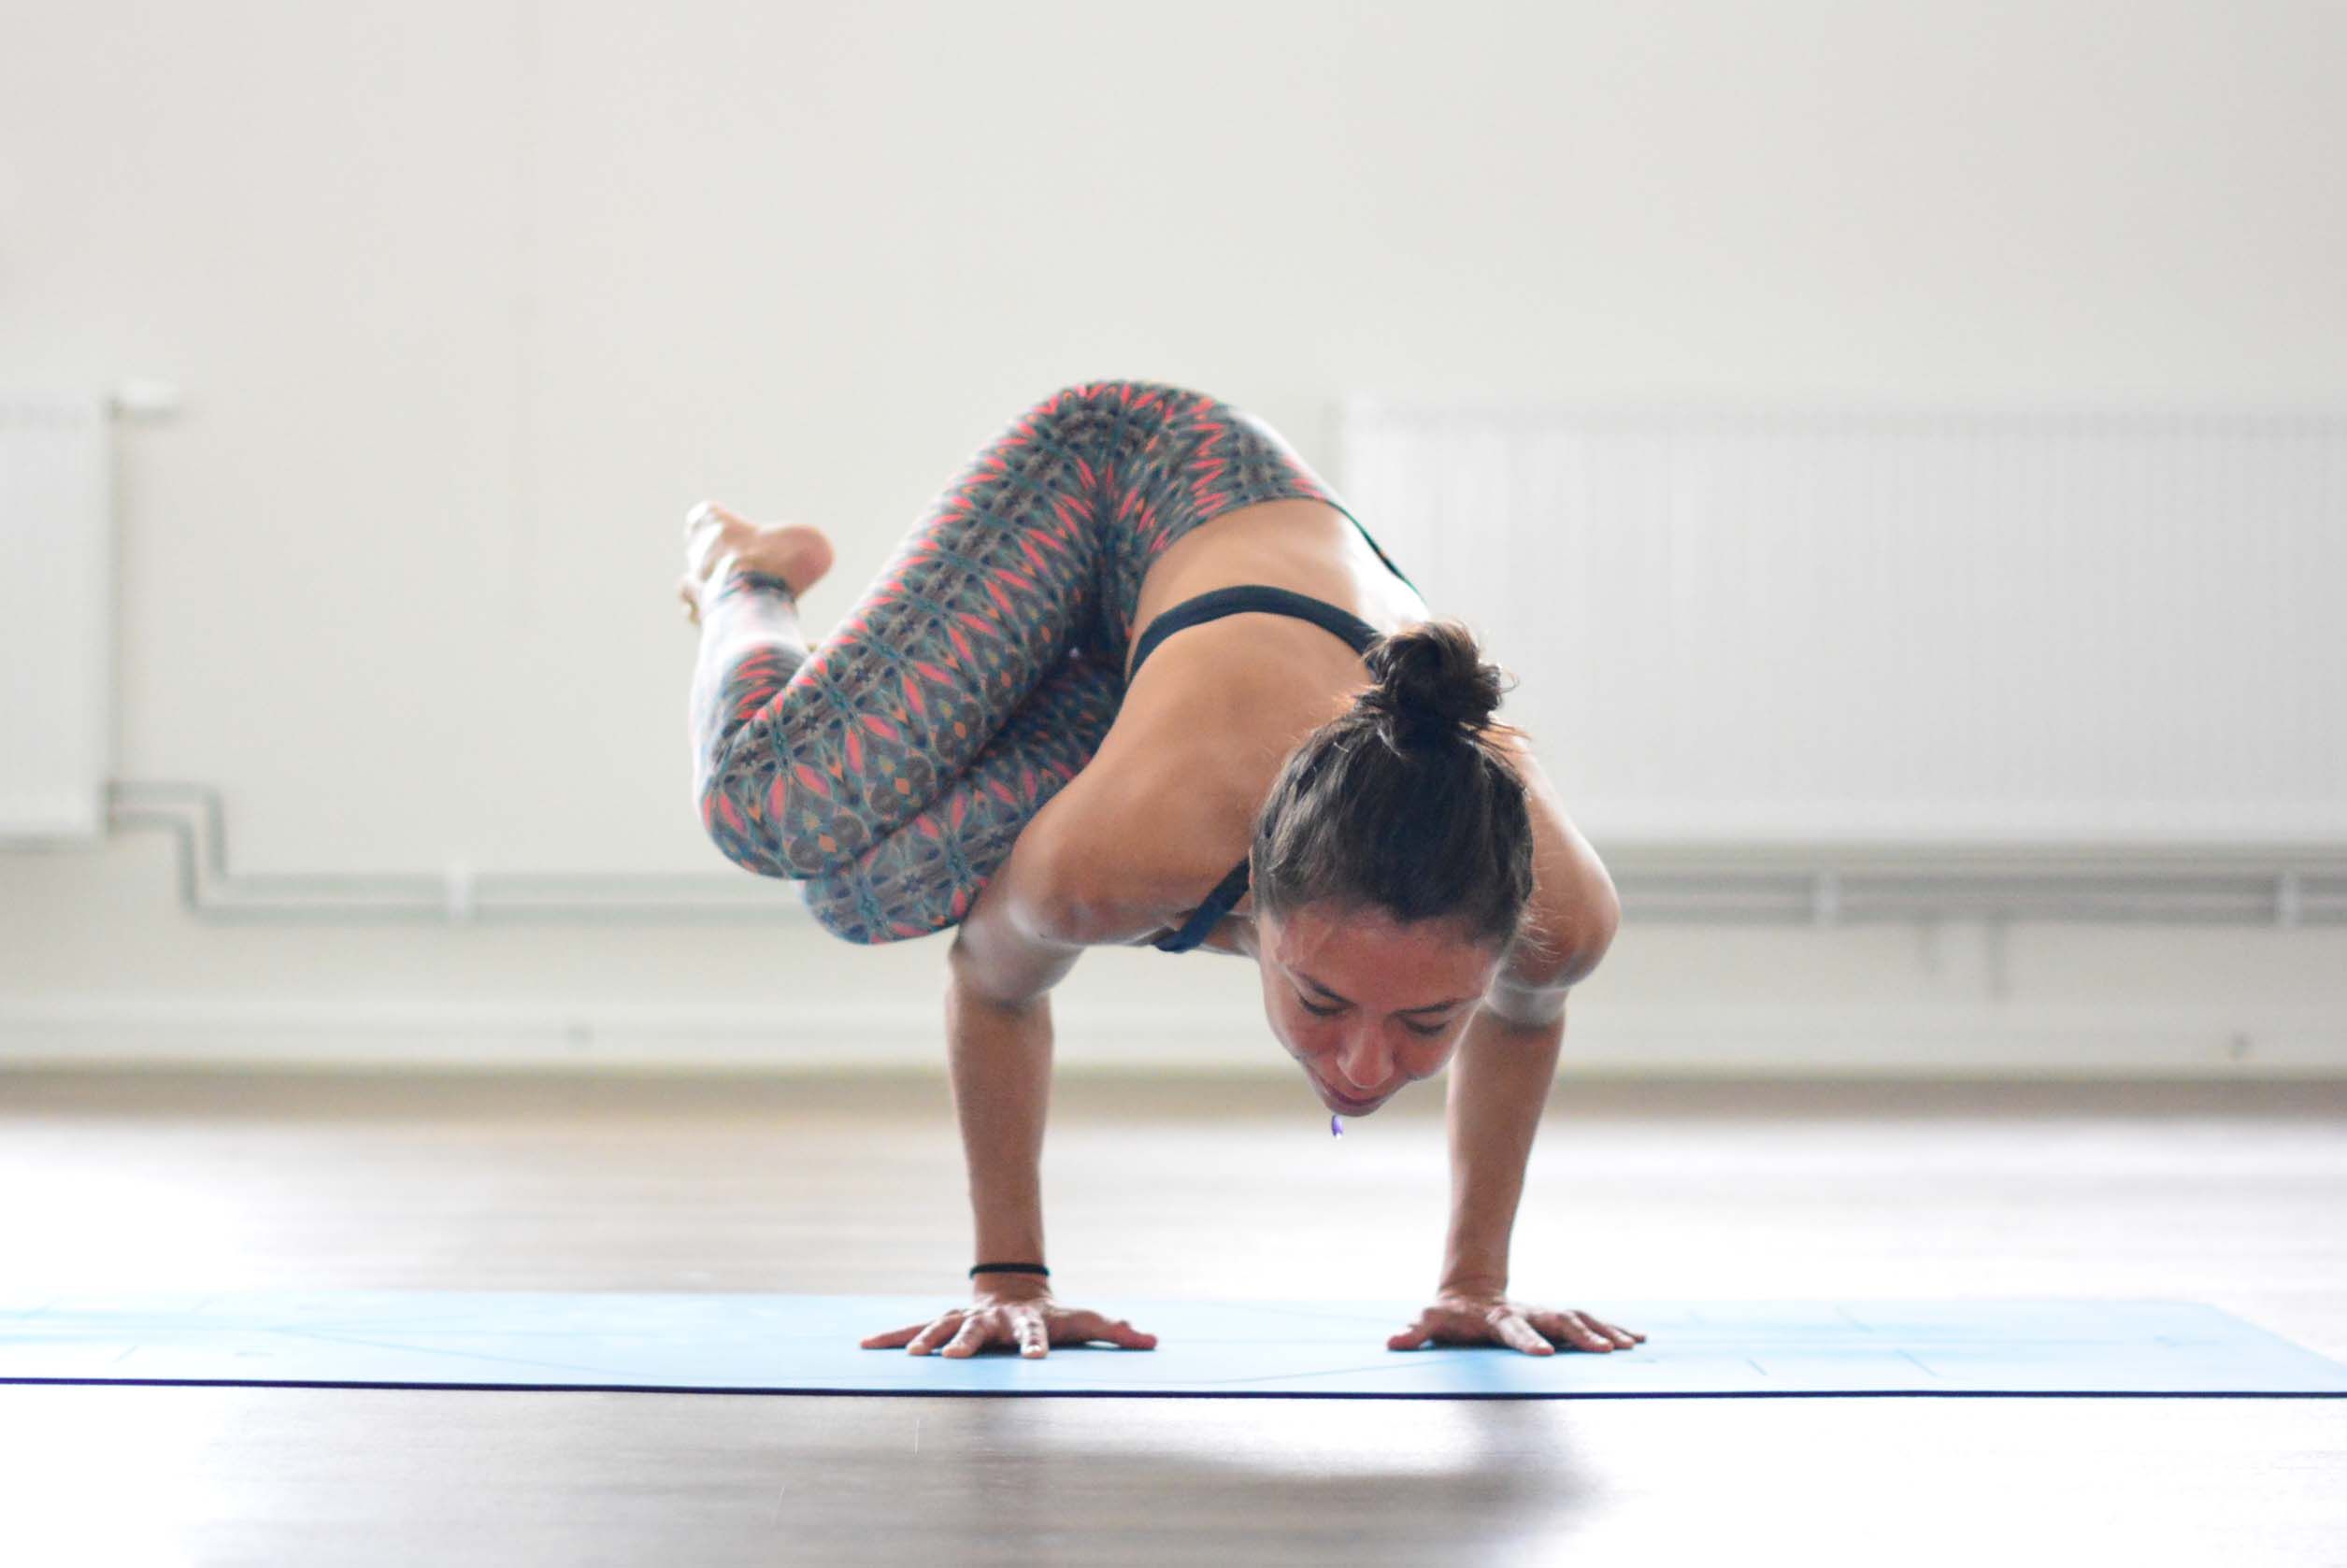
Come to a squat, twist your upper body to your right side, and place both your palms shoulder-width apart on the mat. Inhale and engage your core, form Chaturanga elbows, and rest your right knee on your left elbow.
Slowly shift your weight from your toes to your wrists and lean forward. Make sure your knees are bent and stacked on each other during arm balance.
Once you get used to this variation, you’ll develop better muscle stability, which will help you quickly extend your legs in the eight-angle pose.
Enjoy a Free 1-on-1 Session with a Coach!
Receive personalized guidance tailored to your unique fitness goals, live with a dedicated coach—no credit card required.
Frequently Asked Questions about Astavakrasana (Eight-Angle Pose)
Astavakrasana is a powerful pose and is mostly executed by advanced practitioners. Beginners should not perform Astavakrasana without appropriate core and arm strength.
Combine Navasana, Chaturanga Dandasana, Hindolasana and Eka Hasta Bhujasana in a warm-up sequence to prepare your full body muscles for the Astavakrasana practice.
Benefits of Astavakrasana yoga include strengthening your arms, shoulders, core, and wrists. Plus, it helps enhance your focus, improves body balance, and increases muscle mass in your upper body.
The following are different variations of Astavakrasana, and each of them target similar types of muscle groups:
- Lolasana
- Titibasana
- Mayurasana
- Parsva Bakasana
Avoid if you have arthritis or you are a beginner with zero professional guidance. Also, women should temporarily avoid this pose during pregnancy or menstruation cycle.
It’s recommended to stretch your arms in the Cow-Face pose after Astavakrasana, move your wrist and shoulders in circles (both clockwise & anti-clockwise), and relax your spine in the Child’s pose after your Astavakrasana practice.


.webp)
%20(7).jpg)
