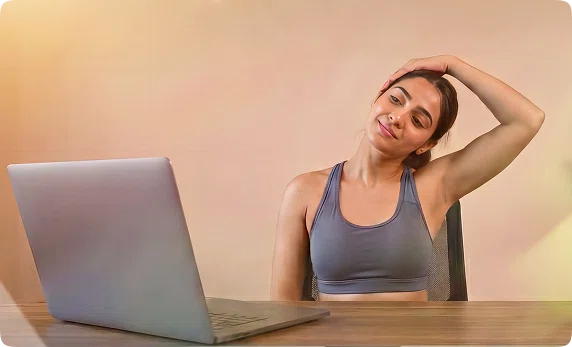
What is Shoulder Stand Pose (Sarvangasana)?
Sarvangasana (pronounced sar-van-GAHS-anna) is a shoulder-supported inversion in which the body is lifted vertically on the shoulders and upper back, with minimal pressure on the neck. Often referred to as Shoulder Stand Pose, it is traditionally valued in yoga for its effects on circulation, the thyroid and throat region, and its calming influence on the nervous system.
Being an active inversion, Sarvangasana requires strength, preparation, and careful alignment. When practiced with proper technique and appropriate props, it offers a safe and systematic way to experience the benefits of inversions.
Sarvangasana: Overview and Meaning of Shoulder Stand Pose
Sarvangasana comes from three Sanskrit words — sarva (all), anga (limbs), and asana (pose) — giving it the meaning “All-Limbs Pose” or “Pose for the Whole Body.” The name reflects how this inversion influences multiple systems, including circulation, glandular function, and the nervous system. This broad impact is why Sarvangasana is often referred to as the “Queen of Asanas,” complementing the more stimulating Headstand (Sirsasana), known as the “King of Asanas.”
Historically, Sarvangasana is mentioned in classical Hatha Yoga texts as a pose that helps keep the body balanced and healthy. The Hatha Yoga Pradipika highlights it as a rejuvenating posture — supports circulation, helps regulate energy, and can calm the nervous system when practiced safely.
In contemporary yoga, Sarvangasana remains a central inversion across styles such as Hatha, Ashtanga, and Iyengar. With the emphasis on neck safety and blanket support, the pose is now taught with a strong focus on alignment and accessibility. Today, practitioners value Sarvangasana not only for its classical importance but also for its practical benefits.
At a Glance
- Sanskrit Name: सर्वाङ्गासन (Sarvangasana)
- Pronunciation: sar-van-GAHS-anna
- English Names: Shoulder Stand, Shoulder Stand Pose, All-Limbs Pose
- Pose Type: Active inversion, balancing pose
- Also Known As: Salamba Sarvangasana (Supported Shoulder Stand)
- Level: Intermediate to Advanced
- Suggested Duration: 30 seconds – 5 minutes (with gradual progression)
- Best Time to Practice: Morning or mid-practice (avoid late evening/bedtime)
- Main Benefits: Supports thyroid function, improves circulation, refreshes tired legs, calms the nervous system, promotes overall balance
- Primary Chakras: Throat (Vishuddha), Third Eye (Ajna), Crown (Sahasrara)
- Essential Props: 2–3 firm, folded blankets under the shoulders for neck safety
Salamba vs. Niralamba Sarvangasana
There are two main ways to practice the Shoulder Stand. The supported version (Salamba) is the foundation; the unsupported version (Niralamba) is an advanced progression. Here’s a clear breakdown of each.
1. Salamba Sarvangasana (Supported Shoulder Stand)
The safest and most widely taught version, ideal for most practitioners.
- Set up 2–3 blankets under your shoulders for neck safety.
- Lie down with your shoulders on the blankets and your head on the floor.
- Bend your knees and lift your hips, bringing your thighs toward your chest.
- Place your hands on your lower back with your elbows close to your body.
- Walk your hands higher up the back until your torso lifts more vertically.
- Straighten the legs upward, aiming for the hips over the shoulders.
- Press elbows into the blankets and lift the chest toward the chin.
- Hold with smooth breath, keeping weight on shoulders and upper arms.
Note: This guide focuses primarily on Salamba Sarvangasana because it offers the most support and is the foundational form of Shoulder Stand.
2. Niralamba Sarvangasana (Unsupported Shoulder Stand)
An advanced variation, practiced only after mastering the supported form.
- Begin in Supported Shoulder Stand with stable alignment.
- Ensure legs are vertical and breath is steady.
- Slowly release one hand at a time from the back.
- Extend both arms either overhead on the floor or alongside the body.
- Keep lifting through the torso using core strength instead of hand support.
- Maintain vertical alignment without collapsing the chest or arching the lower back.
- Hold briefly, then return the hands to the back before coming down.
It’s best to work 1-on-1 with a certified yoga instructor to understand when you’re ready to progress from the supported to the unsupported version.
Benefits of Sarvangasana (Shoulder Stand)
Sarvangasana is believed to influence circulation, hormones, digestion, energy, and the nervous system — all while strengthening the shoulders, arms, and core. When practiced safely and consistently, it can become a deeply therapeutic and rejuvenating part of your routine.
Endocrine & Metabolic Benefits
- Stimulates the thyroid gland: The throat compression can help support healthy thyroid function, which plays a major role in energy, metabolism, and hormone balance.
- Balances parathyroid activity: Shoulder Stand brings gentle pressure to the parathyroid glands, which are involved in calcium regulation and bone strength.
- Supports overall hormonal stability: Sarvangasana is traditionally believed to help regulate the endocrine system as a whole.
- Helps maintain healthy metabolism: Gentle inversion and throat stimulation may support better metabolic balance when practiced regularly.
- Promotes balanced reproductive hormones: The pose can support hormonal cycles in both men and women.
- May help with menstrual regularity: When practiced long-term, some practitioners report better hormonal rhythm.
- Supports healthy aging: Balanced hormones and improved circulation contribute to vitality as you age.
Circulatory & Physical Benefits
- Improves venous circulation: Inversion helps blood flow from the legs back toward the heart, reducing pooling and refreshing heavy legs.
- Supports lymphatic drainage: Helpful for reducing swelling, boosting immunity, and improving detoxification.
- Eases varicose veins & leg fatigue: The reversed blood flow can help manage early symptoms of venous issues.
- Reduces pressure linked with hemorrhoids: Inversion helps redirect blood flow and reduce strain.
- Strengthens the respiratory system: The inverted position encourages deeper diaphragmatic breathing.
- Improves digestion: Gentle compression of the abdomen may stimulate peristalsis and digestive function.
- Helps relieve constipation: Inverted position and abdominal engagement often support regular bowel movements.
- Strengthens core, arms, and shoulders: Supporting the body weight builds stability and postural strength.
- Enhances spinal flexibility: Particularly through the upper back and shoulder girdle.
- Improves balance and proprioception: Inversion builds spatial awareness and neuromuscular control.
Mental & Nervous System Benefits
- Calms the nervous system: Shoulder Stand is known for its soothing effect on the mind, helping shift from stress to relaxation.
- Reduces stress and anxiety: The cooling, grounding quality of the pose helps settle mental agitation.
- Improves mental clarity: Many practitioners experience sharper focus after practicing Sarvangasana.
- Enhances concentration: Inversions naturally heighten awareness and presence.
- Relieves mental fatigue: The shift in blood flow and calming effect helps reset a tired mind.
- Improves sleep quality: When practiced earlier in the day, it can support relaxation and better nighttime rest.
- Supports relief from mild depression: The grounding, soothing quality can help uplift low moods.
Energetic & Spiritual Benefits
- Stimulates the Throat Chakra (Vishuddha): Linked to communication, expression, and inner truth.
- Activates the Third Eye Chakra (Ajna): Traditionally believed to enhance intuition and clarity.
- Opens the Crown Chakra (Sahasrara): Associated with higher awareness and spiritual connection.
- Balances overall energy flow: Through its inverted nature and calming quality.
- Cultivates inner quiet and stillness: Helpful for settling into meditation.
- Deepens introspection: Inversions often encourage pratyahara — drawing the senses inward.
Learn more about the 7 Chakras in this detailed guide!
Therapeutic Applications
Sarvangasana is traditionally used for:
- Thyroid imbalance (especially low thyroid function)
- Varicose veins and leg swelling
- Mild anxiety and stress
- Insomnia (when practiced mid-day)
- Mild respiratory issues
- Digestive sluggishness
- Menstrual irregularities
- Low energy or chronic fatigue
- Early-stage mild hypertension (with supervision)
Work with an expert coach and reap the benefits of Shoulder Stand Pose safely. Book a free 1-on-1 session today!
How to Do Shoulder Stand (Sarvangasana): Step-by-Step Guide
Sarvangasana is an intermediate-to-advanced inversion that requires mindful setup, strong shoulder activation, and careful neck protection. Below is a clear breakdown to help you build confidence and avoid common mistakes.
Part 1: Preparing for the Pose
Blanket Setup for Neck Safety
Proper blanket setup is the single most important part of a safe Shoulder Stand. Elevating your shoulders keeps the weight off the cervical spine and allows the neck to maintain its natural curve.
- Fold 2–3 firm blankets into rectangles about 12–18 inches wide.
- Stack them neatly so all edges line up.
- Place the stack on your mat with the folded edges closest to you.
- Lie down so your shoulders rest on the blankets, while your head stays on the floor.
- There should be 2–3 inches of blanket beyond your shoulders to support your upper back.
- Never practice Shoulder Stand directly on the floor without this support.
Proper props can be the difference between a stable, therapeutic inversion and unnecessary strain.
Warm-Up Sequence (5–10 Minutes)
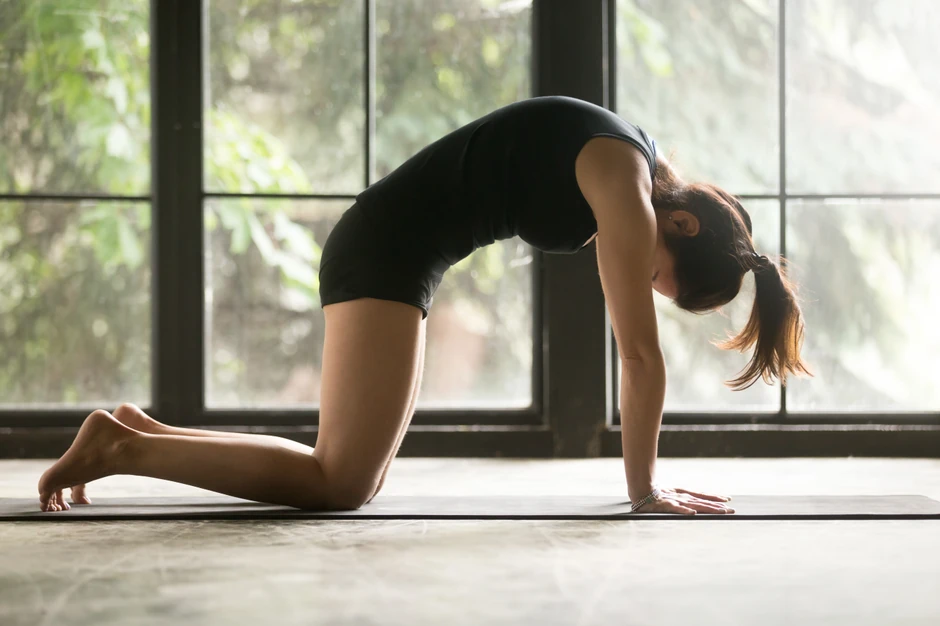
Before lifting into Shoulder Stand, prepare your spine, shoulders, and core with these essential movements:
- Cat–Cow Pose (10 rounds): Warms and mobilizes the spine.
- Bridge Pose (Setu Bandhasana): Strengthens shoulders and opens chest (hold 30–60 seconds, and repeat for 2–3 rounds).
- Plow Pose (Halasana): Prepares spine and shoulders for inversion (hold ~30 seconds if comfortable).
- Dolphin Pose: Builds shoulder stability and core strength (hold 30 seconds).
- Supported Bridge: Block under sacrum to gently open front body (hold 1 minute).
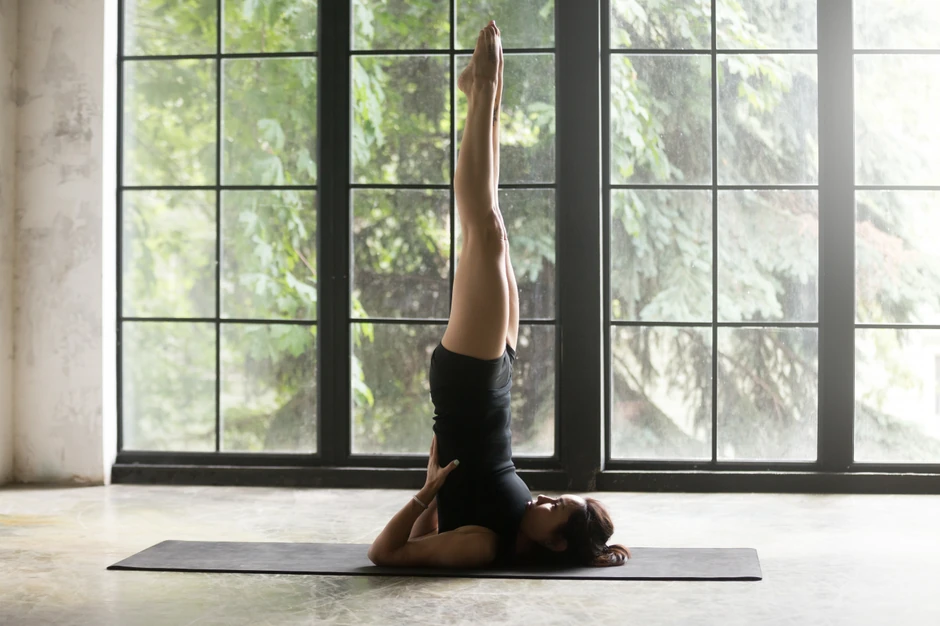
Part 2: How to Do Sarvangasana (Shoulder Stand Pose): Step-by-Step
- Stack 2–3 folded blankets with edges aligned. Lie down so your shoulders rest on the blankets and your head stays on the mat.
- Arms by your sides, palms pressing into the floor. Legs extended together, toes pointing up.
- Draw your knees toward your chest as you press your hands into the floor. Activate your core — this will help lift you up smoothly.
- On an exhale, press down through your arms and lift the hips up. Bring the thighs toward the chest as your torso rises.
- Bend your elbows and place your palms on your lower back, fingers pointing upward. Keep elbows shoulder-width apart.
- Straighten both legs toward the ceiling. Work slowly toward vertical alignment.
- Align well:
- Press weight into shoulders and upper arms, not the neck.
- Walk your hands higher up your back toward the shoulder blades.
- Lift the chest toward the chin (natural chin lock).
- Stack feet over hips and hips over shoulders.
- Press elbows down to stabilize.
- Lengthen upward through the balls of your feet.
- Keep legs active, strong, and hugging toward the midline.
- Maintain slow, steady breaths through the nose.
- Beginners: 30 seconds–1 minute
- Intermediate: 1–3 minutes
- Advanced: 3–5 minutes
- Exit safely:
- Bend the knees toward the forehead.
- Roll down vertebra by vertebra, keeping your hands on your back for control.
- Lower your feet with complete awareness.
- Rest flat on the floor for 5–10 breaths.
Common Mistakes & How to Fix Them
- Weight on the Neck: This creates strain and risk of injury. Instead, use blankets; walk hands higher up the back; lift the chest more
- Elbows Sliding Outward: This reduces stability. Use a strap around the upper arms; press elbows down firmly.
- Lower Back Arching (“Banana Shape”): This can cause collapse and discomfort. Engage core; tuck tailbone; bring hands higher up the back
- Legs Leaning Forward can make balancing difficult. Instead, shift your weight toward your shoulders; engage the core; lift the chest
- Holding the Breath can create tension. Try slow, steady nasal breathing.
- Turning the Head is a high risk of neck injury. Try to keep gaze straight up toward feet or chest; stay centered.
For real-time adjustments, step-by-step guidance, and help building confidence in the pose, book your free 1-on-1 session with an expert yoga teacher today.
Sarvangasana Variations
Sarvangasana can be adapted for beginners, strengthened for intermediate practitioners, and refined into advanced expressions. The following variations help you build confidence, protect your neck, and gradually expand your inversion practice.
Beginner Modifications
These variations help you build shoulder stability, core strength, and familiarity with inversion without overwhelming your body.
1. Supported Shoulder Stand with Wall
Provides effortless balance, reduces fear, and builds awareness of vertical alignment.
- Sit with your hips close to the wall.
- Lie down and walk your feet up the wall.
- Lift your hips slightly and support your back with your hands.
2. Ardha Sarvangasana (Half Shoulder Stand)
This is ideal for beginners trying to build strength.
- Keep knees bent toward the forehead.
- Lift hips only partially.
3. Elevated Shoulder Stand (Chair-Assisted)
Common in Iyengar Yoga; excellent for learning proper shoulder and upper-back integration.
- Place your shoulders on a stable chair seat with your head on the floor.
- Legs lift with minimal pressure on the neck.
4. Strap Around Elbows
Prevents elbows from splaying, increasing stability and lift.
- Place a looped strap around the upper arms at shoulder-width.
Intermediate Variations
For practitioners who can hold the Supported Shoulder Stand with confidence and stable breath.
5. Eka Pada Sarvangasana (One-Legged Shoulder Stand)
This variation provides a deep hamstring stretch, challenges the core, and improves balance and awareness.
- One leg stays vertical.
- The other slowly lowers toward the floor.
6. Parsva Sarvangasana (Side Shoulder Stand)
This version adds a gentle twist, strengthens the obliques, and develops deeper torso control.
- Legs shift together to one side.
7. Parivritta Eka Pada Sarvangasana (Revolved One-Leg Variation)
Builds better balance and core strength and prepares the body for advanced inversions.
- One leg lowers across the body diagonally.
Advanced Variations
These require stability, open shoulders, and refined control. Avoid unless you’ve mastered the full supported form.
8. Niralamba Sarvangasana (Unsupported Shoulder Stand)
Demands exceptional core strength and precise alignment.
- Arms extend overhead or alongside the body.
- No hand support behind the back.
9. Padma Sarvangasana (Lotus Shoulder Stand)
This variation requires high hip mobility & knee safety.
- Bring legs into Lotus while inverted.
10. Urdhva Padmasana (Upward Lotus)
Extreme hip flexibility and spine control are required for this version.
- From Lotus Shoulder Stand, lower knees toward the chest or face.
Essential Props
Props make Sarvangasana safer and more accessible, especially for different body types.
- 2–3 firm blankets (for neck and shoulder support)
- Yoga strap (prevents elbows from sliding)
- Wall support (confidence + alignment assistance)
Sarvangasana (Shoulder Stand Pose): Precautions & Contraindications

If you’re unsure whether this pose is right for you — or how to modify it safely for your body — working with a coach can make all the difference. Book a free 1-on-1 session today!
Sarvangasana is a deeply beneficial pose, but it also places your neck, throat, shoulders, and cardiovascular system in a sensitive position. These guidelines help you practice safely and confidently.
Avoid Sarvangasana Completely If You Have:
- Neck injury or chronic neck pain
- Uncontrolled high blood pressure
- Glaucoma or serious eye conditions
- Detached retina or recent eye surgery
- Heart disease, arrhythmia, or recent cardiac surgery
- Hiatal hernia
- Pregnancy (all trimesters)
- Menstruation
- Recent abdominal surgery
- Severe osteoporosis
- Severe thyroid enlargement or hyperthyroidism (consult a doctor first)
Practice with Caution in Case Of:
- Controlled high blood pressure: Keep the holds short (10–30 seconds) and exit immediately if you feel pressure in the head.
- Menstruation: Listen to your body; choose a gentler pose like Legs-Up-the-Wall if unsure.
- Thyroid disorders: Sarvangasana may influence the thyroid area; check with your endocrinologist before practicing.
- Cervical spondylosis or neck weakness: Generally discouraged; only practice with clearance and expert supervision.
- Higher body weight / heavy torso: The neck may take more load; use extra props or a wall-assisted setup.
- Headaches or migraines: Inversions may trigger discomfort; monitor closely.
Essential Safety Guidelines
DON’Ts:
- Practice the Shoulder Stand on your first day of yoga
- Practice without 2–3 firm blankets under the shoulders
- Turn your head in the pose (high injury risk)
- Hold longer than your breath allows
- Practice right after eating (wait 3–4 hours)
- Practice right before bed (can be too stimulating)
DO’s:
- Warm up with 5–10 minutes of shoulder and spine preparation
- Exit slowly and rest afterward
- Follow with Fish Pose (Matsyasana) to release the neck
- Stay aware of your breath and sensations
- Respect your body’s limits
Shoulder Stand Pose: Related Yoga Poses
Here are more poses that complement Sarvangasana:
1. Headstand (Sirsasana)
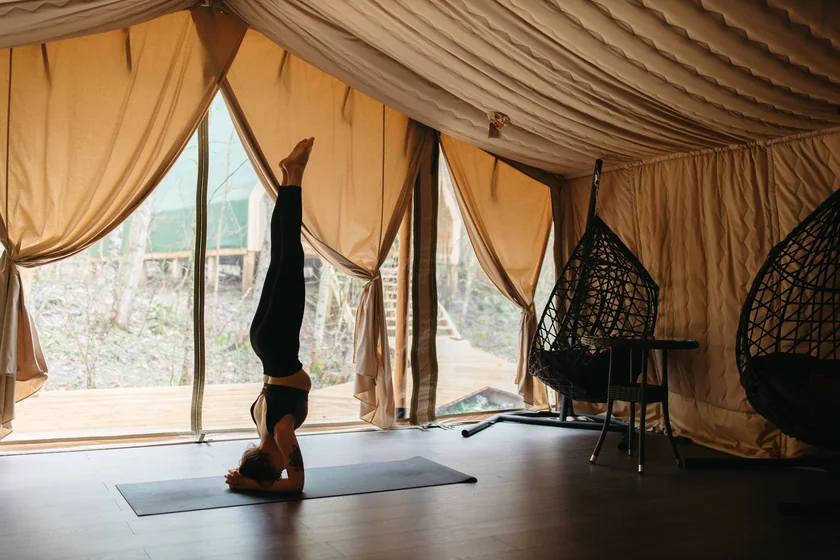
Builds upper-body strength, improves balance, and increases mental focus.
- Start in Dolphin Pose with forearms on the floor.
- Place the crown of your head down and create a tripod with your forearms.
- Walk your feet in and slowly lift your hips.
- Engage your core and lift both legs up into a vertical line.
2. Supported Shoulder Stand (Salamba Sarvangasana)
Supports circulation, stimulates the throat/thyroid region, and calms the nervous system.
- Lie on blankets with your shoulders elevated and head on the floor.
- Lift your hips and bring your thighs toward your chest.
- Place your hands on your lower back for support.
- Straighten legs upward, stacking hips over shoulders.
3. Forearm Stand (Pincha Mayurasana)
Strengthens shoulders and core while building confidence in inversions without neck pressure.
- Start in Dolphin Pose with forearms firmly grounded.
- Walk your feet closer to your elbows to lift the hips.
- Kick or float one leg up, then the other.
- Engage your core and press through the forearms to balance.

Enjoy a Free 1-on-1 Session with a Coach!
Receive personalized guidance tailored to your unique fitness goals, live with a dedicated coach—no credit card required.
Frequently Asked Questions
Sarvangasana is traditionally known for its whole-body impact. It can help stimulate the thyroid gland, improve circulation, refresh tired legs, support hormone balance, strengthen the core and shoulders, calm the nervous system, and enhance mental clarity.
Sarvangasana is an active, strength-based inversion where you lift your body onto your shoulders and engage the legs, arms, and core. Viparita Karani is a passive, restorative inversion done at the wall with little to no muscular effort.
- Sarvangasana: 30 seconds–5 minutes, requires strength & props
- Viparita Karani: 5–20 minutes, gentle & beginner-friendly
Choose Sarvangasana for strengthening; choose Viparita Karani for relaxation.
- Beginners: 10–30 seconds
- Intermediate: 1–3 minutes
- Advanced: 3–5 minutes
Always build gradually over weeks and months. Never exceed your capacity, and come out immediately if you feel neck strain or your breath becomes restricted.
For proper technique and guidance, book a free session today!
Sarvangasana (Shoulder Stand Pose) is known as the “Queen of Asanas.” It complements Headstand with a more calming, therapeutic quality and is traditionally said to support the entire body system — especially circulation, hormones, and the nervous system.
Shoulder Stand Pose should be avoided by anyone with neck injuries, uncontrolled high blood pressure, glaucoma or serious eye conditions, heart disease, recent surgery, severe osteoporosis, or active thyroid enlargement. It’s also generally not recommended during pregnancy, menstruation (based on traditional guidance), or for children under 12 whose cervical spine is still developing.
If you have any medical conditions or experience discomfort in the neck, it’s best to skip this pose or learn it only under the supervision of an experienced teacher.
Fish Pose (Matsyasana) is the essential counter pose. Hold it for at least half the duration of your Shoulder Stand.
Fish Pose gently stretches the throat and chest, reversing the deep neck flexion, and restoring balance in the spine.
Follow with 1–2 minutes of Savasana (Corpse Pose) to allow your system to integrate the effects of inversion.
Related Articles on Padmasana

Yin vs Restorative Yoga: What’s the Difference?
Yin vs Restorative Yoga explained. Compare intensity, hold times, props, and benefits. Learn the key differences and choose the right slow yoga style for you.
.webp)
Detox Yoga Sequence: Refresh and Renew After Holiday Indulgence
Refresh and renew after holiday indulgence with this 12-pose detox yoga sequence. Gentle twists and mindful stretches for digestion, circulation, and energy.
%20(7).webp)
Yoga for Gut Health: How This Ancient Practice Heals Your Gut-Brain Connection
Discover how yoga improves gut health through the gut-brain connection. Learn 8 poses to balance microbiomes, reduce inflammation, and heal your digestive system.