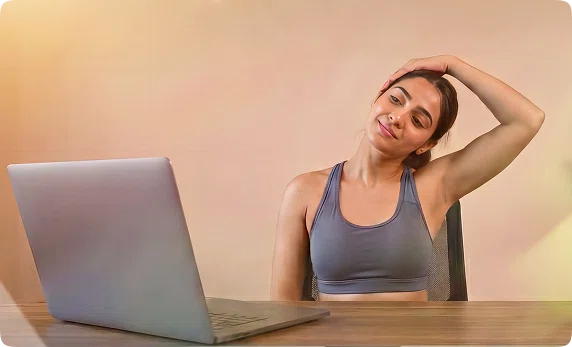
What Is Legs Up The Wall Pose (Viparita Karani)?
Legs Up the Wall Pose (Viparita Karani) is a gentle, restorative inversion where you rest on your back and place your legs vertically against a wall. Pronounced vip-par-EE-tah car-AHN-ee, this simple posture supports healthy circulation, calms the nervous system, and encourages deep, effortless relaxation.
This pose is great for:
- Anyone dealing with stress, burnout, or mental fatigue
- Working professionals with tired, heavy, or swollen legs
- Beginners who want a simple pose that delivers big benefits
People seeking evening relaxation or a bedtime routine
Legs Up The Wall Pose: Overview and Meaning of Viparita Karani
Viparita Karani comes from two Sanskrit words: Viparita, meaning “inverted” or “reversed,” and Karani, meaning “action” or “doing.” Together, they translate to “the inverted action,” referring to the gentle reversal of energy and circulation that happens when you elevate your legs.
Ancient yoga texts, including the Hatha Yoga Pradipika, describe Viparita Karani as both an asana (physical posture) and a mudra (energetic seal). Traditionally, it symbolized longevity, vitality, and the ability to see life from a fresh perspective.
The modern, wall-supported variation was developed to make the traditional pose safer, easier, and more restorative. In the 20th century, restorative yoga teachers—especially Judith Hanson Lasater—popularized this gentle version that uses props, comfort, and stillness. Today, Viparita Karani is widely practiced in Restorative Yoga, Yin Yoga, and Hatha Yoga for stress relief, better sleep, and quiet relaxation.
At a Glance
- Sanskrit Name: विपरीतकरणी (Viparita Karani)
- Pronunciation: vip-par-EE-tah car-AHN-ee
- English Names: Legs-Up-the-Wall Pose, Inverted Lake Pose
- Pose Type: Passive inversion, restorative, supine
- Level: Beginner (all levels)
- Duration: 5–20 minutes
- Best Time: Evening, before bed, after work
- Main Benefits: Improves circulation, reduces swelling, relieves stress, aids sleep
- Chakras: Root & Crown (balancing, grounding, soothing)
- Props Needed: Wall, optional bolster/blanket
Benefits of Legs Up the Wall Pose
This pose works like a reset button for the body — easing tired legs, soothing the nervous system, lifting mental fatigue, and helping you transition into a calmer, more restful state at the end of the day.
Circulatory & Physical Benefits
By elevating the legs, gravity helps reverse the usual downward pull on your circulatory and lymphatic systems, allowing blood and lymph to flow back toward the torso.
- Relieves tired, heavy legs from sitting or standing all day
- Reduces swelling and edema in lower legs and ankles
- Supports lymphatic drainage and natural detoxification
- Eases pressure on varicose veins
- Releases lower back tension by relaxing the lumbar muscles
- Gently stretches hamstrings and calves without pulling
- Reduces menstrual cramps through lower abdominal softening
- Improves digestion by calming the abdominal region
- Helps reduce headaches and mild migraines
Mental & Nervous System Benefits
This pose is deeply soothing because it shifts your body into the parasympathetic nervous system — the “rest-and-digest” mode responsible for relaxation, healing, and recovery.
- Profound stress reduction within minutes
- Helps relieve anxiety, overwhelm, and emotional heaviness
- Improves sleep quality when practiced before bed
- Quiets an overactive mind
- Lowers heart rate and blood pressure naturally when practiced regularly
- Supports recovery from burnout and chronic fatigue
- Helps slow racing thoughts
- Prepares the mind for meditation or breathwork.
Energetic & Spiritual Benefits
On an energetic level, this pose creates a sense of grounding and spaciousness.
- Balances all seven chakras
- Grounds the Root Chakra, promoting emotional stability
- Opens the Crown Chakra for mental clarity
- Reverses energy flow to refresh the mind
- Traditionally viewed as a longevity and anti-aging practice
Therapeutic Applications
Viparita Karani is widely used in therapeutic yoga programs for modern lifestyle concerns. It can support:
- Chronic stress and anxiety
- Insomnia and sleep disturbances
- Mild depression
- Jet lag and fatigue
- Restless leg syndrome
- Varicose veins and circulatory issues
- Chronic lower back pain
- Headaches and migraines
- PMS, menstrual discomfort, and menopause symptoms
For personalized guidance and restorative support, book a free 1-on-1 session with a certified yoga instructor.
How to Do Viparita Karani (Legs Up The Wall Pose): Step-by-Step Guide
Part 1: Preparing for the Pose
Creating the right setup helps you settle into Legs Up The Wall Pose with ease. Find a calm, comfortable space where you won’t be interrupted for 10–20 minutes. You can place a yoga mat perpendicular to the wall for cushioning, although carpet or a soft floor works, too.
What You’ll Need
- A wall
- Optional props:
- Bolster or firm pillow (for hips)
- Blanket (for head support or warmth)
- Eye pillow (to block light)
- Strap (to support legs if they fatigue easily)
Finding Your Distance From the Wall
Your hip-to-wall distance depends on hamstring flexibility:
- Tight hamstrings: 12–18 inches away
- Moderate flexibility: 6–12 inches
- High flexibility: 3–6 inches
Start farther away and move closer only if it feels comfortable.
Best Time to Practice
- Evening/before bed: 10–20 minutes
- After work: 5–10 minutes to unwind
- Post-exercise or long walks: 10–15 minutes for recovery
This pose naturally transitions the body into relaxation mode, making it ideal for stress relief and soothing tired legs.
Part 2: How to Do Viparita Karani: Step-by-Step Instructions
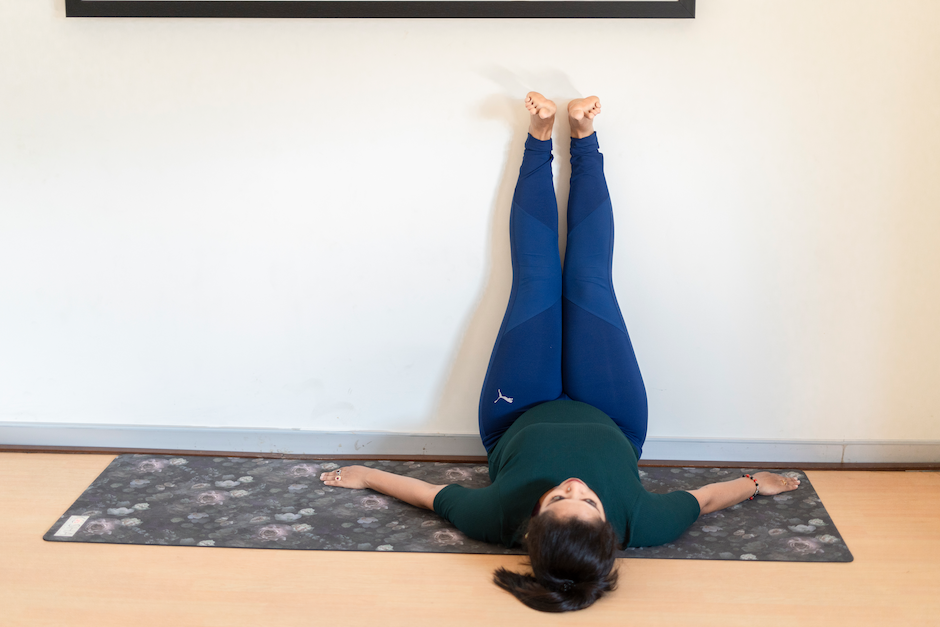
- Place your yoga mat facing the wall. If using a bolster, position it about 6–12 inches from the wall.
- Sit with your right hip touching the wall. This position makes the transition smoother.
- Lean back onto your forearms and gently swing your legs up as your torso lowers to the floor.
- Slide your hips slightly closer or farther until the pose feels comfortable. Choose comfort over perfect alignment.
- If using a bolster, let your sacrum (not lower back) rest on it. Legs should feel supported by the wall — not strained.
- Rest your arms by your sides, palms up, or overhead in a relaxed “goalpost” shape. Keep a slight tuck of the chin for neck comfort.
- Helps calm the nervous system and reduces mental stimulation.
- A soft blanket over the body enhances relaxation and keeps you warm during longer holds.
- Take 5–10 deep breaths at first to settle your body. Then allow breathing to return to its natural rhythm.
- Hold the pose:
- Beginners: 5–10 minutes
- Intermediate: 10–15 minutes
- Restorative practice: 15–20 minutes
Part 3: How to Exit the Pose Safely
- Bend your knees and slide your feet down the wall.
- Roll to your right side and pause for 3–5 breaths.
- Use your hands to press up to a seated position slowly.
- Sit for 1–2 minutes before standing.
This prevents dizziness and allows your body to readjust to the upright position.
Common Mistakes & How to Fix Them
- Legs too close to the wall. Instead, move your hips a few inches farther away.
- Lower back arching or discomfort. Make sure to use a bolster or blanket under the hips.
- Excessive tingling or numbness. Try lowering the legs or bending the knees briefly every few minutes.
- Neck strain. Place a soft, folded blanket under the head.
- Standing up too quickly after the pose. Always roll to your side and rise slowly.
Personalized guidance makes this pose even more relaxing. Book a free 1-on-1 session today!
Viparita Karani Variations
Beginner Modifications
These variations make Viparita Karani comfortable for people who are new to yoga, dealing with tight muscles, or simply want a softer entry into the pose.
1. Bent-Knee Variation
Reduces hamstring strain and relieves lower back pain.
- Sit sideways to the wall and swing your legs up.
- Slide hips back 10–18 inches.
- Bend both knees and place your feet flat on the wall.
- Relax the belly and shoulders.
2. Legs Hip-Width Apart
Softens pressure on the pelvis and inner thighs.
- Come into the basic Viparita Karani setup.
- Separate legs to hip-width or wider.
- Allow feet to relax outward.
- Rest arms comfortably by your sides.
3. Farther-From-the-Wall Version
Eases tight hamstrings and makes the pose accessible.
- Sit 18–24 inches away from the wall.
- Swing legs up with a soft bend.
- Adjust until legs feel supported, not stretched.
- Settle your upper body and breathe.
Supported Variations With Props
Props deepen the restorative quality of the pose by supporting the hips, legs, and nervous system.
4. Bolster Under Hips (Classic Restorative)
Enhances inversion and relieves lower-back pressure.
- Place a bolster 6–12 inches from the wall.
- Sit on the bolster’s edge and swing legs up.
- Lower your torso and adjust the sacrum onto the bolster.
- Let legs rest effortlessly on the wall.
5. Double Blanket Roll
Softer, adjustable lift for added support.
- Fold two blankets into a firm roll.
- Position roll under the sacrum.
- Scoot closer or farther from the wall.
- Let the lower back and hips fully relax.
6. Sandbag on Feet
Provides grounding and reduces restlessness or anxiety.
- Enter your preferred Viparita Karani setup.
- Ask a partner to place a sandbag across your feet.
- Keep knees soft and relaxed.
- Stay still and breathe deeply.
7. Strap Around Thighs
Removes effort from the legs for deeper rest.
- Loop a strap around the mid-thighs.
- Tighten just enough to keep legs together.
- Swing legs up the wall.
- Allow legs to rest without engaging muscles.
Viparita Karani Precautions & Contraindications
While Viparita Karani is accessible for most people, the inverted position may not be safe for certain conditions.
Avoid Viparita Karani If You Have:
- Glaucoma or serious eye conditions (increased pressure may be harmful)
- Detached retina or recent eye surgery
- Uncontrolled high blood pressure
- Recent heart surgery or significant heart issues
- Pregnancy in the 2nd or 3rd trimester (supine position may compress the vena cava)
- Active hernia
- Severe neck or back injuries
- Recent abdominal surgery
- Infections or inflammation in the legs
Practice With Caution If You Have:
Certain conditions don’t require avoiding Viparita Karani altogether — but they do require adjustments, shorter holds, or expert guidance.
- Mild High Blood Pressure: Keep legs at a gentle angle (30–45°), not fully vertical. Limit practice to 3–8 minutes.
- Pregnancy — First Trimester: Use a bolster under the right hip to prevent vena cava compression. Keep sessions short (5–10 minutes max) and avoid feeling breathless or light-headed.
- Menstruation: Many practitioners find this pose soothing for cramps. If the flow is heavy or discomfort arises, skip it and choose a side-lying restorative pose instead.
- Varicose Veins: Generally supportive, but enter and exit slowly. Keep legs slightly bent if pressure increases.
- Lower Back Sensitivity: Lift hips slightly with a bolster or move farther from the wall.
- Tight Hamstrings: Start farther away from the wall (12–18 inches) or bend the knees.
- Mild Glaucoma or Eye Pressure Concerns: Consult your eye doctor first and limit time to 2–5 minutes.
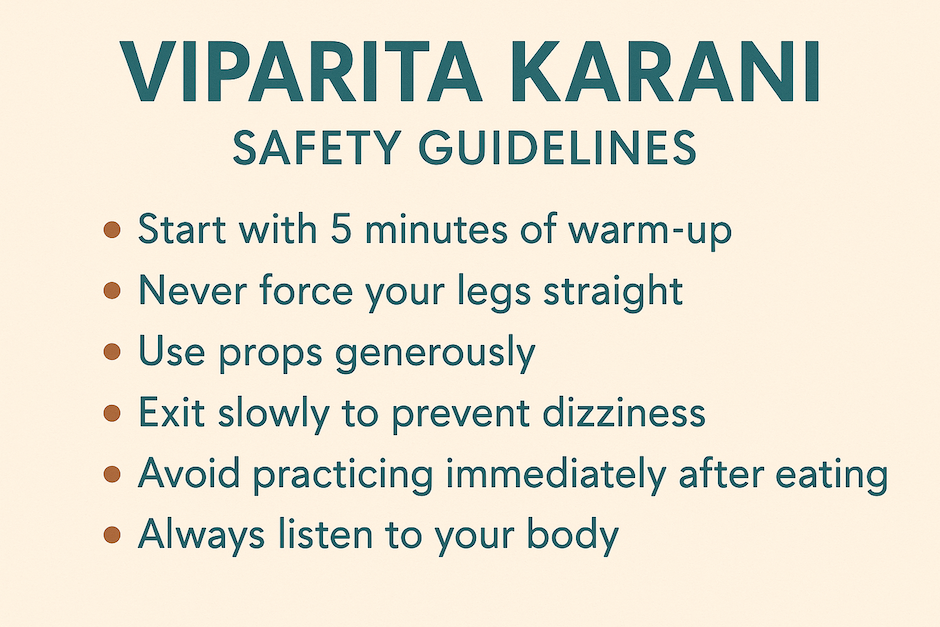
General Safety Guidelines
- Start with 5 minutes if you’re new to inverted positions.
- Never force your legs straight — softness is safer.
- Use props generously to support your spine and hips.
- Exit slowly to prevent dizziness or blood pressure shifts.
- Avoid practicing immediately after eating.
- If tingling becomes intense or painful, come out of the pose.
- Always listen to your body; deep relaxation never requires effort.
Legs Up The Wall Pose Related Yoga Poses
If you enjoy Viparita Karani, similar yoga poses include:
1. Shoulderstand (Sarvangasana)
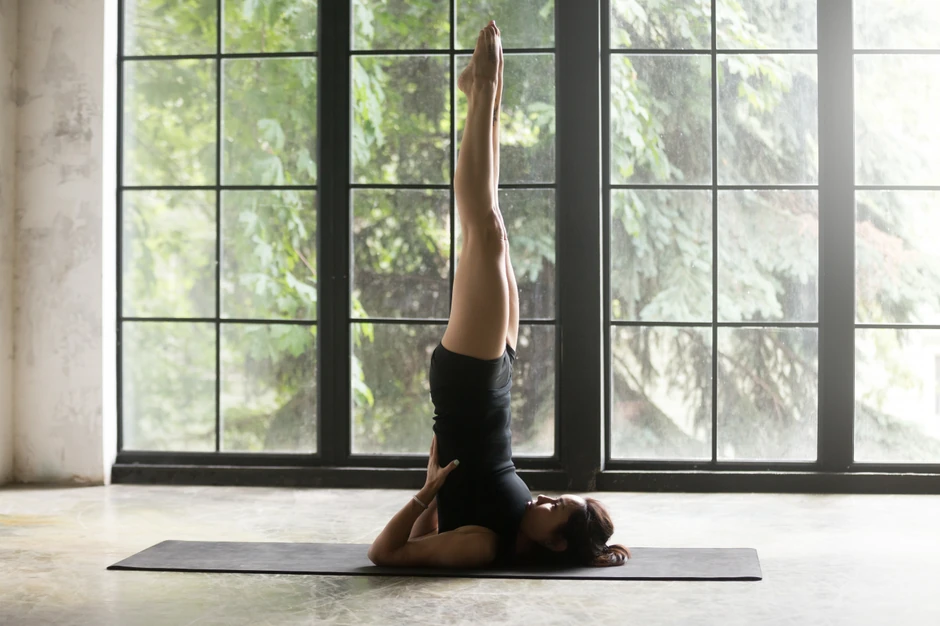
A deeper inversion that improves circulation and stimulates the thyroid.
- Lie on your back and lift your legs overhead.
- Support your lower back with your hands.
- Extend legs upward and keep the neck still.
2. Supported Bridge Pose (Setu Bandhasana)
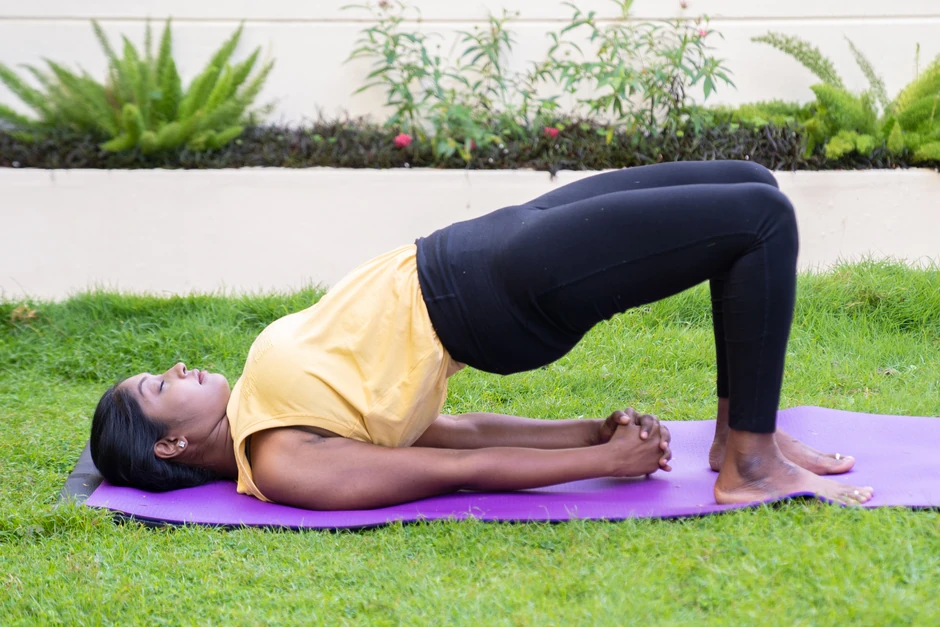
Gently opens the chest and releases lower-back tension.
- Place a block or bolster under your sacrum.
- Lift your hips and rest them on the support.
- Allow the chest to widen and breathe softly.
3. Reclined Bound Angle Pose (Supta Baddha Konasana)
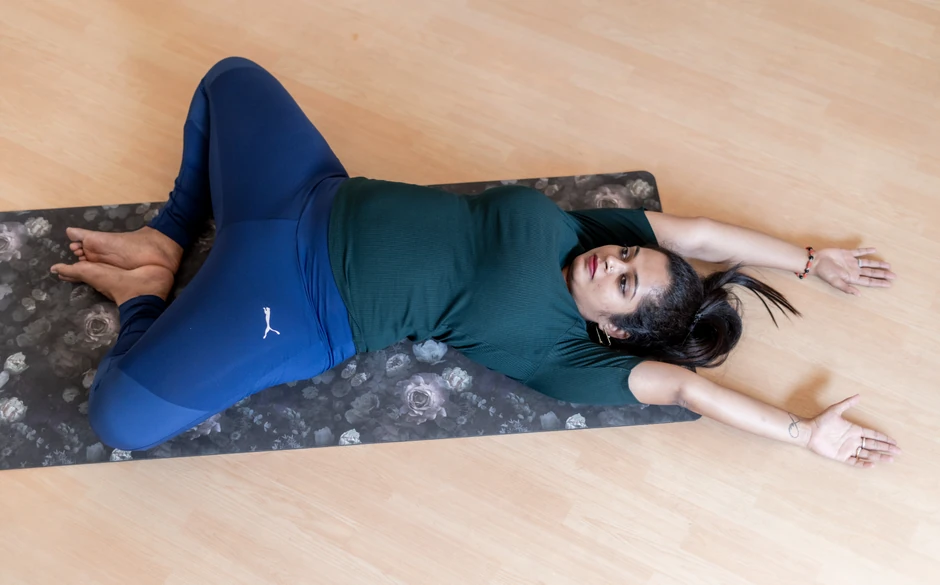
Opens the hips and promotes deep relaxation and grounding.
- Lie on your back and bring the soles of your feet together.
- Let knees fall open to the sides.
- Use blankets under thighs for support.

Enjoy a Free 1-on-1 Session with a Coach!
Receive personalized guidance tailored to your unique fitness goals, live with a dedicated coach—no credit card required.
Frequently Asked Questions
Most people benefit from holding Viparita Karani for 5–10 minutes. If you’re comfortable, extend to 10–15 minutes for deeper relaxation. In restorative sessions, you can hold it for up to 20 minutes, but no longer — benefits plateau and circulation can become uncomfortable. Always exit slowly and mindfully.
Viparita Karani is a wall-supported, passive inversion designed for relaxation. Sarvangasana (Shoulderstand) is an active, unsupported inversion requiring strength and balance.
Viparita Karani can be held 5–20 minutes, while Sarvangasana is typically held 30 seconds to 5 minutes.
Viparita is gentler and accessible for beginners; Sarvangasana is more advanced.
It depends on your body. Many people find Viparita Karani soothing for cramps, fatigue, and mood swings.
Traditional yoga discourages inversions during menstruation, but the wall-supported version is mild and often comfortable.
If your flow is heavy or you feel pressure, skip it and choose a reclining or side-lying pose instead.
Viparita Karani is generally safe only in the first trimester with modifications. Use a bolster under the right hip to prevent vena cava compression and limit the hold to 5–10 minutes. Avoid this pose in the second and third trimesters due to extended back-lying. Always consult a prenatal yoga specialist.
To practice safaely, book a free 1-on-1 session today!
Viparita Karani Mudra is the traditional version described in classical yoga texts. It resembles a supported shoulderstand, held with intentional breath control to influence energetic pathways. The wall-supported version most people practice today is a modern adaptation focused on relaxation rather than energetic seals. Both share the idea of “reversing energy flow.”
Mild tingling is normal — it’s simply blood redistributing as your legs are elevated. If the tingling becomes uncomfortable, move farther from the wall or bend your knees slightly. Lower your legs for a minute every 5 minutes if needed. Severe numbness means it’s time to exit the pose immediately.
Related Articles on Padmasana

Yin vs Restorative Yoga: What’s the Difference?
Yin vs Restorative Yoga explained. Compare intensity, hold times, props, and benefits. Learn the key differences and choose the right slow yoga style for you.
.webp)
Detox Yoga Sequence: Refresh and Renew After Holiday Indulgence
Refresh and renew after holiday indulgence with this 12-pose detox yoga sequence. Gentle twists and mindful stretches for digestion, circulation, and energy.
%20(7).webp)
Yoga for Gut Health: How This Ancient Practice Heals Your Gut-Brain Connection
Discover how yoga improves gut health through the gut-brain connection. Learn 8 poses to balance microbiomes, reduce inflammation, and heal your digestive system.