Restorative yoga is a soothing style of yoga that promotes deep relaxation by slowing down, finding stillness, and enabling both the body and mind to unwind. What sets it apart is the use of props, allowing your body to release tension by holding the poses for longer, without tension or strain.
By using bolsters, blankets, blocks, and straps, restorative yoga encourages your muscles to relax completely while you breathe deeply into each posture. This not only helps release physical tension but also calms the mind by activating the parasympathetic nervous system—your body’s natural “rest and digest” mode. Props create a sense of comfort, safety, and ease in every pose, making the practice therapeutic.
“Restorative yoga teaches us that rest is productive — with the right support, the body knows exactly how to heal.”
With the support of props, even beginners or those recovering from stress, fatigue, or injury can experience the benefits of restorative yoga without overexertion. Some essential props required for restorative yoga practice include:
Yoga Blocks
Bolsters
Blankets
Yoga Belt
Pillows and Cushions
Towels
Read on to learn how to use props effectively for each pose and why they make all the difference.
Benefits of Restorative Yoga with Props
“Props are extensions of awareness; they meet your body where it is today, reducing strain and making space for comfort, release, and true restoration.”
Incorporating props into restorative yoga offers numerous benefits, such as:
Deeper Relaxation: Props like bolsters, blankets, and blocks help release muscle tension and support the body during prolonged holds, allowing for a more comfortable and restorative practice.
Calms the Mind: Props provide added stability, allowing you to fully relax into each pose. This promotes a sense of safety, activates the parasympathetic nervous system, and reduces stress.
Improved Sleep: The added support from props helps you relax completely, making it easier to unwind and prepare for restful sleep. If you want to improve your sleep, you can also give Yoga Nidra a try!
Ease Aches and Pains: Props allow you to hold poses longer with less strain, helping to stretch deeply and relieve chronic muscle tension and discomfort.
Supports Accessibility: Props make restorative yoga accessible for all levels, including beginners, those with injuries, or individuals with chronic health conditions, allowing for a personalized, gentle experience.
By using props, restorative yoga becomes even more effective at calming both body and mind, enhancing the healing benefits of the practice.
[GC]
8 Restorative Yoga Poses with Props
To get started with restorative yoga, you’ll need a mat and additional supportive tools like bolsters, blankets, and yoga blocks. Some poses to practice at home include:
Provides gentle support to the chest and upper back
Offers a softer, more comfortable lift for the torso
Relieves tension in the spine and back while encouraging deep chest opening
Stimulates abdominal organs, aiding digestion
Reduces strain on the lower back
Alternative Props:
A rolled-up towel or cushion under the hips for additional support
A block can be used for added support under the chest instead of a bolster
Step-by-Step Instructions:
Lie face down on your mat with your legs extended straight behind you and the tops of your feet pressing into the floor.
Place a bolster or a soft pillow horizontally beneath your chest and abdomen. The bolster should provide a gentle lift for your torso.
Place your hands directly under your shoulders, keeping your elbows close to your body.
On an inhale, press into your palms and lift your chest and upper torso off the floor. Let the bolster provide support, making sure you don’t overextend your back.
Keep your elbows slightly bent and shoulders relaxed, away from your ears.
If needed, roll a blanket and place it under your hips for extra comfort and support. This will help ease any strain in the lower back.
Hold for 5–10 breaths, allowing the lift to open your chest and gently stretch your spine. Breathe deeply, expanding your ribs and stomach.
To release, slowly lower your torso back to the mat, removing the bolster, and rest in a child's pose or savasana for a few breaths.
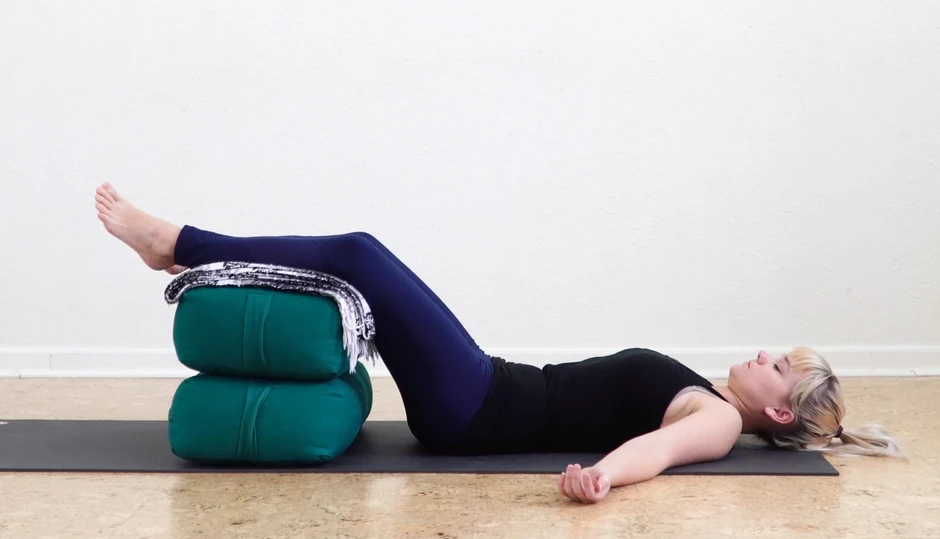
6. Reclined Butterfly Pose with Props (Supta Baddha Konasana)
The reclined butterfly pose helps open the hips and chest while calming the mind.
A rolled-up towel or blanket can be placed under the knees to reduce strain
A blanket can be draped over your body for warmth and comfort
Step-by-Step Instructions:
Start by lying on your back, extending your legs comfortably apart, and your arms by your sides with palms facing upward.
Place a bolster under your knees to reduce any strain on the lower back and promote relaxation.
If you feel tension in the shoulders, place a rolled-up blanket or cushion under the back of each knee to create more ease in the lower back.
Allow your body to relax into the floor, feeling the weight of your body being supported by the props.
Close your eyes and take a few deep breaths, allowing your body to soften with each exhale.
If needed, place a blanket over your body for extra warmth and comfort, especially if you're lying still for an extended period.
Allow your breath to return to a natural rhythm, focusing on releasing any remaining tension.
Stay in this position for 5–10 minutes, or longer if desired, allowing the body and mind to fully relax and restore.
While these poses offer numerous benefits on their own, practicing under the guidance of a dedicated coach can help you make the most of your practice. A coach ensures proper prop placement, helps you hold poses for the right duration, and offers personalized variations to meet your unique needs.
Frequently Asked Questions
Restorative yoga vs. Yin Yoga: What’s the difference?
While both restorative and yin yoga focus on long-held poses to target deep relaxation, there are some key differences. Restorative yoga focuses on deep relaxation with props for support, holding poses for longer to promote rest. Yin yoga targets deep connective tissues with longer holds (3-5 minutes), but with less support from props, and emphasizes stretching rather than relaxation.
How is restorative yoga different from Vinyasa Yoga?
Restorative yoga is slow, focused on relaxation and stress relief, and uses props to support the body. On the other hand, Vinyasa yoga is dynamic, involving flowing sequences and focusing on strength, flexibility, and movement.
Anyone can benefit from restorative yoga, and it is ideal if you’re seeking relaxation, stress relief, or recovery from physical or emotional strain. It’s particularly beneficial for those with chronic pain, injuries, pregnancy, or individuals looking to balance an active lifestyle with gentle self-care.
Try these group classes for free and learn Restorative Yoga with expert guidance.
Yin vs Restorative Yoga explained. Compare intensity, hold times, props, and benefits. Learn the key differences and choose the right slow yoga style for you.
Refresh and renew after holiday indulgence with this 12-pose detox yoga sequence. Gentle twists and mindful stretches for digestion, circulation, and energy.


_optimized.webp)
_optimized.webp)


.webp)